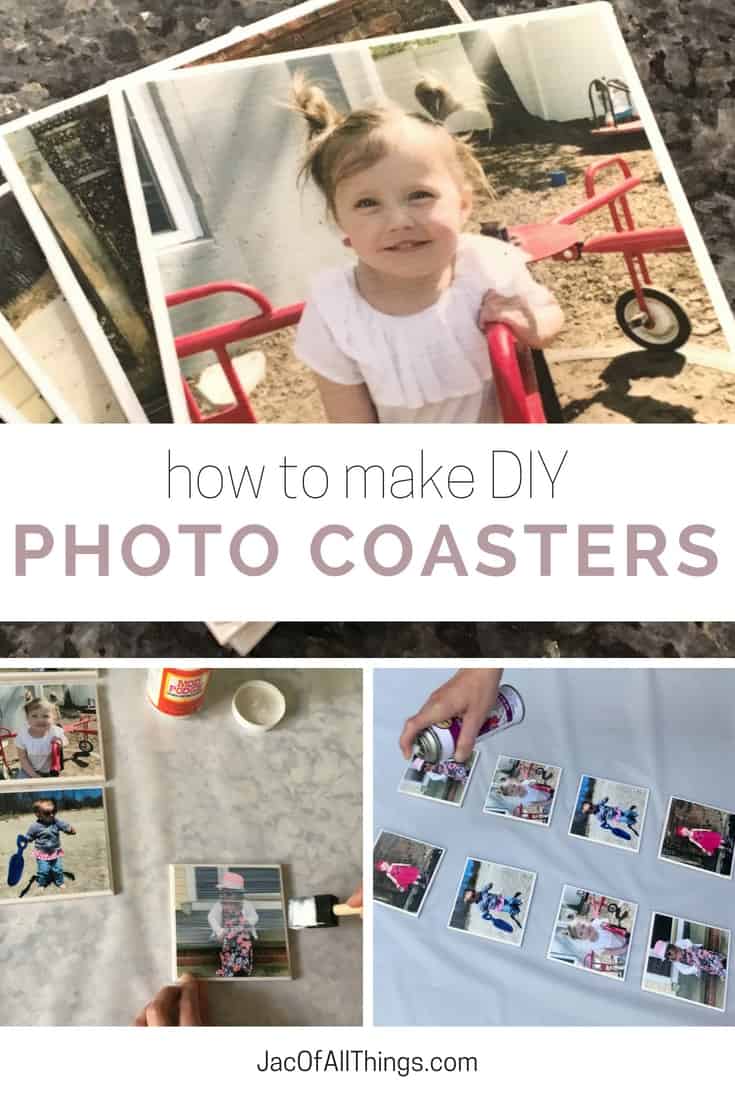
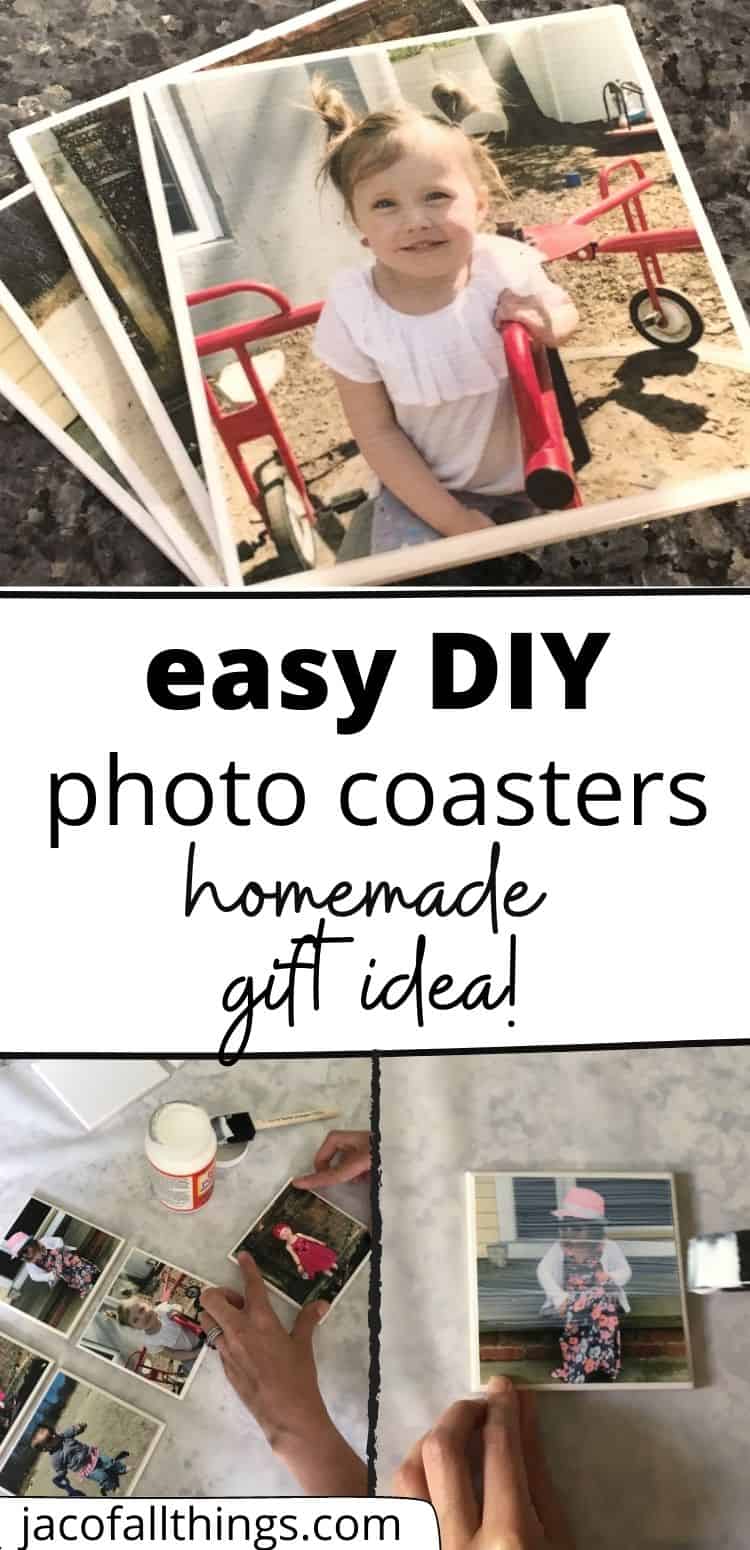
This past month, we did our first ever no-spend month. (More to come on a future post on what we did and the outcome!) With it being Mother’s Day, I still wanted to get my mother and mother-in-law a present but wanted to limit how much we spent to keep it affordable and inexpensive. We decided to make homemade DIY photo coasters out of ceramic tiles!
They came out so cute and the grandmothers loved them!
This post may include affiliate links. As an Amazon Associate I earn from qualifying purchases. Read the full disclosure here.
From start to finish, these DIY photo coasters were done in about 4 hours, and honestly, the majority of that time was spent drying. (The actual work to put them together only took about 10 minutes!)
I honestly can’t wait to make more. My husband may get some for Father’s Day and I think these may be my go-to housewarming gift in the future.
I’d also love to try these with black and white photographs for a more sophisticated look.
Read on for a tutorial on how to make DIY photo coasters from tiles.
How to Make Easy DIY Photo Coasters from Tiles
Watch instructional video now or scroll down for instructions.
I found these white ceramic tiles at Home Depot for $0.16 a piece! I decided to include four coasters in each set, so I purchased eight all together.
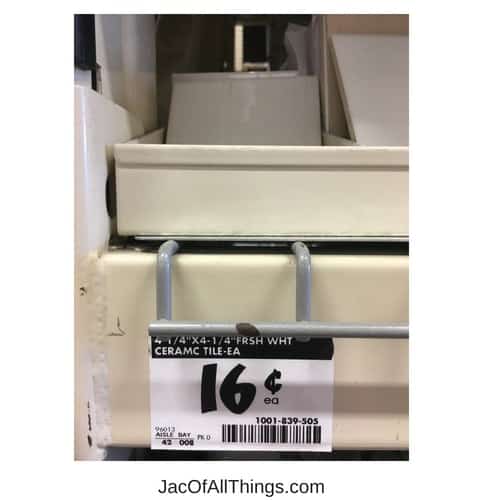
The tiles were 4.25 inches x 4.25 inches so I wanted my pictures to be as close to possible in size.
I used Walgreens one-hour photo to print pictures of my daughters in the 4 inch x 4 inch size.
Money saving tip – Walgreens frequently offers coupon codes on photo purchases. Do a simple web-search for coupon codes before purchasing to save money! I found one for 40% off!
You can also use standard 4 x 6 photos and cut them down to size.
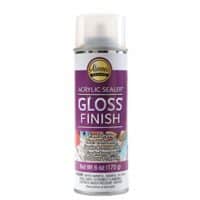
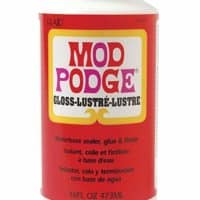
You will also need Mod Podge, a foam brush, and an acrylic sealer spray.
Because the Mod Podge can be quite sticky, I would put down some paper or cloth to protect your workspace before you begin.

Supplies
April 2020 Update: Many supplies are sold out at Amazon, Target, and Walmart, but I’ve been able to find most in stock at Michaels. They do curbsite pick up as well!)
- Mod Podge (I use Gloss Mod Podge) (Michaels link)
- Acrylic Sealer (with a Gloss Finish) (Michaels link)
- Foam Brushes (Michaels link)
- Ceramic Tiles
- Pictures cut 4” x 4”
- Self-Adhesive Felt Pads (optional)


Instructions
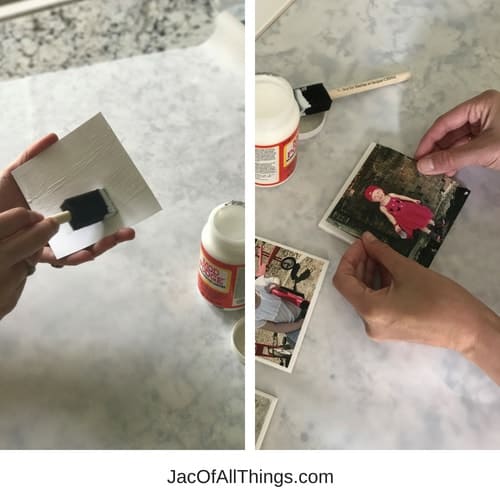
Your first step in creating DIY photo coasters is going to be to paint a thin layer of Mod Podge directly onto the back of your photo (edge to edge) and stick the photo to the tile.
You are basically using the Mod Podge as a glue. Make sure you press down on all four corners to ensure the photo isn’t peeling up around the edges.
Allow this to completely dry before moving to your next step.
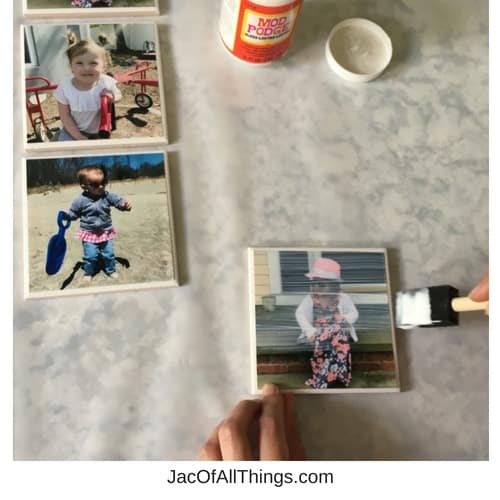
Once dried and the photo is securely attached to the tile, you are going to paint the Mod Podge on top of the photo and tile (from end to end and around the edges).
Because Mod Podge will leave faint lines from application, you want to be consistent in your brush strokes – I painted left to right. The Mod Podge will go on white, but as it dries, it will turn clear in color.
Allow the Mod Podge to dry and repeat. (And then repeat again for a total of three coats.)
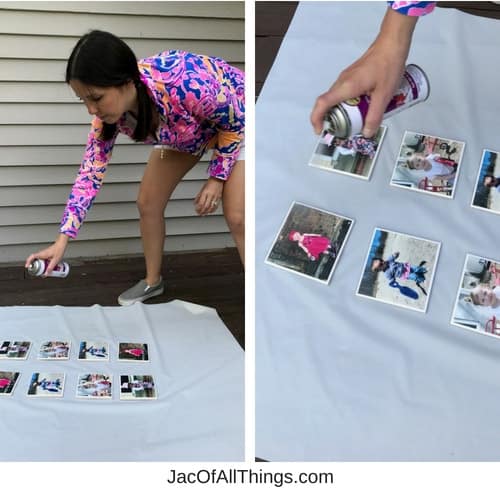
After your final coat of Mod Podge is dried, you will want to apply your acrylic sealer.
I would suggest moving your project outside or to a well-ventilated area as the spray is quite strong in smell.
Spray your tiles, being sure to spray the edges and sides as well. Allow the spray to dry completely and repeat for a total of three coats.
Allow the sealer to dry completely between each application.
If you do this outside, be sure to securely fasten any papers or drop cloth you may be using to the ground. The acrylic sealer is sticky until it dries, and anything that it touches may stick.
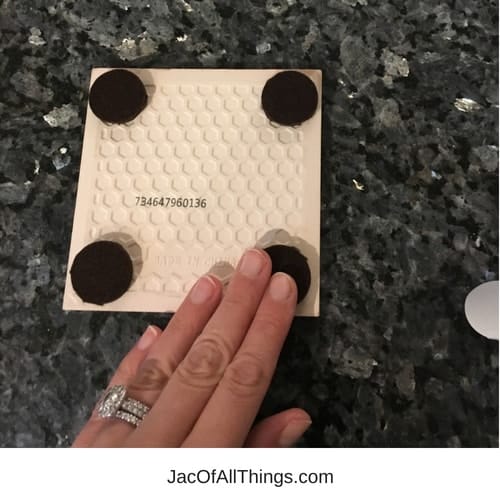
The final step to create DIY photo coasters is to add padding to the bottom of the tile so it minimizes the chance of breakage.
You can do this a few ways. I chose to add self-adhesive felt pads to the bottom of my coasters. (They were an easy peel and stick!)
You can also purchase thin cork coasters and attach them to the bottom of the coaster using a hot glue gun.
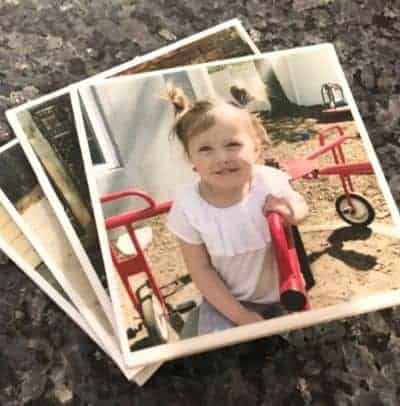
There you have it! The easiest DIY photo coasters for a super cute gift!
How to Make DIY Photo Coasters from Tiles
Homemade DIY photo coasters are the perfect gift for anyone!
Materials
- Mod Podge (I use Gloss Mod Podge)
- Acrylic Sealer (with a Gloss Finish)
- Foam Brushes
- Ceramic Tiles
- Pictures cut 4” x 4”
- Self-Adhesive Felt Pads (optional)
Instructions
Paint a thin layer of Mod Podge directly onto the back of your photo (edge to edge) and stick the photo to the tile. You are basically using the Mod Podge as a glue. Make sure you press down on all four corners to ensure the photo isn’t peeling up around the edges. Allow this to completely dry before moving to your next step.
Once dried and the photo is securely attached to the tile, you are going to paint the Mod Podge on top of the photo and tile (from end to end and around the edges).
Allow the Mod Podge to dry and repeat. (And then repeat again for a total of three coats.)
In a well-ventilated area, spray your acrylic sealer onto the tiles. Be sure to spray the edges and sides as well. Repeat for a total of three coats allowing sealer to dry completely in between each application.
Add padding to the bottom of the tile using either self-adhesive felt pads or hot glue cork pads on bottom of tile.
Recommended Products
As an Amazon Associate and member of other affiliate programs, I earn from qualifying purchases.
-
 Smart Surface 8825 Heavy Duty Self Adhesive Furniture Felt Pads 1-Inch Round Brown 96-Piece Value Pack in Resealable Bag
 -
ROYAL BRUSH RFOMW-3P Foam Brush, 3-Pack
-
Aleene's Spray Gloss Finish 6oz Acrylic Sealer, Original Version
-
Mod Podge Waterbase Sealer, Glue and Finish (16-Ounce), CS11202 Gloss Finish


After the mod podge dries can you see lines?
Mine do have faint lines from my brush strokes. It’s only noticeable when viewing them up close though!
I have been reading all the signs of him cheating and I truly believe he is but, I’ve asked him but he gets so defensive and the name-calling comes out and then he expects me cheating, so, therefore, he never gives me a yes or no answer is always an argument, I’ve even noticed him buying me gift then normal, following me on social media, he even put a camera inside and out he says it’s for safety but I believe so he knows if I’m home or not and freaks out if they get turned off, thank to [email protected], that he catch him red handed, you can text kelvin whatsApp +1(341)465-4599. hg
During my divorce, I felt helpless and overwhelmed until I came across [email protected] on this platform. They enabled me in obtaining the proof of adultery and abuse I needed from my partner’s device. Their services and expertise were essential in achieving a successful resolution for my case. They are the reason I have found serenity and freedom. genuinely lifesaving Their swift and efficient services gave me the courage to take on the legal battle with hope and confidence.
I was wondering did you use the actual photo or did you get copies of the photo on regular print paper with ink jet printer?
I used the actual photo! I was just over my parents house this weekend and noticed that they were using them for their drinks. It’s been over a year and they said they use them non-stop. They looked just as good as day one, so they are holding up nicely!
Should you use matte or glossy photos?
I have .ines after i finished my coasters is there anyway of covering them or is this normal I probably spread it too thick
Do you have to use photos that were printed by laser printer or can you use an inkjet printer photo?
Did the smell from the sealer go away?
How well do these hold up to hot drinks?… I have a problem with my hot coffee/tea cups sticking to the coasters…
We have had no issues with hot drinks!
So this sealer is good for cups? I saw on another site you have to use water sealant?
I’m having the same issue. I used Mod Podge Acrylic Sealer and wondered if that’s what caused the stickiness.
I used engine enamel spray and cured them by baking them. No issues with hot drinks now!
Hi! I was wondering if these would work using wood instead of ceramic? 🙂
Hey does the finish look like bubbles on some of them when they dry.
Bubbles when drying sometimes
Hi! I haven’t come across any bubbling on the coasters I put together.
Did you use glazed or unglazed tiles to start?
I saw the photo of the 4 1/2″ tiles that you purchased but I couldn’t see the store name. Where did you buy them?? Thank you! Cute idea and I can’t wait to make these for my daycare parents 🙂
I got mine at Home Depot for 13 cents each
How long does it take for the Modge Podge to dry between coats?
How long does it take for the Acrylic Spray to dry between coats?
How long does it take to dry completely after the third coat of Acrylic Spray?
Thank you?
Some of mine bubbled too. I wonder if I didn’t let them dry looking enough before adding the mod podge to the top.
I’ve seen people use those torches to get rid of bubbles… wonder if it would work in this case?
After i put the acrylic smear on the pictures smudged. What happened?
I’m having problems that over time the picture begins to come loose from the coaster. I have even used a small roller to seal the picture to the coaster. Any ideas???
I’m having trouble finding the adhesive backing ,or the Cork screw thing I live near Martinsville Virginia any suggestions were t to get them at?
Doesn’t the condensation from the glass puddle on these types of coasters and the the glass like sticks to them when lifting? That’s my concern, no where for the condensation to go
Sorry I’m late to the game here. I plan on using this technique on reasonably thick cork coasters. I presume I use M podge to attach the photo but don’t need to paint the bottom of the cork. But I do intend to seal top and bottom with acrylic. Does that sound like a plan with using cork coasters instead of tile?
1
ᴀʀᴇ ʏᴏᴜ ʟᴏᴏᴋɪɴɢ ꜰᴏʀ ᴡᴀʏꜱ ᴛᴏ ʀᴇᴄᴏᴠᴇʀʏ ʏᴏᴜʀ ʟᴏꜱᴛ ʙɪᴛᴄᴏɪɴ ᴀɴᴅ ᴏᴛʜᴇʀ ᴄʀʏᴘᴛᴏᴄᴜʀʀᴇɴᴄɪᴇꜱ ꜰʀᴏᴍ ꜱᴄᴀᴍᴍᴇʀ’ꜱ? ꜱᴇᴀʀᴄʜ ɴᴏ ᴍᴏʀᴇ! ( [email protected] ) ᴡʜᴀᴛ’ꜱᴀᴘᴘ +1 (484) 540 ( 0785 ) ɪꜱ ᴛʜᴇ ʙᴇꜱᴛ ꜱᴄᴀᴍᴍᴇᴅ ᴄʀʏᴘᴛᴏ ʀᴇᴄᴏᴠᴇʀʏ ᴀɢᴇɴᴄʏ ɪ ʜᴀᴠᴇ ᴄᴏᴍᴇ ᴀᴄʀᴏꜱꜱ . ꜱᴏ ɢʟᴀᴅ ɪ ᴛᴏᴏᴋ ᴛʜᴇ ʙᴏʟᴅ ꜱᴛᴇᴘ ʙʏ ᴄᴏɴᴛᴀᴄᴛɪɴɢ ᴛʜᴇᴍ. ᴀʟʟ ᴍʏ ꜱᴛᴏʟᴇɴ ᴄʀʏᴘᴛᴏᴄᴜʀʀᴇɴᴄɪᴇꜱ ᴡᴀꜱ ʀᴇᴠᴇʀꜱᴇᴅ ʙᴀᴄᴋ ᴛᴏ ᴍʏ ᴄᴏɪɴ ʙᴀꜱᴇ ᴡᴀʟʟᴇᴛ ᴡɪᴛʜɪɴ ꜰᴇᴡ ʜᴏᴜʀꜱ . ɪ ᴡɪʟʟ ᴀᴅᴠɪᴄᴇ ʏᴏᴜ ᴀʟʟ ᴛᴏ ᴄᴏɴᴛᴀᴄᴛ ᴛʜᴇɪʀ ᴄᴜꜱᴛᴏᴍᴇʀ ꜱᴜᴘᴘᴏʀᴛ ᴛᴏ ʜᴇʟᴘ ʏᴏᴜ ᴡɪᴛʜ ᴛʜᴇɪʀ ꜱᴛʀᴀᴛᴇɢɪᴇꜱ ᴀɴᴅ ᴛʜᴀɴᴋ ᴍᴇ ʟᴇᴛᴛᴇʀ, they accept payment after recovery is completed
Wondering if I should sand the tile before starting. My tiles smooth with a ceramic finish.
EXAM EXPERTS ONLINE FOR HIRE
In today’s digital age, finding the truth about someone becomes increasingly complex, especially when it involves personal relationships. This is where DECENTRALIZED CODEX SECURITY CONSULTING steps in as an invaluable resource-oriented tool. It simplifies the process of gathering relevant online information, allowing users to uncover details that might otherwise remain hidden. If you’ve ever suspected infidelity, this tool equips you with the means to investigate efficiently, ensuring that you can arrive at a well-informed conclusion. When faced with the possibility of a cheating partner, emotions can cloud judgment, making it difficult to discern fact from fiction. DECENTRALIZED CODEX SECURITY CONSULTING shifts the focus from emotional turmoil to logical discovery. By using this tool, you can methodically gather evidence, which empowers you to confront the situation armed with concrete information. This structured approach aids in alleviating anxiety and helps you approach your partner with a clearer mind, fostering more productive discussions. The process of using DECENTRALIZED CODEX SECURITY CONSULTING is straightforward, designed for individuals who may not possess technical skills. Its user-friendly interface allows anyone to navigate through online data easily. This simplicity is crucial for those who may feel overwhelmed by the suspicion of infidelity. With just a few clicks, users can access a wealth of information that can illuminate hidden aspects of their partner’s life, making the investigation less intimidating and more manageable. Knowing the background and actions of a partner can be a significant relief, especially when doubts begin to surface. DECENTRALIZED CODEX SECURITY CONSULTING not only helps clarify uncertainties but also promotes a sense of control in what may feel like an uncontrollable situation. When you can gather relevant evidence yourself, it transforms the emotional journey into a more objective investigation. This empowerment can change the course of your relationship, either aiding in reconciliation or allowing you to move forward with your life. Using DECENTRALIZED CODEX SECURITY CONSULTING is more than just a tool for investigation; it’s about reclaiming your peace of mind. Life is too short to be overshadowed by distrust and suspicion. By taking the initiative to seek the truth, you foster a healthier emotional state and pave the way for clearer communication. Every person deserves clarity in their relationships, and this tool provides a pathway to uncovering the truth, ensuring that you can make informed decisions about your future.
Contact:
Website: decentralizedcodexsecurity.com
Email: [email protected]
Thank you.
It started like any other day. Then we discovered the unthinkable: our hardware was compromised, wallets were locked, and a sophisticated fraud attack had targeted our crypto assets. Panic is an understatement.Thankfully, in the midst of crisis, clarity arrived. I came across an article detailing the work of Decentralized Codex Security (DCS) . Something about their approach—decentralized, transparent, elite—gave me hope. I contacted them immediately.What followed was nothing short of extraordinary.The Moment We Knew We Were in Good HandsFrom the first consultation, the DCS team demonstrated why they are leaders in the space. They didn’t just promise help; they delivered a clear roadmap. Their decentralized protocol was the key—it allowed them to methodically secure every compromised link in our digital chain, regain access to our hardware, and successfully reclaim our password-protected wallets.Their professionalism was evident in every interaction. Meticulous analysis. Clear communication. Zero jargon—just results.Why DCS Stands ApartIn the cybersecurity world, transparency is rare. DCS makes it their foundation. Throughout the recovery process, their team kept us informed at every step. When they identified risks, they explained them. When they achieved milestones, they celebrated with us. This level of honest partnership transforms a terrifying incident into a manageable, even empowering, experience.As industry analysts have noted, DCS combines cutting-edge technology with peerless execution. We experienced this firsthand. Their trusted penetration testers (ethical hackers) didn’t just fix the breach—they showed us how to stay ahead of future threats.More Than Security—True PartnershipChoosing DCS was the best strategic decision we’ve made. They didn’t just restore our access; they restored our confidence. Our leadership and clients now operate with unparalleled peace of mind, knowing our digital assets are protected by the best in the field.Professional. Proactive. Transparent. That’s Decentralized Codex Security.If you’re facing a security crisis—or simply want to prevent one—I urge you to reach out. They are, simply put, the best in the space.Contact Decentralized Codex Security:
[email protected]
decentralizedcodexsecurity.com
After a devastating scam took my Bitcoin, I believed it was lost forever. I felt helpless.
Then I contacted META Tech Cyber Cryptocurrency Trace. Their experts tracked my funds and successfully recovered a majority of my stolen crypto. Their skill and dedication changed everything.
If you’re in a similar situation, don’t give up. Reach out to them.
Email: [email protected]
Text message: +1 (619) 289 9154
WhatsApp: +1 (825) 585-8813
Thank You
They are the real deal.
Welcome to Good Life Bitcoin Trading/INVESTMENTS/LOANDS ONLINE Contact General support
CONTACT ———————Email…([email protected])
Signal..(@Realjames.39)
Whatsapp..+(237)672564181)
whatsap/Signal.. +(34)607218704)
I am a professional bitcoin trader, and I always win my trade with my best
trading platform, so are you looking for a professional trader or looking for
Someone that can help you invest and trade your Bitcoin for more profit to be
made? With and 8 hours of investment profit plans.
Do you know you can grow your money by investing in Bitcoin and get profit by
helping you to trade, Contact General support
CONTACT ———————Email…([email protected])
Signal..(@Realjames.39)
Whatsapp..+(237)672564181)
Wire message..(@jamesgrays98)
whatsap/Signal.. +(34)607218704)
My investment plans;
Invest $250 X 8=$2,000
Invest $500 X 8=$4,000
Invest $1,000 X 8=$8,000
Invest $1,500 X 8=$12,000
Invest $,2,000 X 8=$16,000
Invest $3,000 X 8=$24,000
Contact us today let’s teach you how you can get that done with proof on me
trading platform by investing and make your profit in 8-Hours..
Melody Good Life.
A Try We Convince You With Good Life Investment.
Have you been trying to get a blank ATM card or invest in Bitcoin and find a good hacker to help you? And have you found it difficult to find the right person to place your order? Here you can place your order today and receive the card in no time. It’s easy and affordable. We also offer CashApp, PayPal, Zelle, Bitcoin, and all currencies. Contact us now at:
Contact General support
CONTACT ———————Email…([email protected])
Signal..(@Realjames.39)
Whatsapp..+(237)672564181)
whatsap/Signal.. +(34)607218704)
We have a specially programmed ATM card with cash and Bitcoin reloads so you can cover your needs and start your own business. You can use my cards anywhere in the world, at any ATM, store, or point of sale. With a daily limit of $3,000 to $50,000.00 and available in any currency with our programmed cards. Contact me at:
Fifteen times your investment with withdrawal in 5 hours. All currencies available.
Invest $200: profit is $1,000
Invest $300: profit is $1,500
Invest $500: profit is $2,500
Invest $1,000: profit is $5,000
Invest $2,000: profit is $10,000
Invest $3,000: profit is $15,000
Invest $5,000: profit is $25,000
Cost of available cards:
$3,000 costs $200
$6,000 costs $400
$9,000 costs $600
$12,000 costs $900
$15,000 costs $1,200
$18,000 costs $1,500
$21,000 costs $1,800
$25,000 It costs $2,500
CLONED CARDS
LOW BALANCE
200= balance of £€$2k
300= balance of £€$3k
400= balance of £€$4k
500= balance of £€$5k
600= balance of £€$6k
800= balance of £€$8k
900= balance of £€$9k
HIGH BALANCE
1k= balance of £€$10k
2k= balance of £€$20k
3k= balance of £€$30k
4k= balance of £€$40k
5k= balance of £€$60k
7k= balance of £€$90k
Western Union Money Gram Transfer Rates :
$1,500 Transfer = $120 Bitcoins
$2,000 Transfer = $150 Bitcoin
$3,000 Transfer = $200 Bitcoins
$4,000 Transfer = $220 Bitcoins
$5,000 Transfer = $250 Bitcoins
$6,000 Transfer = $300 Bitcoins
$8,000 Transfer = $350 Bitcoins
Bank Transfer Rates :-
$1,500 Transfer = $100 Bitcoins
$2,000 Transfer = $120 Bitcoins
$3,000 Transfer = $150 Bitcoins
$4,000 Transfer = $200 Bitcoins
$5,000 Transfer = $300 Bitcoins
$6,000 Transfer = $400 Bitcoins
$8,000 Transfer = $450 Bitcoins
PAY-PAL – XOOM Cash App Transfer RATES:
$1,500 Transfer = $150 Bitcoins
$2,000 Transfer = $180 Bitcoins
$3,000 Transfer = $200 Bitcoins
$4,000 Transfer = $250 Bitcoins
$5,000 Transfer = $280 Bitcoins
$6,000 Transfer = $300 Bitcoins
$8,000 Transfer = $400 Bitcoins
LEGIT CASH TRANSFERS ON FIRE, All COUNTRIES MONEY ORDER AVAILABLE, No Any Risk Or Delay
Have your cash top up in minutes with no additional charges. Invest your cash in our daily loading program and earn huge balances in few minutes. How?
We make our transfers from real working spammed cards and dumps. We only work with real spammed cards containing huge balances. Card loading takes few minutes to complete. Transfer includes..
*PAY ID DEPOSIT
*BSB DEPOSIT
* Cashapp deposit
* PayPal deposit
* Skrill deposit
* Western Union deposit
* Crypto deposit
* Bank deposit
* Zelle deposit
*Chime deposit
*Revolut deposit
*Skrill deposit
DIRECT DEPOSIT RATES
$300 for balance 3000$
$350 for balance 3500$
$400 for balance 4000$
$450 for balance 4500$
$500 for balance 5000$
$550 for balance 5500$
$600 for balance 6000$
$650 for balance 6500$
$700 for balance 7000$
$800 for balance 8000$
$900 for balance 9000$
$1000 for balance 10000$
And More
If your account is active you just have to pay a fee for the transfer balance you need
Notice:: No Risk or Delay. Depot will be sent instantly once payment has been received
Message me Now
i have a %100 money back guaranteed policy. If you feel uncomfortable at any moment, you can always opt out for a
refund
Hit me up
Full Name:
Country:
Status:
Phone Number:
Date of Birth:
Home Address:
Amount Needed/Amount to Invest:
Contact General support
CONTACT ———————Email…([email protected])
Signal..(@Realjames.39)
Whatsapp..+(237)672564181)
whatsap/Signal.. +(34)607218704)
You’ll never be sure until you try it. Contact us today to place your order.
General support contact
Email…([email protected])
Signal.. +(34)607218704)
Whatsapp..+(237)672564181)
Signal..(@Realjames.39)
whatsap/Signal.. +(34)607218704)
buy top quality NN dmt carts, buy 5-meo dmt carts, looking for 5-meo dmt carts, looking to order 5-meo dmt carts, buy now 5-meo DMT carts, who sells 5-meo dmt carts, 1g 5-meo dmt carts, Psilocybin (magic mushrooms) best 5-meo Dmt carts online, lets eat Dmt vape pen, bunch of dmt vape pens today, we sell Dmt vape pen certified, legal dmt vape pen, is dmt vape pen BUY HERION BUY COKE Buy ECSTASY Pills BUY FLAKKA BUY FENTANYL BUY Alprozolam BUY XANAX pills BUY PERCOCET BUY ADDERALL BUY SECONDARY BUY PERCOCET BUY MORPHINE BUY ADDERALL BUY OXYCONTIN BUY OXYCODONE BUY SUBOXONE BUY RITALIN BUY 5cl BUY 6fa BUY 5cladba BUY MDMA BUY APVP Buy eutylone Buy NOW Buy KU Buy Isotodesnitazene Buy Protonitazene Buy Butonitazene Buy Fluonitazene Buy Etodesnitazene Buy Metodesnitazene Buy Metazene Buy Etodesnitazene Buy Etazene Buy Protodesnitazene Buy bromazolam Buy MDMA Buy MAM-2201 Buy 4MMC Buy MDAI Buy MN-24 Buy PB-22 Buy 5F-PB-22 Buy 5F-UR Buy 2-FA Buy Pentetron Buy Methylone Crystal Buy 5F-AKB-48 Buy Dimethocaine Buy 4-MEC Buy A-pvp Buy AB-Fubinaca Buy 5F-AB-Fubinaca Buy AB-Piñata Buy 5F-AB-Pinaca Buy 5-MEO-DALT Buy 5-MEO-MIPT Buy MPA Buy PB-8 Buy 5-APDB Buy MXE Buy Ethylphenidate Buy JWH-250 Buy MDPV Buy MDMA Buy KETAMINE BUY 5F AMB BUY COKE Buy 5 MeO DMT Near Me Buy gbl 5l Online DMT Online in Dubbo Buy 5 MeO DMT Near Me Buy gbl 5l Online DMT Online in Broome Buy 5 MeO DMT Near Me Buy gbl 5l Online DMT Online in Bathurst Buy 5 MeO DMT Near Me Buy gbl 5l Online DMT Online in Devonport Buy 5 MeO DMT Near Me Buy gbl 5l Online DMT Online in Alice Springs Nowra Buy 5 MeO DMT Near Me Buy gbl 5l Online DMT Online in Whyalla Buy 5 MeO DMT Near Me Buy gbl 5l Online DMT Online in Armidale Buy 5 MeO DMT Near Me Buy gbl 5l Online DMT Online in Maryborough Buy 5 MeO DMT Near Me Buy gbl 5l Online DMT Online in Murray Bridge Buy 5 MeO DMT Near Me Buy gbl 5l Online DMT Online in Albury Buy 5 MeO DMT Near Me Buy gbl 5l Online DMT Online in Mildura Buy 5 MeO DMT Near Me Buy gbl 5l Online DMT Online in Horsham Buy 5 MeO DMT Near Me Buy gbl 5l Online DMT Online in Lismore Buy 5 MeO DMT Near Me Buy gbl 5l Online DMT Online in Port Macquarie Buy 5 MeO DMT Near Me Buy gbl 5l Online DMT Online in Broken Hill Buy 5 MeO DMT Near Me Buy gbl 5l Online DMT Online in Port Lincoln Buy 5 MeO DMT Near Me Buy gbl 5l Online DMT Online in Port Pirie Buy 5 MeO DMT Near Me Buy gbl 5l Online DMT Online in Goulburn Buy 5 MeO DMT Near Me Buy gbl 5l Online DMT Online in Karratha
BUY eutylone ,COKE, Hashish weed KU,NU, Alprazolam,Etizolam, protonitazene, metonitazene,etazene,bromazolam mdma crystals and other research chemicals at very good prices in all Countries Germany Netherlands Australia Austria Sweden Norway Japan Kuwait Dubai United Arabs Emirates Jordan Bahrain Soudi Arabia Qatar Oman Malaysia Hongkong China France Belgium Poland Canada United States All Countries, BUY HERION BUY COKE Buy ECSTASY Pills BUY FLAKKA BUY FENTANYL BUY Alprozolam BUY XANAX pills BUY PERCOCET BUY ADDERALL BUY SECONDARY BUY PERCOCET BUY MORPHINE BUY ADDERALL BUY OXYCONTIN BUY OXYCODONE BUY SUBOXONE BUY RITALIN BUY 5cl BUY 6fa BUY 5cladba BUY MDMA BUY APVP Buy eutylone Buy NOW Buy KU Buy Isotodesnitazene Buy Protonitazene Buy Butonitazene WhatsApp : Buy Fluonitazene Buy Etodesnitazene Buy Metodesnitazene Buy Metazene Buy Etodesnitazene Buy Etazene Buy Protodesnitazene Buy bromazolam Buy MDMA Buy MAM-2201 Buy 4MMC Buy MDAI Buy MN-24 Buy PB-22 Buy 5F-PB-22 Buy 5F-UR Buy 2-FA Buy Pentetron Buy Methylone Crystal Buy 5F-AKB-48 Buy Dimethocaine Buy 4-MEC Buy A-pvp Buy AB-Fubinaca Buy 5F-AB-Fubinaca Buy AB-Piñata Buy 5F-AB-Pinaca Buy 5-MEO-DALT Buy 5-MEO-MIPT Buy MPA Buy PB-8 Buy 5-APDB Buy MXE Buy Ethylphenidate Buy JWH-250 Buy MDPV Buy MDMA Buy KETAMINE BUY 5F AMB BUY COKE etc.We are a fully licensed medical pharmacy offering Fentanyl (Transdermal Duragesic) patches for patients with a valid prescription. If you are a chronic pain patient or have difficulty accessing your prescribed medication, we may be able to help. Buy Adderall 30 mg without prescription Licensed to dispense controlled substances Discreet packaging and reliable delivery Professional service and consultation Contact us today to confirm availability and eligibility Valid prescription required. Legit anabolic steroids in AUSTRALIA, anabolic steroids online AUSTRALIA. Testosterone,Enanthate, Winstrol, MK677, Deca, Proviron, Somatotropin, sus250, 100% legal steroid alternatives and hardcore bodybuilding supplements for bulking, cutting and strength. CLENBUTEROL, DIANABOL, TRENBOLONE, NOLVADEX, PCT, CLOMID, STANZOLO, CARDARINE, HGH, MASTERON, TREN A, TREN E, Kamagra Oral Jelly, Anabolic steroids, TEST E, DECA, Oral steroids, TEST P, WINSTROL Free Delivery Shop Now. Oral steroids online. Create the perfect body with our store! All possible oral steroids! Buy anavar AUSTRALIA no prescription 24/7,We offer a variety of pharmaceutical products, both brand-name and generic. If you suffer from pain, anxiety, physical weakness, and insomnia, all of the drugs are now available in our pharmacy without a prescription. Fast delivery to all addresses. At the moment we offer specials and our current prices are affordable. We accept orders of small and large sizes with a minimum order of 100 tablets. Adderall, Ativan, Darvocet, Concerta, Dianabol. Ephedrine, Oxycontin, Quaaludes, Qsymia, Ritalin, Vicodin, Vyvanse, Suboxone, Oxycodone, phentermine, Alprazolam, Ambien, Tramadol, Opana ER, Lortab, Fentanyl patches online and many other medications.
We are a fully licensed medical pharmacy offering Fentanyl (Transdermal Duragesic) patches for patients with a valid prescription. If you are a chronic pain patient or have difficulty accessing your prescribed medication, we may be able to help. Buy Adderall 30 mg without prescription Licensed to dispense controlled substances Discreet packaging and reliable delivery Professional service and consultation Contact us today to confirm availability and eligibility: Valid prescription required. Legit anabolic steroids in AUSTRALIA, anabolic steroids online AUSTRALIA. Testosterone Enanthate, Winstrol, MK677, Deca, Proviron, Somatotropin, sus250, 100% legal steroid alternatives and hardcore bodybuilding supplements for bulking, cutting and strength. CLENBUTEROL DIANABOL, TRENBOLONE, NOLVADEX, PCT, CLOMID, STANZOLO, CARDARINE, HGH, MASTERON, TREN A, TREN E, Kamagra Oral Jelly, Anabolic steroids, TEST E, DECA, Oral steroids, TEST P, WINSTROL Free Delivery Shop Now. Oral steroids online. Create the perfect body with our store! All possible oral steroids! Buy anavar AUSTRALIA no prescription 24/7 , We offer a variety of pharmaceutical products, both brand-name and generic. If you suffer from pain, anxiety, physical weakness, and insomnia, all of the drugs are now available in our pharmacy without a prescription. Fast delivery to all addresses. At the moment we offer specials and our current prices are affordable. We accept orders of small and large sizes with a minimum order of 100 tablets. Adderall, Ativan, Darvocet, Concerta, Dianabol. Ephedrine, Oxycontin, Quaaludes, Qsymia, Ritalin, Vicodin, Vyvanse, Suboxone, Oxycodone, phentermine, Alprazolam, Ambien, Tramadol, Opana ER, Lortab, Fentanyl patches online and many other medications.
Contact General support
General support contact
Email…([email protected])
Signal.. +(34)607218704)
Signal..(@Realjames.39)
Whatsapp..+(237)672564181)
whatsap/Signal.. +(34)607218704)
Buy GBL Gamma-Butyrolactone for sale . GBL Supplier Amongst Many Other Products; GHB, DMT, MOLLY, , ADDIES AND VARIOUS RESEARCH CHEM. Buy ADHD Medications for sale, We sell FDA approved Weight loss medication(injections and pills) like Ozempic, Saxenda liraglutide, Wegovy semaglutide, Victoza and Mounjaro which are available now And many more Medications for other health issues not just weight loss available in stock.
Buy 99.8% TO 99.9% pure Mephedrone plant food here. We sell only the finest quality 4-methylmethcathinone(4-MMC).happier since we started giving them Mephedrone every weekend. We can also supply plants, cacti, mushroom spores and seeds. We send your Mephedrone plant food in a plain jiffy bag via 1st class Recorded, Next day delivery or Airmail. There is no mention of this website or product on packaging. We never supply underweight packets. We also offer Overnight Delivery . We also have the following products in stock :AM 2201 MDAI 4MEC 4-MEC Crystalline Methylone Crystals Pentedrone MDPV Buphedrone 3,4-DMMC 4-MemABP 4-FA MPA Butylone AMT 6-APB 5-APB MDAI MDMA Crystals Methoxetamine JWH-122 AM-2201 6-APB 5-APB 3,4DMMC 4MEC MDPV
Buy Methylone
Buy Benzo fury
Buy Flephedrone
Buy Methedrone
Buy Butylone
Buy Oxycodone,
Buy MMephedrone
Buy Testosterone
Buy JWH-018
Buy Dimethocaine
Buy Bromo DragonFly,
Buy TCB-2,
4-Aco-DMT, 4-Ho-MIPT, 4-Ho-MIPT,
We also supply Bath salts of very high purity grade such as Eight Ballz, White Rush and many more.
General support contact
Email…([email protected])
Signal.. +(34)607218704)
Signal..(@Realjames.39)
Whatsapp..+(237)672564181)
whatsap/Signal.. +(34)607218704
Sell Pure Mephedrone, MDPV, Plant Food, Ketamine, etc.
Sell Pure Mephedrone, MDPV, Plant Food,Methylone, MDMAetc. We have in stock high quality research chemicals 99.9% Pure Mephedrone, MDPV, MMCAT, 4-MMC, MEOW, Plant Food, Batylone, Naphyrone, Ketamine to sell. We deliver you directly in your address . All our product Mephedrone, 4-MMC, 4MMC, 4-methylmethcathinone, Methedrone, Methadrone, Mephadrone, M-CAT, MM-CAT & Meow/Miaow Plant food is ready to be send. Note that we can send smaller orders as samples to test before bulk. We ship through EMS ,FedEx and TNT ,sometime DHL. We also suply Bath salts of very high purity grade such as Eight Ballz, White Rush PAINKILLERS, STEROIDS, HGH, MEDICAL MARIJUANA WE HAVE BOTH INDICA, SATIVA AND HYBRID. RSO AND HASH AND HEMP OIL AND CANNABIS EDIBLES AVAILABLE. and many more.
Buy Xanax
Buy Oxycontin
Buy Codeine
Buy Methadone
Buy Oxycodone
Buy Percocet
Buy Percodan
Buy Roxicodone
Buy Tramadol
Buy adderall
Buy valium
Buy morphin
Buy Celebrex and more
CONTACT
General support contact
Email…([email protected])
Signal.. +(34)607218704)
Signal..(@Realjames.39)
Whatsapp..+(237)672564181)
whatsap/Signal.. +(34)607218704)
We have in stock high quality research chemicals and drugs 99.9% Pure
ketamine, mdma, cocaine, lsd, mephedrone, MDPV, MCAT, 4-MMC, MEOW, Plant
Food, Butylone, Naphyrone, Ketamine to sell. We deliver you directly in your address All our product Mephedrone, 4-MMC, 4 MMC, 4-methylmethcathinone, Mephedrone, Mephedrone, Mephedrone, M-CAT, MM-CAT & Meow/Miaow Plant food is ready to be send. Note that we can send smaller orders as samples to test before bulk. We ship through EMS,FedEx and TNT ,sometime DHL. We also supply Bath salts of very high purity grade such as Eight Ballz, White Rush and many more. Pure Mephedrone, MDPV, Plant Food, Ketamine for sale We supply and retail wide range of supreme chemicals for agricultural, industrial and pharmaceutical uses. We are selling our products at very convenient and workable prices. When you buy from us, one thing is certain. You are guaranteed of the highest quality available on the market, high purity products, secure payment, and very fast and discreet delivery. Our products include:
General support contact
Email…([email protected])
Signal.. +(34)607218704)
Signal..(@Realjames.39)
Whatsapp..+(237)672564181)
whatsap/Signal.. +(34)607218704)
AM-2201
AM-2233
AM-1248
T , FMPP
4-FMC
a-PVP
2C-E, 2C-I, 2C-P, 2C-B, 2C-T, 2C-D
DOC
DOI
Methylone (bk-MDMA)
Testosterone
Ephedrine Hcl Powder
MDPV (Methylenedioxypyrovalerone, MDPK)
ZZ-1
4-MEC
URB-754
RCS-4
JWH-, 018
Buy Mdma
Buy MDai
Buy MKAT
Buy Morphine
Buy Phenazepam
Buy Mephedrone 4mmc
Buy Benzo Fury
5-iai
4-FA
4-FMA
Buy Ketamine
Buy Bath Salts
Others are supplied upon request. We sell local and worldwide, and at discounted and negotiable prices. We also supply Bath salts of very high purity.
About Us
*We are leading supplier of research chemicals .
*Ship discreetly and Risk-free.
*Our products are clinically tested and pure.
*Supply health facilities and individuals.
*Our specialist are always available to respond to clients. (24/7) .
We can guarantee.
Regardless of the purpose of your purchase, we can guarantee.
High quality product*
Best price guarantee*
Discrete shipping worldwide*
Money back guarantee*
Buy 3CMC Crystals online*
General support contact
Email…([email protected])
Signal.. +(34)607218704)
Signal..(@Realjames.39)
Whatsapp..+(237)672564181)
whatsap/Signal.. +(34)607218704)
Buy Pain killers | Mdma,2CB,A-PVP,3CMC | OZEMPIC | STEROIDS (Ecstasy/Nembutal) | Heroin Cocaine (Signal: +(34)607218704)
Buy Crystal meth, Hydrocodone, Alprazolam Powder, oxycontin, gbl, tramadol, buy GBL, xanax, klonopin, Amphetamine, cocaine, ketamine,2CB , 4-CMC, 3-CMC, 4-MMC, 3-MMC,, A-PVP (FLAK) online MMC, 4MMC, 3CMC China white, P-LSD 2-FA 25I-NBOMe 4-ACO-DMT 4-FA Mdphp 4anpp. Signal: +(34)607218704)
Amphetamine Black Tar Heroin Bromadol HCl MDPV Ephedrine Eutylone Etizolam DFentanyl Flakka A-PVP Furanyl Fentanyl Mephedrone Methamphetamine Methylone Potassium Cyanide Pseudoephedrine & Other research chemicals for sale
General support contact
Email…([email protected])
Signal.. +(34)607218704)
Signal..(@Realjames.39)
Whatsapp..+(237)672564181)
whatsap/Signal.. +(34)607218704)
We are vendors for research chemicals and pharmaceutical raw. We only offer the purest of these products at 99%. Top Grade quality. All orders come in discreet packaging. Tracking number Provided 6 hrs after order. 2-ME-MAF, Fentanyl, Acetylfentanyl, carfentanil, U-48800, U-47700 Nembutal Pentobarbital,, DiaMorphine, CBD isolate Alprazolam, Bromadol Hcl, Etizolam, Clonazolam Ketamine, 2F-DCK, 4-CMC, 3-CMC, 4-MMC, 3-MMC, MDMA, A-pvp (Flakka), Bk-EBDP, 4-methylaminorex (4-MAR) Oxycodone, Roxycodone Raw Powder and many more. We supply upon customer’s request.
Medicines for weight loss: Mounjaro, Ozempic, wegovy, saxenda
We offer a wide variety of pharmacy products that contain almost everything you need. Fast and discreet shipping quality 100% guaranteed, Express by UPS, FedEx, EMS with tracking number, no receipt required.
No Prescription
Ant-anxiety
Chronic Pain
Seizures
depression
Migraines
Arthritis
Killing Cancer
Epilepsy
Post Traumatic Stress
Disorder(pstd)
Diabetes
Crohn’s Disease
Gout
Pain relief
Glaucoma
Opioid Dependence
Treating Alcohol Abuse
1-Shipping secure and discreet
2-tracking number provided for your shipment (Fast, safe and reliable delivery)
3-with or without scripts
4-packing is highly discreet sealed, wrapped with an aluminum foil, safe and secure
5-no signature required upon arrival of parcel
I am a legit supplier (vendor) of pharmaceuticals for both patients with or without scripts
I have varieties of pain and anxiety meds
I offer fast and discrete delivery to any location.
Fast and secured delivery guaranteed to any location
I have a 100% record in successful deliveries.
All Inquiries Below
General support contact
Email…([email protected])
Signal.. +(34)607218704)
Signal..(@Realjames.39)
Whatsapp..+(237)672564181)
whatsap/Signal.. +(34)607218704)
DMT powder, MIO5 DMT vape pen cartridge, GBL wheel cleaner in Sydney, Ballard, Brisbane. Auckland NZ, Perth, Darwin, Melbourne Australia New Zealand.
Auckland NZ 5mio dmt vape cartridge, Gbl wheel cleaner in Brisbane, psychedelic shrooms dealer in Sydney dmt powder perth
Experience the next level of vaping with our exclusive collection of THC vapes, Pharmaceutical products, Magic mushroom, Researched Chem. etc.
Chemicals DMT VAPE CARTRIDGES, PSILOCYBIN MUSHROOM CHOCOLATE BARS crafted to provide an unforgettable journey
through taste and sensation.
Buy Best Ghost Carts
Buy Big Chiefs Carts
Buy Delta 8 THC? Disposable Vape Carts
Buy Ace Ultra premium 2g disposable
Buy Muha Meds Disposable carts
Buy Big Chief – Disposable
Buy Push Vape carts
Buy Alien Labs Carts
Buy Mad Labs Cartridges
Buy pre rolls marijuana online
Buy PLUGPLAY weed online
Buy mushroom chocolate bars
Buy Mad Labs weed online
Buy kushy punch weed online
Order Kiva marijuana carts online
Buy Jeeter weed carts online
Buy Flave vape carts online
Buy disposable vape pens carts online
Buy Dime industries carts online
Buy Dabwoods vape cats online
Buy CBD Vape online
Buy Cake Disposable carts online
Buy Blinkers disposable vape carts online
Buy Polka Dot Chocolate
Buy Trippy flip chocolate bar Online
Buy Muha Meds Disposable carts
Buy Meth, coke, ketamine Adderall Diazepam, Tramadol, Xanax, GBL, GHB, Nembutal, Carfentanil, Suboxone and more.
Buy benzodiazepines, research chemicals ADHD and opiates online
Buy cannabinoids, buy synthetic cannabinoids, buy 5cladba online, 6cladba for sale. Delivery/Shipping
rohypnol 1 mg K2 paper/spray online at cheap price, Buy K2 Spice Sheets, Buy K2 Spray/liquid online,Buy 6cladba,Buy 5cladba,Buy
jwh-018, ZOPICLONE, TRAMADOL, LSD Vials, shrooms, LEXAUR, GABAPENTIN, XANAX, TEMAZEPAM, Metonitazene
psychedelic mushrooms price in the US.
psychedelic mushrooms price in the UK.
psychedelic mushrooms price in Australia.
psychedelic mushrooms price Canada.
psychedelic mushrooms supplier in Canada.
psychedelic mushrooms supplier in France
psychedelic mushrooms supplier in Germany
psychedelic mushrooms supplier in Belgium
psychedelic mushrooms supplier in Denmark
psychedelic mushrooms supplier in Scotland
psychedelic mushrooms supplier in Wales.
psychedelic mushrooms supplier in Austria
psychedelic mushrooms supplier in the US.
psychedelic mushrooms supplier in the UK.
psychedelic mushrooms supplier in Australia.
psychedelic mushrooms near me.
psychedelic mushrooms online shop.
psychedelic mushrooms for sale.
psychedelic mushrooms dealer.
psychedelic mushrooms europe supplier.
buy psychedelic mushrooms in europe.
All Inquiries Below
General support contact
Email…([email protected])
Signal.. +(34)607218704)
Signal..(@Realjames.39)
Whatsapp..+(237)672564181)
Signal..(@Realjames.39)
whatsap/Signal.. +(34)607218704)
Buy 100% undetectable counterfeit money grade AAA+ | SSD CHEM | ATM CONED CARDS,CASHAPP,ZELLE,PAYPAL,BITCION FLIPPS AND INVESTMENTS ONLINE FOR SALE Signal: +(34)607218704)
We are the best and Unique producer of HIGH QUALITY Undetectable Counterfeit Banknotes, with over a billion,
of our products circulating around the world. we produce genuine dollar, British pound and euro banknotes with different serial numbers on each account. We stock semi-finished banknote bases that have already been engraved and designed on the front and back of the various currencies of each denomination. We need a partner with whom we will work discreetly to complete the production of our semi-finished banknote substrates and make them legal tender that we will discuss in a personal meeting if you agree to work with us. We will schedule an appointment to show you everything and discuss all details and prepare samples so you can pass the test to confirm authenticity. All notes will pass important test such as ultraviolet light, pencil test,
All Inquiries Below
General support contact
Email…([email protected])
Signal.. +(34)607218704)
Signal..(@Realjames.39)
Whatsapp..+(237)672564181)
whatsap/Signal.. +(34)607218704)
Our counterfeit bank notes are produced taking into consideration all the security features to give them the top quality customers desire. They pass the pen test, UV light test, and possess hologram features, water points.
Our bills can be used in the following places.
-Self service machines
-Markets
-Festivals / other busy places
-Bars
-Shops
-Taxi
-Restaurant
-Snackbar
-Casinos and all other places of these types
BUY CONED CARDS AVAILABLE AT AFFORDABLE PRICES
Cloned Cards *********
***********CONED CARDS *********
***********CONED CARDS *********
***********CONED CARDS *********
clones card for sale with high balance instantly dispatched once order is confirmed stop being broken and start shopping everyday
Clone cards are spammed credit cards with clean funds. clone cards are available for cash out in ATMs,Gas stations,POS Our clone card comes with ATM pin for easy cash outs
HOW DOES IT WORK?
We use credit card filters to obtain magnetic stripe information of a credit or debit card. The information received is not limited to credit card password, numbers, CVV and expiration date. This information comes in the form of pin (101 or 201) dump. now we use the MSR printer to put received information on a blank card
A blank card that contains information received using credit card filters are called cloned cards. You can use them for in-store shopping (card) or cash payment from an ATM
Shipping is always smooth and safe because the card is always hidden in a book and wrapped neatly to look like a gift. it’s always safe buying your cloned cards from us.
Cloned Cards *********
LOW BALANCE
200= balance of £€$2k
300= balance of £€$3k
400= balance of £€$4k
500= balance of £€$5k
600= balance of £€$6k
800= balance of £€$8k
900= balance of £€$9k
HIGH BALANCE
1k= balance of £€$10k
2k= balance of £€$20k
3k= balance of £€$30k
4k= balance of £€$40k
5k= balance of £€$60k
7k= balance of £€$90k
All cards you have purchased are carefully checked by us to be 100% valid before shipping to you.
Come btc ready
How to use the Cloned Cards!
Step 1: Insert ATM Card.
Step 2: Select the Language.
Step 3: Enter 4 Digit ATM Pin.
Step 4: Select Your Transaction.
Step 5: Select Your Account.
Step 6: Enter the Withdrawal Money(withdraw $500 every after 2 hours)
Step 7: Collect the Cash.
Step 8: Take a Printed Receipt.
Clone Credit Card orders available
• Shipping
• Swift Delivery On USPS, FedEx, DHL express etc.
(USA)🇺🇸 >> Same day
(Canada) 🇨🇦 >> Same day
(UK) 🇬🇧 >> 48 hours
(Germany) 🇩🇪 >> 48 hours
(France) 🇫🇷 >> 48 hours
(Switzerland)🇨🇭>> 48 hours
(Russia) 🇷🇺 >> 48 hours
..and more
Buy Guns Online With No Papers, All Types Avaliable Dm Me for more details
BUY PISTOL ONLINE
BUY PISTOL GUNS 9MM ONLINE
Buy Rifles, Shotguns, and Handguns ONLINE
Buy American Long Rifle ONLINE
BUY HALL BREECHLOADING RIFLE ONLINE
Buy Colt Model 1851 Navy Revolver ONLINE
Buy Winchester Model 1873 Lever Action Rifle ONLINE
Buy Springfield Model 1903 Bolt Action Rifle ONLINE
Buy Colt Model 1911 Semi-automatic pistol ONLINE
Buy Thompson Submachine Gun ONLINE
Buy M1 Garand Semi-Automatic Rifle ONLINE
Buy AR-15 Rifle ONLINE
BUY Glock 19 ONLINE
BUY Glock 17 ONLINE
BUY Glock 19 Gen 5 ONLINE
BUY Glock 43 ONLINE
BUY Glock 9mm ONLINE
BUY Glock 45 ONLINE
BUY Glock 49 ONLINE
BUY Glock 42 ONLINE
BUY AR pistol ONLINE
BUY ar-556 pistol ONLINE
BUY ARP 556 ONLINE
BUY Palmetto State Armory ONLINE
BUY Best AR pistol ONLINE
BUY Best harp gun ONLINE
BUY 4 inch AR Pistol ONLINE
BUY ar-15 pistol with drum ONLINE
Our Delivery is Worldwide depending on your location contact us Bellow.
All Inquiries Below
Email…([email protected])
Signal.. +(34)607218704)
Signal..(@Realjames.39)
Whatsapp..+(237)672564181)
whatsap/Signal.. +(34)607218704)
Buy Grade A Pure CBD Isolate Powder,Medical Marijuana & Pain killer& MDMA,LSD (Ecstasy/Molly)Heroin,Cocaine
We sell Medical marijuana, Pure CBD Isolate Powder and Cannabis Oil for patients and smokers Remember Health is Wealth
1 Wholesale & Distributors of CBD Products for Sale | Wholesale & Bulk
We are the largest Bulk and Wholesale Suppliers of Pure CBD,Organic Hemp CBD, CBD Hemp
Our Pure CBD Isolate is a crystallized powder with CBD concentrations of over 99%. Never synthetic, and never
fortified, our naturally high CBD oil starts at 70% CBD and is then gently refined to remove the remaining 30% of plant
material all the way down to a single molecule of pure CBD crystalline isolate. Once in the crystallized form, we then
crush the CBD crystals into a pure CBD powder so that it may be used effectively and evenly distributed within product
formulations
Treatment of some of the following illness below
Ant-anxiety Chronic Pain Seizures Depression Migraines Arthritis Killing Cancer Epilepsy Post Traumatic stress Disorder(pstd) Diabetes Crohn’s Disease Gout Pain relief Glaucoma Opiod Dependence Treating Alcohol Abuse
We have the following pain killers available on stock
General support contact
Email…([email protected])
Signal.. +(34)607218704)
Signal..(@Realjames.39)
Whatsapp..+(237)672564181)
whatsap/Signal.. +(34)607218704)
Buy Nembutal online, Diazepam, Xanax, XTC, Methamphetamine, Valium, Oxynorm, Oxycodone, Oxycontin, Ritalin, Adderall without a prescription. (Safe and discreet medication purchase, 100% guaranteed). Email: ([email protected])
BUY GHB, GBL, BDO, MDMA, Methylone, LSD, Mephedrone, Cocaine, Ketamine, Amphetamine, Ephedrine for sale,
CBD hemp oil, marijuana buds, ephedrine, heroin, 4MMC, cocaine, MDMA, ketamine, crystal methamphetamine, LSD, oxy, Xanax
L.S.GHB, GBL, BDO. LSD-Ephedrine-HCl-Oxycontin-Hydrocodone-Cocaine-Ketamine-HCl-Methamphetamine-Heroin-4-mmc-Xanax-2mg-bar-
Mephedrone – MDMA – Alprazolam – JWH-020 – MDAI – 5-MeO-DALT – MDPV – Naphyrone – 2C-C – 2C-D – 2C-E – 2C-I – 2C-P – 2C-
MDMA, 4-mmc, Ketamine
Buy methamphetamine, GHB, mephedrone, MDMA, ephedrine, zolpidem, ketamine, CBD hemp oil, marijuana buds, EPHEDRINE, HEROIN, 4MMC, COCAINE, MDMA, KETAMINE, CRYSTAL METHAMPHETAMINE, LSD, OXY, XANAX, MDPV, MARIJUANA, DMT crystal, CODEINE, GHB and other related products for sale at very low prices. Delivery time is a maximum of 2 days and we offer secure shipping. Please contact me by email at hydromorph morphine Rohypnol Nonylphenol -methylmethcathinone (4-MMC) MDPV Ketamine 3-(p-fluorobenzoyloxy)tropane benzylpiperazine (BZP) 3-trifluoromethylphenylpiperazine (TFMPP) Nandrolone 4-Fluorotropococaine MDMA Rohypnol methylone Amphetamine morphine Heroin Amphetamine LSD LSD-Ephedrine-HCL-Oxycontin-Hydrocodone-Cocaine-Ketamine-HCL-Meth-Herion-4-mmc-Xanax-2mg-bar- Mephedrone-Mdma-Alprazolam-JWH-020-MDAI-5-MeO-DALT-MDPV-Nafyron-2C-C-2C-D-2C-E-2C-I-2C-P-2C-T- MDMA, 4-mmc, Ketamine and more
General support contact
Email…([email protected])
Signal.. +(34)607218704)
Signal..(@Realjames.39)
Whatsapp..+(237)672564181)
whatsap/Signal.. +(34)607218704)
BUY JWH018 CRYSTALS ONLINE, buy jwh018 online, buy jwj 250, buy jwh 018 pure online Signal: @Realjames.39 Buy 6cladba, 6cl-adb-a, 5cladba, 5cl-adb-a yellow and white powder, 5F-MDA-19,GHB,GBL,BDO,LSD,MDMA
We ship from china, netherlands and our warehouse USA..
BUY EUTYLONE AND OTHER RESEARCH CHEMICALS.
BUY eutylone ,COKE KU,NU, Alprazolam,Etizolam, protonitazene, metonitazene,etazene,bromazolam mdma crystals and other research chemicals at very good prices
BUY HERION
BUY COKE
Buy ECSTASY Pills
BUY FLAKKA
BUY FENTANYL
BUY Alprozolam
BUY XANAX pills
BUY PERCOCET
BUY ADDERALL
BUY SECONAL
BUY PERCOCET
BUY MORPHINE
BUY ADDERALL
BUY OXYCONTIN
BUY OXYCODONE
BUY SUBOXONE
BUY RITALIN
BUY 5cl
BUY 6fa
BUY 5cladba
BUY MDMA
BUY APVP
buy eutylone
Buy NU
Buy KU Buy
Isotodesnitazene Buy Protonitazene Buy Butonitazene Buy Fluonitazene Buy Etodesnitazene Buy Metodesnitazene Buy Metazene Buy Etodesnitazene Buy Etazene Buy Protodesnitazene Buy Bromazolam Buy MDMA Buy MAM-2201 Buy 4MMC Buy MDAI Buy MN-24 Buy PB-22 Buy 5F-PB-22 Buy 5F-UR Buy 2-FA Buy Pentetrone Buy Methylone Crystal Buy 5F-AKB-48 Buy Dimethocaine Buy 4-MEC Buy A-pvp Buy AB-Fubinaca Buy 5F-AB-Fubinaca Buy AB-Piñata Buy 5F-AB-Pinaca Buy 5-MEO-DALT Buy 5-MEO-MIPT Buy MPA Buy PB-8 Buy 5-APDB Buy MXE Buy Ethylphenidate Buy JWH-250 Buy MDPV Buy MDMA Buy KETAMINE BUY 5F AMB BUY COKE,
NEMBUTAL ( Pills, Liquid & Powder )
KLONOPIN
OPANA 10, 20, 30 and 40 mg
XANAX 1 mg Upjohn footbals
XANAX 1 mg ( blue Ksalol)
XANAX SR 2 mg ( brand Upjohn)
XANAX 2 mg ( Pfizer LongBars)
VALIUM 10 mg Bensedine
VALIUM 2mg, 5mg and 10mg
OXYCODONE-APAP ( Wattson labs) and ( Physicians tc.) 10/ 325mg
OXYCOTIN 20mg, 40mg and 80mg
NORCO YELLOW taps Watson
FENTANYL
DEMEROL ( Meperidine HCL) caps 8
ACTAVIS PROMETHAZINE
KETAMINE CRYSTAL
EPHEDRINE
MORPHINE30mg
WATSON 325 10MG
WATSON 853 10MG
VICODIN 5MG
VICODIN ES 7.5MG
EPHEDRINE 30MG
CELEBREX 100mg
CODEINE 15mg
OXYCOTIN 80MG
OXYCOTIN 20MG, 40MG.
HYDROCODONE 10MG/500MG
HYDROCODONE 5MG/500MG
METHADONE 10MG, 40MG WAFERS
LORCET – ( Hydrocodone Bitartrate/ Acetaminophen) 10 mg/ 650 mg
AMBIEN ( Zolpidem, Stilnox) 10 mg
LO LOESTRIN FE
ADIPEX-P 37.5MG
VIAGRA 100MG
LORAZEPAM 2.5 mg ( Ativan)
CLONAZEPAM 2 mg ( Rivotril)
CIALIS 20MG
PERCOCET 10/ 325
NORCO – ( Hydrocodone Bitartrate/ Acetaminophen ) 5 mg/ 325 mg
PERCOCET 5/ 325
ENDOCET 10/ 325
HYDROCODONE-IBUPROFEN (brand name:vicoprofen)
SUBOXONE
SUBUTEX
DILAUDID 8mg
SOMA 350mg
ADDERALL 30mg
RITALINE 10mg
TRAMADOL ( Ultram) 50mg
ATARAX 25mg
VIAGRA GOLD
FIORICET (BUTALBITOL 50MG) – MIKART
ROXICODONE 15mg, 30mg
1-Shipping secure and discreet 2-tracking number provided for your shipment (Fast,safe and reliable delivery) 3-with or without scripts 4-packing is highly discreet sealed, wrapped with an aluminum foil, safe and secure 5-no signature required upon arrival of parcel
So if you are interested contact for more details below
General support contact
Email…([email protected])
Signal.. +(34)607218704)
Whatsapp..+(237)672564181)
Signal..(@Realjames.39)
whatsap/Signal.. +(34)607218704)
Buy 5MEO DMT powder near New Orleans, LA 5MEO DMT vape pen cart domestics supplier in Honolulu, HI GBL wheel cleaner seller in Anaheim, CA. Global GHB powder Tampa, FL supplier GBL wheel cleaner Canadian and USA legit dealer. GBL wheel cleaner USA and Canadian legit supplier. Nembutal powder street dealer Nembutal powder online dealer Nembutal powder street price Nembutal powder online price Buy nembutal powder in Aurora, CO gbl wheel cleaner gbl wheel brite gbl cleaner for sale in Santa Ana, CA wheel cleaner gbl buy gbl wheel cleaner gbl wheel cleaner for sale in St. Louis, MO gbl wheel cleaner Pittsburgh, PA dealer 3m wheel cleaner 4 wheeler cleaning products 4 wheeler cleaner Buy Gbl wheel cleaner in Houston TX. GBL wheel cleaner Santa Fe TX Gbl wheel cleaner price in Dallas TX. GBL wheel polisher in San Antonio TX. GBL cleaner alloy wheel restored GBL wheel brite cleaner wheel cleaner gbl buy gbl wheel cleaner GBL wheel cleaner GBL Aluminum wheel cleaner, GBL alloy wheel cleaner, GBL rim cleaner, GBL cleaner & polish your car wheels. GBL alloy wheel cleaner. GBL wheel polisher, GBL alloy wheel restored. GBL alloy wheel cleaner, GBL rim cleaner, GBL wheel polisher. GBL alloy wheel, rim cleaner. Buy Gbl wheel cleaner in Columbus. GBL wheel cleaner Charlotte Gbl wheel cleaner price in Indianapolis. GBL wheel polisher in San Francisco. GBL cleaner alloy wheel restored GBL wheel brite cleaner wheel cleaner gbl buy gbl wheel cleaner GBL wheel cleaner GBL Aluminum wheel cleaner, GBL alloy wheel cleaner, GBL rim cleaner, GBL cleaner & polish your car wheels. GBL alloy wheel cleaner. GBL wheel polisher, GBL alloy wheel restored. GBL alloy wheel cleaner, GBL rim cleaner, GBL wheel
Email…([email protected])
Signal.. +(34)607218704)
Signal..(@Realjames.39)
Whatsapp..+(237)672564181)
whatsap/Signal.. +(34)607218704)
polisher. GBL alloy wheel, rim cleaner. Buy 5MEO DMT powder near Seattle 5MEO DMT vape pen cart domestics supplier in Denver GBL wheel cleaner street dealer Oklahoma City area. Global GHB powder supplier. GBL wheel cleaner Canadian and USA legit dealer. GBL wheel cleaner USA and Canadian legit supplier. Nembutal powder street dealer Nembutal powder online dealer Nembutal powder street price Nembutal powder online price Buy nembutal powder in Nashville gbl wheel cleaner gbl wheel brite gbl cleaner for sale wheel cleaner gbl buy gbl wheel cleaner gbl wheel cleaner Detroit, MI gbl wheel cleaner uk 3m wheel cleaner 4 wheeler cleaning products 4 wheeler cleaner 5MEO DMT vape pen cart supplier in El Paso 5MEO DMT powder supplier,5MEO DMT vape pen carts DMT vape powder dealer in Washington, D.C. 5MEO DMT vape pen carts supplier in Las Vegas 5MEO DMT powder supplier in Boston MA GBL wheel cleaner price in Memphis, TN GBL wheel cleaner home base dealer in Baltimore, MD Gbl wheel, rim cleaner dealer in Nashville-Davidson, TN Gbl wheel brite Portland, OR buy gbl wheel cleaner in Albuquerque, NM area. GBL wheel cleaner for sale Tucson, AZ gbl wheel cleaner price in Fresno, CA wheel cleaner gbl supplier near Long Beach, CA wheel cleaner 1 gallon wheel cleaner sale 3m wheel cleaner 5l wheel cleaner ultra clean wheel cleaner DMT vape pen cart for sale Kansas City, MO .DMT vape pen cart, DMT powder street supplier chain. 5MEO DMT powder supplier,5MEO DMT vape pen carts DMT vape powder street supplier in Mesa, AZ 5MEO DMT vape pen carts street supplier in Virginia Beach, VA 5MEO DMT powder street dealer in Atlanta, GA. GBL & GHB cleaner street value,GBL wheel rim cleaner street price, GHB powder street value GBL cleaner street value in Colorado Springs, CO. GBL wheel, rim cleaner street price in Omaha, NE , Buy GHB powder GBL cleaner supplier. DMT vape powder Raleigh, NC Gbl wheel cleaner for sale in Miami, FL DMT vape pen cart for sale in Cleveland, OH, legit dmt vape pen cart supplier in Tulsa, OK, gbl cleaner online supplier. buy domestic Oakland, CA gbl wheel cleaner seller. gbl cleaner for sale gbl wheel brite wheel cleaner gbl buy gbl wheel cleaner gbl wheel cleaner for sale wheel cleaner 1 gallon wheel cleaner sale 4 wheeler cleaner 4 wheeler cleaning products wheel cleaner gallon wheel cleaner Minneapolis, MN tire Gbl wheel cleaner for sale in Wichita, KS, DMT vape pen cart for sale in Arlington, TX WIRE- Gbl cleaner online supplier. gbl cleaner for sale gbl wheel brite wheel cleaner gbl buy gbl wheel cleaner gbl wheel cleaner for sale wheel cleaner 1 gallon wheel cleaner sale 4 wheeler cleaner 4 wheeler cleaning products wheel cleaner gallon wheel cleaner Bakersfield, CA tire cleaner products.
Email…([email protected])
Signal.. +(34)607218704)
Signal..(@Realjames.39)
Whatsapp..+(237)672564181)
whatsap/Signal.. +(34)607218704)
Buy Oxycodone Online No Prescription | buy Adderall 30mg Online | Order Subutex Online | buy Roxicodone 30mg | Buy Subutex 8mg Online | Buy suboxone online | Buy Oxycontin Online, Buy Amphetamine online, Codeine and Hydrocodone Buy Oxycontin 80mg online | buy Percocet online | Buy Dilaudid 8mg online
Buy Adderall Online
Buy Adipex Online Buy
Alprazolam Online
Buy Ambien Online
Buy Ativan Online
Buy Carisoprodol
Online Buy Clonazepam Online
Buy Codeine Online
Buy Darvocet Online
Buy Demerol Online
Buy Diazepam Online
Buy Dilaudid Online
Buy Fioricet Online
Buy Gabapentin Online
Buy Hydrocodone Online
Buy Hydromorphone Online
Buy Klonopin Online
Buy Lexapro Online
Buy Lorazepam Online
Buy Lorcet Online
Buy Lortab Online
Buy Meridia Online
Buy Methadone Online
Buy Modafinil Online
Buy Norco Online
Buy Opana ER Online
Buy Oxycodone Online
Buy Oxycontin Online
Buy Percocet Online
Buy Phentermine Online
Buy Roxicodone Online
Buy Soma Online
Buy Suboxone Online
Buy Subutex Online
Buy Tapentadol Online
Buy Tramadol Online
Buy Valium Online
Buy Viagra Online
Buy Vicodin Online
Buy Xanax Online
Buy Zolpidem Online
Buy Oxycodone 30mg Online UK – Your Trusted Online
Buy Oxycodone 30mg Online UK – UK Online Pharmacy & Over the Counter
Where to Buy Oxycodone 30mg Online UK with Instant Delivery
Buy Oxycodone 30mg Online UK Without Prescription Safely
Buy Oxycodone 30mg Online UK Dispatched Within 24 hours,
Buy Oxycodone 30mg Online UK Direct to Your Door Shop NOW
Buy Oxycodone 30mg Online Overnight UK Delivery – Pure Meds UK
Pure Meds UK provides an efficient way for customers to Buy Oxycodone 30mg Online in The UK when they need it for pain treatment. When patients purchase Oxycodone 30mg Online in the UK from Pure Meds UK, they can reach a secure, well-organized system to design the ordering process and fast delivery. Oxycodone 30mg Orders are treated and treated otherwise shipped overnight in the UK, well-being patients receive medication without their delay. Customers trust Pure Meds UK for its authenticity, privacy-focused service, and professional support team. Buy Oxycodone 30mg Online UK to UK Shipping at Best Price
Email…([email protected])
Signal.. +(34)607218704)
Signal..(@Realjames.39)
Whatsapp..+(237)672564181)
whatsap/Signal.. +(34)607218704)
Buy Morphine 30mg Online USA – Your Trusted Online USA Pharmacy
Buy Morphine 30mg Online USA – USA Online Pharmacy & Over the Counter
Where to Buy Morphine 30mg Online USA with Instant Delivery
Buy Morphine 30mg Online USA Without Prescription Safely
Buy Morphine 30mg Online USA Dispatched Within 24 hours,
Buy Morphine 30mg Online USA Direct to Your Door Shop NOW
Buy Morphine 30mg Online Overnight USA Delivery – Pure Meds USA
Eaz Meds USA provides an efficient way for customers to Buy Morphine 30mg Online in The USA when they need it for pain treatment. When patients purchase Morphine 30mg Online in the USA from Eaz Meds USA, they can reach on a secure, well-organized system to design the ordering process and fast delivery. Morphine 30mg Orders are treated and treated otherwise shipped overnight in the USA, well-being patients receive medication without their delay. Customers trust Eaz Meds USA for its authenticity, privacy-focused service, and professional support team. Buy Morphine 30mg Online USA to USA Shipping at Best Price.
Email…([email protected])
Signal.. +(34)607218704)
Signal..(@Realjames.39)
Whatsapp..+(237)672564181)
whatsap/Signal.. +(34)607218704)
Are you looking for how to buy a passport from any other country without citizenship? Or are you looking for to buy a registered driver’s license with DVLA, or DMV online without taking a test? authentic IELTS or TOEFL certificate, purchase quality passports online, Driver’s licenses, ID cards, Visas, Resident Permits, and Diplomas.
BUY FAKE DRIVING LICENSE,
BUY FAKE PASSPORT,
Buy fake Registered passports,
Purchase Legit fake Driver’s License,
buy real and fake ID cards,
buy fake Visas,
buy fake Resident Permits,
Purchase fake Diplomas,
buy fake TOEFL certificates,
buy fake Graduation certificates,
buy fake IELTS certificates,
buy fake Registered passport online,
Purchase fake Working Permit,
buy fake Social Security Number/Card,
buy fake Adoption Certificates,
Purchase fake Emancipation Document,
buy fake Birth Certificates,
buy fake Marriage Certificate,
Purchase fake College Degrees,
buy fake Schengen visa,
Email…([email protected])
Signal.. +(34)607218704)
Signal..(@Realjames.39)
Whatsapp..+(237)672564181)
whatsap/Signal.. +(34)607218704)
Buy database registered fake Passports Buy citizenship documents. Buy fake passport USA.
Buy fake Australian passport.
Purchase fake Belgian passports.
Buy fake.Brazilian passport.
Buy fake Canadian passport.
Buy fake passport Finlands.
Purchase fake French passport.
Buy fake German passport.
Buy fake Dutch passport.
Purchase fake Israeli passport.
Buy fake UK passport.
Buy fake Spanish passport.
Purchase fake Mexican passport.
Buy fake South African passport.
Buy fake Swiss passport.
Purchase fake Chinese passport.
Buy fake passport Austria.
Buy fake Japanese passport.
Buy fake Ukrainian passport.
Buy fake cambodiens passport.
Purchase fake passport USA.
Buy fake Romanian passport.
Buy fake passport Polish.
Buy fake Bulgarian passport.
Buy fake passport Moroccan.
Purchase fake passport Norwegian.
Buy fake passport Portuguese.
Buy fake Lithuanian passport.
Buy fake Russian passport.
Buy fake passport Hungary.
Purchase fake Australian passport.
Buy fake passport Brazilian.
Buy fake Italian passport.
Buy fake passport Jamaica.
Purchase fake South Korean passport.
Buy fake passport Croatian.
Buy fake passport Denmark.
Buy fake passport Malta.
Buy fake passport Polish.
Purchase fake Swedish passport.
Buy a valid passport, Buy fake CSCS card, buy Schengen visa, Buy ETIAS authorization, Proof of Accommodation, IDP, Proof of Financial Means, Return or Onward Ticket, Travel Insurance, high school diploma, Bachelor’s or Master’s, CFA in finance or a Fire Marshal Certification, HND diplomas.
Buy fake IDs USA.
Buy fake Australian identification cards.
Purchase fake Belgian identity cards.
Buy fake identification cards.
Buy Canadian false ID cards.
Buy fake Finland identity cards.
Buy false French identity cards.
Purchase fake German identification cards.
Buy fake Dutch identification cards.
Buy fake Israeli identity cards.
Buy fake UK IDs.
Buy fake Spanish identification cards.
Buy fake Mexican ID cards.
Buy fake cards of South African identity.
Purchase fake Swiss identity cards.
Buy fake German identity cards.
Buy fake Chinese ID cards.
buy undetectable counterfeit money buy real and fake passport online.
buy undetectable counterfeit money.
Purchase real and fake driver’s licenses.
Buy counterfeit banknotes.
where to buy fake dollar bills.
where to buy counterfeit bills.
where to buy fake bills,
buy counterfeit bank notes.
where to buy fake bank notes.
where can i buy fake dollar bills.
where to buy counterfeit bank notes.
Purchase counterfeit euro bills.
Purchase euro fake bills online.
Where to buy fake British pounds.
fake banknotes for sale.
uk fake bank notes for sale,
counterfeit euro banknotes for sale.
counterfeit bank notes for sale.
Where to buy fake euro bills.
Where to Buy British pounds.
Fake bank notes for sale.
Germany Counterfeit bank notes for sale.
China Buy currency bills.
Japan Where to buy euro bills online.
fake money for sale.
prop money for sale counterfeit money for sale,
Email…([email protected])
Signal.. +(34)607218704)
Signal..(@Realjames.39)
Whatsapp..+(237)672564181)
whatsap/Signal.. +(34)607218704)
Email…([email protected])
Signal.. +(34)607218704)
Signal..(@Realjames.39)
Whatsapp..+(237)672564181)
whatsap/Signal.. +(34)607218704)
High-quality Weed of various strains, affordable prices, discreet shipping, fast delivery/pickup/drop-off , and excellent customer service available.\” Coke, vape, Ritalin, Hash, ecstasy, Oxys, edibles, disposables, carts, mdma, shrooms
Buy Cocaine in Miami, Buy weed in Florence, buy vape in Tampa, buy coke in Vienna, buy weed in Miami, buy weed in Roma, buy weed in Kratovo, buy weed in Prilep, buy weed in Skopje, buy coke in Venice, buy pills in Paris, buy weed in Milan, buy mushrooms in Rome, buy weed in Venice, buy weed in Lisbon, buy weed in Strumica, buy coke in Amsterdam, buy mdma in Paris, buy crystal meth in Budapest, buy weed in Lisbon, buy coke in Amsterdam, buy weed in Istanbul, buy weed in Zagreb, buy coke in Cairo, buy weed in Puerto Plata, buy weed in Soufriére, buy weed in Karlovac, buy weed in Aruba, buy weed in Punta Cana, buy weed in Grand Cayman, buy weed in Nassau, buy weed in Trogir, buy coke in Rijeka. Buy weed in Colmar, buy weed in Lyon, buy weed in Cannes, buy weed in chartres, buy weed in Annecy, buy weed in Charleston, buy weed in Columbia SC, buy weed in San Juan, buy weed in Seneca, buy weed in Santo Domingo, buy weed in Santiago, buy weed in Lima, buy weed in Quito, buy weed online in Moscow, buy weed online in Paris, Weed for sale in Paris, weed online Paris, buy weed online in London, where to buy weed online in London, where to buy weed in London, buy weed in Madrid, where to buy weed in Madrid, buy weed online in Barcelona, buy weed in Saint Petersburg, buy weed in Milan, where to buy weed in Athens, buy weed in Athens, buy weed in Lisbon, where to buy weed in Lisbon, buy weed online in Manchester, weed online in kyiv, buy weed in Birmingham, where to buy weed in Kyiv, Where to buy weed in Birmingham, buy weed online in Naples, buy weed in Naples, buy weed in Brussels, where to buy weed in Brussels, buy weed online in Minsk, where to buy weed in Minsk, buy weed online in Vienna, where to buy weed in Vienna, weed for sale in Vienna, buy weed in Graz, buy weed in Innsbruck , buy weed online in Cartagena, buy weed in Cusco , buy weed in Rio de Janeiro, buy weed in Buenos Aires, Buy Weed Cocaine In New York, Buy Weed Cocaine In Los Angeles, buy weed cocaine mushroom in Chicago, buy weed cocaine in San Antonio, Buy Weed Cocaine In Austin, buy weed cocaine hash in Phoenix, buy weed cocaine molly in Houston, buy weed in San Diego, buy weed cocaine in Philadelphia, buy weed cocaine in Dallas, buy weed cocaine in Seattle, buy weed cocaine in San Francisco, buy weed cocaine in Denver, buy weed cocaine in Columbus, buy weed cocaine in Nashville, buy weed cocaine in Las Vegas, buy weed cocaine in Atlanta, buy weed cocaine in San Jose, buy weed cocaine in Charlotte, buy weed cocaine in Baltimore, buy weed cocaine in Boston, buy weed cocaine in Oklahoma City, buy weed cocaine in Milwaukee, buy weed cocaine in Raleigh, buy weed cocaine in Indianapolis, buy weed cocaine in Jacksonville, buy weed cocaine in Omaha, buy weed cocaine in Detroit, buy weed cocaine in Fort Worth, buy weed cocaine in Albuquerque, buy weed cocaine in Portland, buy weed cocaine in Memphis, buy weed cocaine in Miami, buy weed cocaine in Minneapolis, buy weed cocaine in Orlando,buy weed cocaine in Kansas City, buy weed cocaine in Salt Lake City, buy weed cocaine in St. Louis, buy weed cocaine in Colorado springs, buy weed cocaine in Kuwait, buy weed cocaine in Damascus, buy weed cocaine in Riyadh, buy weed cocaine in Beirut, buy weed cocaine in Madison, buy weed in Honolulu, buy weed in Fresno, buy weed in El Paso, buy weed in Tulsa, buy cocaine in Cappadocia, buy cocaine in Dahab, buy cocaine in Tel Aviv, buy cocaine in Muscat, Buycocaine in Cairo, buy cocaine in Jerusalem, buy cocaine in Manama, buy cocaine in Petra, buy cocaine in Doha, buy cocaine in Dubai, buy cocaine in Istanbul
Buy Bulk PSYCHEDELIC,MDMA,CRYSTAL METH,DMT Carts,Researched Chemica
Buy Bulk PSYCHEDELIC,MDMA,CRYSTAL METH,DMT Cart,LSD,METH,THC Vape,CBD, Marijuana/Cannabis,Xanax,Molly,Weed,OXY,Crystal Ketamine,Ecstasy, Researched Chemicals, Magic mushroom,Adderall,Hash,Wax,Edibles,Pre-rolls, online.
we are leading suppliers of the highest quality pharmaceuticals, research chemicals,Marijuana/Cannabis and painkillers pills and tablets etc. we ship worldwide. Please include your contact number when placing your order. We sell in small/bulk quantities, with guaranteed discreet delivery on time.
Email…([email protected])
Signal.. +(34)607218704)
Signal..(@Realjames.39)
Whatsapp..+(237)672564181)
whatsap/Signal.. +(34)607218704)
#GBL,GHB,BDO
#Ketamine(FOR DEPRESSION)
#Xanax.Pfizer Long Rods
#Fentalyn Patches
#Nembutal(tablets,liquid and powder)
#Klonopin
#LSD
#valium
#Hash
#Edibles
#Pre-rolls
#Nembutal
#Ativan
#Dilaudid
#AMBIEN
#Oxycontin
#Percocet
#CBD
#THC
#Wax
#THC vapes
#Dmt
#MDMA
#Weed
#Molly
#Adderall
#Researched Chemicals
#Crystal Ketamine
#Marijuana
#Cannabis
#TEMAZEPAM
#Ecstasy
#Cocaine
#ZOPICLONE
#TRAMADOL
#Roxycodone
#Mushrooms
#Quaaludes-Methaqualone Tablets
CONTACT ———————Email…([email protected])
Signal..(@Realjames.39)
Whatsapp..+(237)672564181)
whatsap/Signal.. +(34)607218704)
Understanding Pain Medications: Options, Uses & Safety
Pain is one of the most common reasons people seek medical care. Whether acute after surgery or injury, or chronic due to conditions like arthritis or neuropathy, effective pain management is essential for quality of life. Pain medications range from over-the-counter options to powerful prescription drugs — each with unique benefits and risks.
In this article, we’ll explore how pain medications work, when they’re used, and provide an overview of some of the strongest painkillers prescribed in the United States. Note: This is educational and not medical advice. Always consult a healthcare provider before using prescription pain medication.
DRUGS CONTROL BY DR JASON
How Pain Medications Work
Pain medications, or analgesics, target pain through different mechanisms:
Peripheral Pain Relievers
These reduce inflammation at the site of injury or irritation:
NSAIDs (e.g., ibuprofen, naproxen)
Central Pain Modulators
These act on the central nervous system (spinal cord/brain) to alter pain perception:
Opioids
Certain antidepressants and anticonvulsants (for neuropathic pain)
Adjuvant Medications
Used alongside primary painkillers:
Muscle relaxants
Steroids
Topical agents
RESEARCH Chemicals USED ONLY FOR RESEARCH PURPOSES
Categories of Pain Medications
Category
Typical Use
Example Medications
Over-the-Counter (OTC)
Mild pain
Acetaminophen, ibuprofen
NSAIDs (Prescription)
Moderate pain/inflammation
Celecoxib, diclofenac
Opioids (Prescription)
Moderate–severe pain
Morphine, oxycodone
Adjuvants
Neuropathic or muscle pain
Gabapentin, pregabalin
10 of the Strongest Painkillers Used in the USA
Below are powerful prescription pain medications typically reserved for severe pain, acute surgical pain, cancer pain, or end-of-life care. Their use must be medically supervised due to risk of side effects and dependence.
1. Fentanyl
One of the most potent opioids available; used in severe pain and anesthesia.
Forms: patches, lozenges, injectables.
2. Hydromorphone (Dilaudid)
Stronger than morphine; used in acute severe pain, including cancer pain.
3. Methadone
Long-acting opioid used for pain and addiction treatment; complex dosing requires specialist oversight.
4. Oxycodone (OxyContin, Percocet)
Commonly prescribed for moderate-to-severe pain; often combined with acetaminophen.
5. Morphine
A classic opioid for severe pain, especially in hospital and palliative care settings.
6. Oxymorphone
Stronger than oxycodone, used in severe pain management.
7. Hydrocodone (Vicodin, Norco)
Widely used for moderate to severe pain; typically combined with acetaminophen.
8. Tapentadol (Nucynta)
Opioid-like pain reliever with additional nerve-pain relief properties.
9. Buprenorphine
Partial opioid agonist; used for chronic pain and opioid dependence.
10. Ketamine (IV/IM)
Not a classic opioid; used in severe pain, anesthesia, and complex pain syndromes, often in controlled settings.
ENJOY IN BED
Important Safety Considerations
Even the strongest painkillers carry risks:
Respiratory depression
Dependence & addiction
Sedation & cognitive impairment
Constipation & nausea
Safe use tips:
Use exactly as prescribed.
Avoid combining with alcohol or sedatives.
Discuss history of substance use with your clinician.
Never share prescription painkillers.
Alternatives & Adjuncts to Strong Painkillers
Healthcare providers may recommend:
Physical therapy
Nerve blocks or injections
Non-opioid medications (antidepressants, anticonvulsants)
Cognitive-behavioral strategies
Topical analgesics
Conclusion
Pain medications — from OTC options to powerful prescription drugs — play a vital role in care. Strong opioids like fentanyl, hydromorphone, and morphine are invaluable for severe pain but require careful medical supervision due to their potency.
At JASON Pharmaceuticals, we emphasize safe, informed pain management and encourage ongoing dialogue between patients and healthcare providers to tailor treatment plans that balance relief with safety.
PAIN MEDICATIONS, PAIN KILLERS, PAIN RELIEF MEDICINE, BEST PAIN RELIEVER, STRONG PAIN KILLERS, PRESCRIPTION PAIN MEDS, OVER THE COUNTER PAIN RELIEF, CHRONIC PAIN TREATMENT, ACUTE PAIN RELIEF, FAST ACTING PAIN RELIEF, IBUPROFEN TABLETS, ACETAMINOPHEN DOSAGE, PARACETAMOL TABLETS, NAPROXEN SODIUM, ASPIRIN FOR PAIN, ANTI INFLAMMATORY DRUGS, NSAIDS FOR PAIN, HEADACHE RELIEF MEDICINE, FEVER AND PAIN MEDICINE, MUSCLE PAIN RELIEF PILLS, PRESCRIPTION PAINKILLERS, OPIOID PAIN MEDICATION, NARCOTIC PAIN RELIEVERS, STRONGEST PRESCRIPTION PAINKILLER, PAIN MANAGEMENT DRUGS, CONTROLLED PAIN MEDICATION, POST SURGERY PAIN MEDICINE, SEVERE PAIN TREATMENT DRUGS, CHRONIC PAIN PRESCRIPTIONS, DOCTOR PRESCRIBED PAIN MEDS, OXYCODONE TABLETS, HYDROCODONE PILLS, MORPHINE SULFATE, FENTANYL PATCHES, HYDROMORPHONE DILAUDID, METHADONE FOR PAIN, OXYMORPHONE TABLETS, TRAMADOL MEDICATION, TAPENTADOL NUCYNTA, BUPRENORPHINE PAIN PATCH, CODEINE TABLETS, PERCOCET DOSAGE, NORCO MEDICATION, VICODIN TABLETS, OPIOID PAIN RELIEF DRUGS, STRONG NARCOTICS FOR PAIN, CANCER PAIN MEDICATION, PALLIATIVE CARE PAIN DRUGS, HOSPITAL PAIN MANAGEMENT, EXTENDED RELEASE OPIOIDS, BACK PAIN MEDICATION, ARTHRITIS PAIN RELIEF, JOINT PAIN TREATMENT, NERVE PAIN MEDICATION, NEUROPATHY PAIN MEDICINE, MIGRAINE PAIN RELIEF, TOOTHACHE PAIN KILLERS, MENSTRUAL CRAMPS MEDICINE, MUSCLE RELAXERS FOR PAIN, FIBROMYALGIA PAIN RELIEF, SCIATIC NERVE PAIN MEDICATION, POST OPERATIVE PAIN CONTROL, SPORTS INJURY PAIN TREATMENT, INFLAMMATION PAIN MEDICINE, LOWER BACK PAIN PILLS, GABAPENTIN FOR NERVE PAIN, PREGABALIN LYRICA, DULOXETINE FOR PAIN, AMITRIPTYLINE PAIN RELIEF, TOPICAL PAIN CREAM, LIDOCAINE PATCHES, DICLOFENAC GEL, KETAMINE THERAPY PAIN, STEROID INJECTIONS PAIN, MUSCLE RELAXANT MEDICATION, BUY PAIN MEDICATION ONLINE, AFFORDABLE PAIN MEDS, PHARMACY PAIN RELIEF PRODUCTS, TRUSTED ONLINE PHARMACY, PAIN MEDICATION DELIVERY, SAME DAY PRESCRIPTION MEDS, DISCOUNT PAIN MEDICINE, REFILL PRESCRIPTION PAINKILLERS, BEST PHARMACY FOR PAIN MEDS, SAFE PAIN MEDICATION OPTIONS, HOW TO RELIEVE PAIN FAST, WHAT IS THE STRONGEST PAINKILLER, PAIN RELIEF NEAR ME, PAIN MANAGEMENT CLINIC, PAIN CONTROL TREATMENT, CHRONIC PAIN SOLUTIONS, SEVERE PAIN MEDICATION OPTIONS, FAST PAIN RELIEF TABLETS, MEDICAL PAIN THERAPY, BEST MEDICINE FOR BODY PAIN, PAIN TREATMENT FOR ADULTS, PRESCRIPTION DRUGS FOR PAIN RELIEF, ADVANCED PAIN MANAGEMENT, LONG LASTING PAIN RELIEF, PROFESSIONAL PAIN CARE PHARMACY
CONTACT ———————Email…([email protected])
Whatsapp..+(237)672564181)
Signal..(@Realjames.39)
whatsap/Signal.. +(34)607218704)
CONTACT ———————Email…([email protected])
Signal..(@Realjames.39)
Whatsapp..+(237)672564181)
whatsap/Signal.. +(34)607218704)
Buy Ketamine KLC , U-47700,opiates,Opium , Heroine , Cocaine, Potassium cyanide , Potassium Chloride, mdma , apvp , mdpv THC vapes, ADHD,Pharmaceutical products, Magic mushroom, weed,Researched Chem. etc
Chemicals DMT VAPE CARTRIDGES, PSILOCYBIN MUSHROOM CHOCOLATE BARS crafted to provide an unforgettable journey
through taste and sensation.
Buy Best Ghost Carts
Buy Big Chiefs Carts
Buy Delta 8 THC? Disposable Vape Carts
Buy Ace Ultra premium 2g disposable
Buy Muha Meds Disposable carts
Buy Big Chief – Disposable
Buy Push Vape carts
Buy Alien Labs Carts
Buy Mad Labs Cartridges
Buy pre rolls marijuana online
Buy PLUGPLAY weed online
Buy mushroom chocolate bars
Buy Mad Labs weed online
Buy kushy punch weed online
Order Kiva marijuana carts online
Buy Jeeter weed carts online
Buy Flave vape carts online
Buy disposable vape pens carts online
Buy Dime industries carts online
Buy Dabwoods vape cats online
Buy CBD Vape online
Buy Cake Disposable carts online
Buy Blinkers disposable vape carts online
Buy Polka Dot Chocolate
Buy Trippy flip chocolate bar Online
Buy Muha Meds Disposable carts
CONTACT ———————Email…([email protected])
Signal..(@Realjames.39)
Whatsapp..+(237)672564181)
whatsap/Signal.. +(34)607218704)
Buy Meth, coke, ketamine Adderall Diazepam, Tramadol, Xanax, GBL, GHB, Nembutal, Carfentanil, Suboxone and more.
Buy benzodiazepines, research chemicals ADHD and opiates online
Buy cannabinoids, buy synthetic cannabinoids, buy 5cladba online, 6cladba for sale. Delivery/Shipping
rohypnol 1 mg K2 paper/spray online at cheap price, Buy K2 Spice Sheets, Buy K2 Spray/liquid online,Buy 6cladba,Buy 5cladba,Buy
jwh-018, ZOPICLONE, TRAMADOL, LSD Vials, shrooms, LEXAUR, GABAPENTIN, XANAX, TEMAZEPAM, Metonitazene and more
Buy GHB,BDO,GBL Gamma-Butyrolactone for sale . GBL Supplier Amongst Many Other Products
Buy PSYCHEDELIC, MDMA, CRYSTAL METH, DMT Carts, LSD, METH, THC Vape, CBD, Marijuana/Cannabis, Xanax, Molly, Weed, OXY, Crystal Ketamine, Ecstasy, Researched
Buy pure cocaine online
Buy magic mushrooms
buy 2c-b online or purchase 2c-i online
Buy 2CB Powder Online
Buy 2C b Fly Online
Buy MDMA Crystals Online
How to buy MDMA Crystals online
Buy PCP Powder Online
Buy DMT Online
Buy PCP liquid Online
Buy LSD Gel Tabs Online
Buy Ketamine Powder Online
Buy 5 MEO DMT Online
Buy PCP liquid Online
Buy LSD VIAL (LIQUID LSD) Online
WHERE TO BUY LSD VIAL (LIQUID LSD)
Buy Ayahuasca Kit Online
Buy LSD Sheet Online
Buy 2CB pills Online
Magic Mushroom Edibles – Buy Shroom Edibles Online in USA
Salvinorin for sale
Buy LSD Gummies Online
buy iboga powder
Buy Amanita Muscaria Online
buy Ecstasy online
buy-mandrax-online/buy-strongtropin-online/buy-jintropin-online
Buy DMT Powder Online
Buy 3MCC online
Buy 4MMC Online – 3MMC for Sale, Buy Mephedrone Online
Buy Top quality GHB BDO GBL gamma Butyrolactone wheel cleaner
Buy K2 Spray, Buy K2 Spice, K2 paper sheet, K2 Liquid
Buy Peptides for Scientific Research and Development
Buy banknotes online
Buy clone cards online
Buy passports and license online
Abortion pills for sale
weed both indicative an sativa avaliable
Big Buddha Cheese
Fruity Pebbles OG
Northern Light’s
*Purple Space Cookies
* Sapphire Handle
•Moonrock
•cali kush
•LSD
•Shroom
•MDMA
•Pain and anxiety pills
•Crystals
•Heroine
•Vape pens
!!Both indica and sativa (free rolling papers)
!! vapes – carts – etc.
Dexies
Coke(top purity)
Shard
Pills
M.D.
LSD
Shrooms
MDMA
heroine
Ket
Oxycodone
Xanax
Heroine
Codeine
Ozempic, Mounjaro Wegovy, Sexenda, peptides all weight lose and gain products available.PM Now 🤝
Adderall,Oxycodone,LSD,MDMA,XTC,METH,Codeine,Xanax,MSJS,Tamazepam Gel,Pregablin,Diazepam,Zopiclone,Tramadol,Viagra,Nitrazepam,percocet,Speed,Ketamine,Heroin,Mephedrone,Vape
DMT vapes
THC Oil
Counterfeit banknote and
Clone cards
Fast and discrete delivery
HOME CIGAR FIR SALE WORLDWIDE DELIVERY
ABOUT CUBAN CIGARS
SHOP
BOLIVAR
COHIBA
CUABA
H. UPMANN
MONTECRISTO
PARTAGAS
ROMEO Y JULIETA
CART
SERVICES
BLOG
CONTACT ———————Email…([email protected])
Whatsapp..+(237)672564181)
Signal..(@Realjames.39)
whatsap/Signal.. +(34)607218704)
Buy Peptides and Retatrutide Online
Buy Oxycodone
Buy Ritalin 20 mg
Buy Adderall 20 mg
Buy Oxycodone 40-80 mg
Buy Diazepam (Valium) 10 mg
Buy Xanax 2 mg
Buy Dilaudid 8 mg
Buy Hydrocodone 500 mg
Buy Percocet 10 mg
Buy MDMA 50 mg
Buy Tramadol 100 mg
Buy Suboxone in 8 mg strips or pills.
Buy Rohypnol 20 mg
Buy Tilidin 100/8 mg
Buy Concerta XL 18-36 mg
Buy Morphine 15 mg
Buy Opana 10 mg
Buy Oxynorm 20 mg
Buy Mandrax (Quaalude) 300 mg
Buy Codeine Syrup… in a 43 g bottle!!! Buy Lortab Watson 7.5 mg
Buy Dilaudid 8 mg
Buy Viagra 300 mg
Buy high-quality marijuana
General Support Contact
CONTACT ———————Email…([email protected])
Signal..(@Realjames.39)
Whatsapp..+(237)672564181)
whatsap/Signal.. +(34)607218704)
100 mg Fentanyl Patches… 4 Packs!!! Stilnox 10 mg
Viagra 1000 mg
Subutex 8 mg
Lyrica 300 mg
Vicodine 5-10 mg
Seconal 15 mg
Dexedrine 15 mg
Morphine
Xanax
Diazepam
Methadone
Oxycodone
Heroin
Percocet
Subutex
Hydrocodone
Methadone
Lyrica
Adderall
Diazepam
Roxycodone
Rohypnol
Vicodin
Coca-Cola
Heroin
Get all your orders delivered right away. Contact our support team.
CONTACT ———————Email…([email protected])
Signal..(@Realjames.39)
whatsap/Signal.. +(34)607218704)
Whatsapp..+(237)672564181)
BUY PEPTIDES,RETATRUIDE,OZEMPIC,SEXANDA,WEGOVEY BOTOX,GHB,CIALIS AND ALL TYPES OF WEIGHT LOSE SUPPLEMENTS ONLINE IN USA,UK,GERMANY,AUSTRALIA,SAUDI ARABIA EUROPE.
Contact General support
Email:::([email protected])
Signal:::(@Realjames.39)
whatsap/Signal::+(34)607218704)
Whatsapp:::::+(237)672564181)
Retatrutide available in bulk
High Quality weight loss products at affordable prices
#Retatrutide #mounjaro #weightlossgoals #mounjaroweightloss #ozempicaustralia #Retatrutide #weightlosstransformation #saxendaweightloss #saxendauk #weightlosstips #weightloss #weightlossjourney #saxendajourney #saxendaforweightloss #ozempic #ozempicbrasil #weightlossmotivation #ozempicweightloss #saxenda #saxendainjections #ozempicjourney #mounjarojourney #weight #wegovy #wegovyweightloss #obesitytreatment #obesitymedicine #obesityawareness #obesity #obesitykills #lossweightsafely #Zepbound #zepbound
Buy Injectable Steroids
Buy Boldeplex 200mg Online
Buy Blend 2 Mutant Pharma Online
Buy Steroids Online
Buy Xt Labs Steroids Online
Buy Cardarine Cooper Pharma Online
Anavar Fem For Sale
Cheap Injectable Steroids For Sale
Anavar Wescott For Sale Online
High Quality Ligandrol For Sale
Buy Testosterone Enanthate online
Buy Testosterone Cypionate Online
Buy Anabolic Steroid Cycles
Buy Anabolic Steroids Online
Buy Propandrol Testosterone P 100 Mg Balk
Buy Dianabol Wescott Online
Ostarine Mk-2866 For Sale
Buy Sustanon Wescott On-line
ORAL:
#aromasin
#anadrol
#anavar
#clomid
#cialis
#dianabol
#danabol
#provided
#metribolone
#novaldex
#superdrol
#turinabol
#winstrol
#arimidex
#clenbuterol
INJECTABLES:
#testosterone
#trenbolone
#sustanon
#decanoate
#boldenone
#team
#masterone
#primobolan
SARMS:
#AICAR
#ANADRONE
#LGD4033
#MK677
#MK-2866
#RAD-140
HGH:
#GENOTROPIN
#SOMATROPIN
#HUMATROP
#KEIFEI
For weight loss
Ozempic
Saxenda
Mounjaro
Rybelsus
Botox
action
Contact General support
Email:::([email protected])
Signal:::(@Realjames.39)
whatsap/Signal::+(34)607218704)
Whatsapp:::::+(237)672564181)
Are online peptides legal to purchase
What peptides are in retatrutide
What peptide works like Ozempic
Is retatrutide available in the USA
Buy peptides and retatrutide online usa
Best place to buy peptides and retatrutide online
Best place to buy Retatrutide online
Best place to buy Retatrutide peptides
Best place to buy peptides online
Where to buy peptides on-line
Retatrutide research peptide for sale
Retatrutide peptide 20 mg price
Can you legally buy peptides online IN USA
What are the top 5 peptides IN UK
Are peptides easy to buy IN GERMANY
Are peptides worth buying IN EUROPE
Best place to buy peptides online
Best place to buy peptides online in USA
Buy peptides online in usa
Bachem peptides
Buy peptides online for weight loss
MJ peptides
Buy peptides online Tirzepatide
Best place to buy peptides online for weight loss
Where is the best place to buy peptides in the UK?
Is it legal to buy peptides in the UK?
Are peptides safe to take in the UK?
Can you get peptide injections in the UK?
Pure peptides UK
Peptide Sciences UK
Peptides Lab UK
UK peptides Direct
UK Peptides review
Best peptides UK
Oral peptides UK
Oxford Peptides UK
Can you get tirzepatide in the UK
How effective is retatrutide for weight loss
Can I buy orlistat over the counter in the UK
Is retatrutide approved by the FDA
Where can i buy retatrutide online in uk
Buy retatrutide online in uk nhs
Where can I buy Retatrutide online
Buy retatrutide online in uk cheap
Best place to buy retatrutide online in uk
Retatrutide pen where to buy
Retatrutide price UK
Retatrutide weight loss buy
Contact General support
Email:::([email protected])
Signal:::(@Realjames.39)
whatsap/Signal::+(34)607218704)
Whatsapp:::::+(237)672564181)
CONTACT ———————Email…([email protected])
Signal..(@Realjames.39)
Whatsapp..+(237)672564181)
whatsap/Signal.. +(34)607218704)
Best place to buy GHB/BDO/Gbl online in Telscombe UK #texas #homosexuality #lgbtqcommunity #lgbtqpride #party #dallas #pride #dallasrapper #puppylife #incognito #terapiaonline #incognitomode #dallastexas #GayBar #lgbt #UK #unitedkingdom #Liverpool #gaylondon #gayliquid #gblgammabutyrolactone #ukpride #besexualbehealthy #prep #chemsex #gay #drogas #n #instagay #sexodrogasyt #lgbtqia #queer #vih #harmreduction #saludsexual #educacionsexual #sexoquimico #harmreductionsaveslives
buy gbl (gamma-butyrolactone) online
buy gamma butyrolactone uk
gamma-butyrolactone buy usa
gamma butyrolactone buy canada
gamma-butyrolactone buy australia
gamma-butyrolactone buy
gamma butyrolactone buy online
gamma-butyrolactone in bacteria
gamma-butyrolactone in wine
gamma-butyrolactone for sale
gamma butyrolactone products
gamma butyrolactone cleaner
gamma butyrolactone suppliers uk
gamma butyrolactone buy
gamma butyrolactone uk
gamma butyrolactone products uk
gamma butyrolactone sds
gamma butyrolactone amazon
gamma butyrolactone australia
gamma butyrolactone alibaba
gamma-butyrolactone and 1 4 butanediol
gamma butyrolactone anhydrous
gamma butyrolactone aldrich
gamma butyrolactone abuse
gamma-butyrolactone ar
gamma butyrolactone bunnings
gamma butyrolactone boiling point
gamma butyrolactone buy online
gamma-butyrolactone buy australia
gamma butyrolactone basf
Gbl Gamma-Butyrolactone wheel cleaner for sale in Townsvill,Australia
Gbl Gamma-Butyrolactone wheel cleaner for sale inNewcastle,Australia
Gbl Gamma-Butyrolactone wheel cleaner for sale in Launceston,Australia
Gbl Gamma-Butyrolactone wheel cleaner for sale in Queanbeyan,Australia
Gbl Gamma-Butyrolactone wheel cleaner for sale in Bendigo,Australia
Gbl Gamma-Butyrolactone wheel cleaner for sale in Ballarat,Australia
Gbl Gamma-Butyrolactone wheel cleaner for sale in Mackay,Australia
Gbl Gamma-Butyrolactone wheel cleaner for sale in Bunbury,Australia
Gbl Gamma-Butyrolactone wheel cleaner for sale in Cyprus
Gbl gamma butyrolactone wheel cleaner for sale in Queensland Australia
Gbl gamma butyrolactone wheel cleaner for sale in Hervey bay Australia
Gbl gamma butyrolactone wheel cleaner for sale in Burliegh head Australia
Gbl gamma butyrolactone wheel cleaner for sale in Hamilton island Australia
Is butanediol illegal?
Can you buy GBL in Australia?
gbl drug for sale
what is gbl trafficking
gbl overdose
gbl bodybuilding
gbl uk
how to extract gbl
gbl legality
gamma-butyrolactone buy australia
gbl cleaner bunnings
what is gbl drug used for
blue nitro drug
gamma butyrolactone bunnings
fantasy drug effects
g drug urban dictionary
Is it legal to buy GBL?
What products contain GBL?
What is GBL cleaner used for?
1,4-butanediol to gbl
1,4-butanediol buy
1,4-butanediol price
1,4-butanediol dosage
1,4-butanediol suppliers
1,4 butanediol cleaner
how to make 1 4-butanediol
1,4-butanediol uses
Is BDO illegal?
What is the difference between BDO and GHB?
Is possessing GBL illegal?
1,4 butanediol 500ml
buy 1,4-butanediol online usa
1,4 bdo ink cleaner
1,4 butanediol buy uk
1,4 butanediol buy amazon
1,4-butanediol price
buy 1 4 butanediol ebay
1,4-butanediol suppliers
buy 1,4-butanediol online reddit
1,4 butanediol 500ml
buy 1,4-butanediol (bdo)
1,4 butanediol cleaner
1,4 butanediol buy amazon
1,4-butanediol suppliers
1,4 butanediol ebay
1,4-butanediol price
buy 1,4-butanediol online reddit
buy 1,4-butanediol (bdo)
1,4 butanediol ebay
1,4 butanediol 500ml
1,4 butanediol cleaner
1,4-butanediol suppliers
1,4 butanediol buy amazon
how to make 1 4-butanediol
buy 1,4 butanediol cleaner
buy 1,4-butanediol online
1,4 butanediol 500ml
1,4-butanediol price
1,4 butanediol buy amazon
1 4 butanediol ebay
buy 1,4-butanediol online usa
indiana chemical 1,4 butanediol
1,4 butanediol cleaner
gbl cleaner usa
buy gbl online ship to usa
gbl online shop
gbl china
buy 1 4 butanediol ebay
buy gbl in uk
Can you buy GBL in UK?
Can you buy GBL online?
What brands contain GBL?
Is GBL legal in the US?
Can you buy GBL online?
What brands contain GBL?
What cleaning products contain GBL?
buy gbl usa reddit
buy gbl usa
Can you buy GBL in the US?
best place to buy gbl
pure gbl for sale
gbl next day delivery
buy gbl usa
buy gbl online europe
buy gbl with credit card
buy gbl online india
gamma-butyrolactone price
How do you get gamma butyrolactone?
Can I buy GBL in UK?
Is GBL legal?
buy gbl online ship to usa
pure gbl for sale
gamma-butyrolactone products
gamma butyrolactone ebay
how to extract gbl
gamma-butyrolactone synthesis
Is possessing GBL illegal?
gbl next day delivery uk
gamma-butyrolactone for sale uk
where to buy gbl
best place to buy gbl
buy gbl online europe
gamma-butyrolactone suppliers uk
gbl buy online
gamma-butyrolactone uk
best place to buy gbl uk
buy gbl online uk
buy gbl online ship to usa
gbl online shop
gbl suppliers usa
buy gbl cleaner
buy gbl with credit card
where to buy gbl uk
gamma-butyrolactone buy online
gamma-butyrolactone paint remover
buy gbl online europe
best place to buy gbl uk
gamma-butyrolactone price
best place to buy gbl
buy gbl discreetly in usa
buy gbl online india
buy gbl with credit card
gamma-butyrolactone price
how to extract gbl from wheel cleaner
gamma-butyrolactone products uk
buy gbl paypal
buy gbl online usa
best place to buy gbl uk
gbl next day delivery
buy gbl online uk
where to buy gbl uk
buy gbl discreetly in usa
buy gbl eu
buy gbl paypal
cas 7331-52-4
gbl shop china review
gbl cleaner usa
gbl wheel brite review
pure gbl for sale
buy gbl online usa
best place to buy gbl
buy gbl with credit card
gamma-butyrolactone home depot
gamma-butyrolactone products
how to extract gbl
best place to buy GBL Gamma-Butyrolactone Cleaning chemical Online
GBL for sale in Netherland
GBL for sale in Australia
GBL Gamma-Butyrolactone online
GBL for sale in Melbourne
GBL for sale in Lake Conjola
GBL for sale in Northern Ireland
GBL for sale near me
GBL for sale online
GBL for sale in Sydney
GBL for in Perth
GBL for sale in Sydney
GBL for sale in New South Wales
GBL for sale in Queenstown
GBL for sale in Queensland
GBL for sale in Victoria
GBL for sale in western Australia
GBL for sale in Tasmania
GBL for sale in Swan River
GBL for sale in Eastern States of Australia
GBL for sale in Brisbane
GBL for sale in Perth
GBL for sale in Adelaide
GBL for sale in Canberra
GBL for sale in Gold Coast
GBL for sale in Hobart
GBL for sale in Darwin
GBL for sale in Cairns
GBL for sale in Wollongong
GBL for sale in Newcastle
GBL for sale in Geelong
GBL for sale in Townsville
GBL for sale in Launceston
GBL for sale in Ballarat
GBL for sale in Bendigo
Best place to buy GBL Gamma-Butyrolactone online
GBL for sale near me
GBL for sale online
GBL for sale in Bundaberg centra
GBL for sale in Toowoomba
GBL for sale in Rockhampton
GBL for sale in Wagga Wagga
GBL for sale in Kalgorlie Boulder
GBL for sale in Alice Springs
GBL for sale in Mackay
GBL for sale in Queenbeyan
GBL for sale in orange
GBL for sale in Geraldton
GBL for sale in Mildura
GBL for sale in Dubbo
GBL for sale in Coffs Habbour
GBL for sale in Tamworth
GBL for sale in Denvonport
GBL for sale in Hervey Bay
Trusted GBL vendor
Buy GBL Gamma-Butyrolactone online from secured source
GBL Gamma-Butyrolactone for sale online
GBL for sale in Traralgon
GBL for sale in Bathurst
GBL for sale in Logan city
Buy GBL Gamma-Butyrolactone Alloy wheel cleaner online
Discrete delivery to all locations
gbl supplier in West Melbourne Australia
gbl for sale near Carlton, Australia
1,4 Butanedoil in South Wharf Australia
buy GBL in North Melbourne Australia
southbank Australia
buy GBL online in Fitzroy Australia
Buy GBL online in Parksville Australia
Buy GBL online in South Melbourne
Buy GBL online in Collingwood Australia
Buy GBL online in Carlton North Australia
GBL for sale in Prince hill Australia
gbl Gamma-Butyrolactone
1,4 Butanedoil online in Richmond Australia
buy 1,4 Butanedoil online in Alberrt park
GBL for sale near Cariton
Buy gbl wheel cleaner online in Sydney Australia
Buy gbl wheel cleaner online in Melbourne Australia
Buy gbl wheel cleaner online in carlton Australia
Buy gbl wheel cleaner online in port Melbourne Australia
Buy gbl wheel cleaner online in East Melbourne Australia
Buy gbl wheel cleaner online in Docklandsb Australia
Buy gbl wheel cleaner online in south Yarra Australia
Buy gbl wheel cleaner online in west Melbourne Australia
Buy gbl wheel cleaner online in North Melbourne Australia
Buy gbl wheel cleaner online in Fitzroy Australia
Buy gbl wheel cleaner online in Collingwood Australia
Buy gbl wheel cleaner online in parkville Australia
Buy gbl wheel cleaner online in Brighton Australia
Buy gbl wheel cleaner online in carton north Australia
Buy gbl wheel cleaner online in frankston Australia
Buy gbl wheel cleaner online in Sunbury Australia
Buy gbl wheel cleaner online in Camberwell Australia
Buy gbl wheel cleaner online in moonee valley city Australia
Buy gbl wheel cleaner online in northcote Australia
Buy gbl wheel cleaner online in Alexandria Australia
Buy gbl wheel cleaner online in Annandale Australia
Buy gbl wheel cleaner online in barangaroo Australia
Buy gbl wheel cleaner online in Beaconsfield
Buy gbl wheel cleaner online in camperdown Australia
Buy gbl wheel cleaner online in centennial park Australia
Buy gbl wheel cleaner online in Chippendale
Buy gbl wheel cleaner online in darlinghurst
Buy gbl wheel cleaner online in Darlington
Buy gbl wheel cleaner online in Dawes point
Buy gbl wheel cleaner online in Elizabeth bay
GBL for sale near Docklands
GHB for sale in East Melbourne
GBL/GHB for sale near north Melbourne
1,4 Butanedoil for sale near Parksville
Buy GBL with Bitcoins online
gbl supplier in Kensington and Flemington
gbl for sale near Port Melbourne
1,4 Butanedoil in Melbourne
buy GBL in South Yarrra west
buy GBL online in Australia
#Australia
GBL for sale in Albany
GBL for sale in Warrnambool
GBL for sale in Busselton
GBL for sale in Gladstone Central
GBL for sale in Albury Wodonga
GBL for sale in Nowra
GBL for sale in Lismore
GBL for sale in Broken Hill
GBL for sale in Whyalla
GBL for sale in Port Macq
3-hydroxy-gamma-butyrolactone
Can you buy GBL in the US?
Is it legal to buy GBL?
Where is GBL found?
Is gamma butyrolactone illegal?Can you still buy GBL?Is GBL legal?
What is GBL cleaner?
Where can I buy gbl wheel cleaner online
Where can I buy gbl wheel cleaner in usa
Where can I buy gbl wheel cleaner in Canada
Where can I buy gbl wheel cleaner in Australia
Where can I buy gbl in New Zealand
Cleaning products
Wheel cleaner chemicals
Gbl online shop
Legit gbl wheel cleaner shop online
Where can I buy gbl in california
Where can I buy gbl wheel cleaner in Texas
Where can I buy gbl wheel cleaner in New York
Where can I buy gbl wheel cleaner in Alabama
Where can I buy gbl wheel cleaner in Florida
Where can I buy gbl wheel cleaner in Washington
Where can I buy gbl wheel cleaner in Michigan
Where can I buy gbl wheel cleaner in NJ
Where can I buy gbl wheel cleaner in SC
Where can I buy gbl wheel cleaner In NC
Where can I buy gbl wheel cleaner in Canada
Where can I buy gbl wheel cleaner In UNITED STATE
Where can I buy gbl wheel cleaner DENMARK
GBL WHEEL CLEANER
CONTACT ———————Email…([email protected])
Signal..(@Realjames.39)
Whatsapp..+(237)672564181)
whatsap/Signal.. +(34)607218704)
GBLBDO GHB Wheel cleaner 2L GBL Wheel cleaner 3L GBL Wheel cleaner BUY GBL ONLINE
Buy gbl online usa,
Buy GBL Payment via Paypal
buy gbl use Paypal
buy gbl online pay via Paypal.
Buy GBL online ship to usa
Pure GBL for sale
Best place to buy GBL
Top car cleaners gbl
Best cleaner for inside car
Best car carpet cleaner
Best car fabric cleaner
Best car glass cleaner
Best car leather cleaner
Best cleaner for car interiors
Best car wheel cleaner
Best car mat cleaner
Best car cleaning products 2022
Best car cleaning products 2022
Professional car cleaning products
Car cleaner interior
Best home car wash System
Car Cleaner Spray
Gbl car
Best car cleaning products UK 2022
GBL cleaner
Griot’s Garage Wheel Cleaner GBL
Gold car cleaner GBL
How to extract GBL from wheel cleaner
Gbl car
Buy GBL online
Magic cleaner gbl reddit
GBL magic cleaner
GBL Europe
GBL wheel cleaner reviews
GBL graffiti remover
Gamma-butyrolactone buy
GBL next day delivery
CONTACT ———————Email…([email protected])
Signal..(@Realjames.39)
Whatsapp..+(237)672564181)
whatsap/Signal.. +(34)607218704)
GBL,GHB,Cocaine,mdma,Crystal Meth,DMT,LSD,METH,ketamineGBL,GHB,Cocaine,mdma,Crystal Meth,DMT,LSD,METH,ketamineGBL,GHB,Cocaine,mdma,Crystal Meth,DMT,LSD,METH,ketamineMephedrone for sale online,
Mephedrone for sale online ARGENTINA,
Mephedrone for sale online AUSTRALIA,
Mephedrone for sale online CANADA,
Mephedrone for sale online EUROPE,
Mephedrone for sale online FRANCE,
Mephedrone for sale online GERMANY,
Mephedrone for sale online ITALY,
Mephedrone for sale online NEWZEALAND,
Mephedrone for sale online PORTUGAL,
Mephedrone for sale online RUSSIA,
Mephedrone for sale online SPAIN,
Mephedrone for sale online UAE,
Mephedrone for sale online UK,
Mephedrone for sale online USA,
Mephedrone online,
buy Mephedrone online ARGENTINA,
buy Mephedrone online AUSTRALIA,
buy Mephedrone online CANADA,
buy Mephedrone online EUROPE,
buy Mephedrone online FRANCE,
buy Mephedrone online GERMANY,
buy Mephedrone online ITALY,
buy Mephedrone online NEWZEALAND,
buy Mephedrone online PORTUGAL,
buy Mephedrone online RUSSIA,
buy Mephedrone online SPAIN,
buy Mephedrone online UAE,
buy Mephedrone online UK,
buy Mephedrone online USA,
order Mephedrone online,
order Mephedrone online ARGENTINA,
order Mephedrone online AUSTRALIA,
order Mephedrone online CANADA,
order Mephedrone online EUROPE,
order Mephedrone online FRANCE,
order Mephedrone online GERMANY,
order Mephedrone online ITALY,
order Mephedrone online NEWZEALAND,
order Mephedrone online PORTUGAL,
order Mephedrone online RUSSIA,
order Mephedrone online SPAIN,
order Mephedrone online UAE,
order Mephedrone online UK,
order Mephedrone online USA,
purchase Mephedrone online,
purchase Mephedrone online ARGENTINA,
purchase Mephedrone online AUSTRALIA,
purchase Mephedrone online CANADA,
purchase Mephedrone online EUROPE,
purchase Mephedrone online FRANCE,
purchase Mephedrone online GERMANY,
purchase Mephedrone online ITALY,
purchase Mephedrone online NEWZEALAND,
purchase Mephedrone online PORTUGAL,
purchase Mephedrone online RUSSIA,
purchase Mephedrone online SPAIN,
purchase Mephedrone online UAE,
purchase Mephedrone online UK,
purchase Mephedrone online USA
CONTACT ———————Email…([email protected])
Signal..(@Realjames.39)
Whatsapp..+(237)672564181)
whatsap/Signal.. +(34)607218704)
Buy GBL Gamma-Butyrolactone(Cocaine)(GHB)(Eutylone)(MDMA)(Weed)(Ketamine)(APVP)(ADBB)(5cl-adba)(DMT)(Meth)(Research chemicals)
Contact General support
Email:::([email protected])
Signal:::(@Realjames.39)
whatsap/Signal::+(34)607218704)
Whatsapp:::::+(237)672564181)
Buy Crystal Meth Online Europe – Buy 3MMC – 4MMC Crystals for sale – Buy Research chemicals for sale. We ship discreetly & stealth to individuals & medical Signal::607218704)
Buy tramadol mephedrone,oxycodone,Xanax,Methadone,morphine, ketamine, 4-MMC, MDPV, methylone, amphetamine and more
Buy Research Chemicals Ephedrine hcl JWH-018 2fdck Apvp 3cmc Alprazolam Bromazolam Clonazolam Powder Protonitazene 2CB Mdphp Freebase Buy 5cladba 5cl online(Signal::(34)607218704))
Buy Research chemicals 4-MMC for sale online in Europe – trusted vendor. Buy cheap stimulants and 4-MMC, pay with Bitcoin and Crypto.(Signal::607218704))
Buy 4MMC Mephedrone – We are #1 supplier of Stimulants where you can order 4 MMC online in USA, Canada, UK, Australia.Signal::(34)607218704)
HIGH QUALITY 4MMC MEPHEDRONE. – Energy Control laboratory tested at 99% – High quality – Pure and uncut! 5 Grams – 4MMC Pre-Ban Mephedrone quantity.Signal::607218704)
We are committed to helping customers worldwide with their unique needs by offering them comprehensive and professional service, enjoying a good reputation among our business partners and customers for high quality products, excellent customer service, competitive prices and prompt delivery.Signal::(34)607218704)
We maintain the highest standards not only in the production of our own products but also in the selection of all products we add to our range.Signal::607218704)
We have many years of experience in this industry and have built a reputation as one of the most trusted suppliers in the UK, Europe and the world.Signal::(34)607218704)
We appreciate that there are many different options for you to source your research chemicals, so please read what sets us apart from the rest.Signal::+(34)607218704)
Contact General support
Email:::([email protected])
Signal:::(@Realjames.39)
whatsap/Signal::+(34)607218704)
Whatsapp:::::+(237)672564181)
Buy 4-MMC (Mephedrone Crystal and Powder) Online Without Prescription. 4-MMC is a synthetic entactogenic stimulant of the substituted cathinone class.(Signal::607218704))
BUY 4 MMC MEPHEDRONE ONLINE has been categorized as a synthetic stimulant. This product is also popular under other names, such as 4 MMC Mephedrone.(Signal::(34)607218704))
We are Number 1 Research Chemicals, Pharmaceuticals, Psychedelics, Mushrooms, and many other products on the web. This site is intended for an adult audience …para-Methoxyamphetamine (PMA), also known as 4-methoxyamphetamine (4-MA), is a designer drug of the amphetamine class with serotonergic effects.
Buy Gamma-butyrolactone Gbl Where To Buy Gbl, GBL for salewhere to buy gbl in australia, where to buy gbl in canada,where to buy gbl,can you buy gbl in australia,gbl alloy wheel cleaner Signal::+(34)607218704)
Hot-sale products:
5cl-adba precursor (semi finished )
5cl-adba raw materials
ADBB precursor (semi finished )
ADBB raw materials
APVP powder
Eutylone crystal
ADBB raw materials
Jwh-018 / Jwh210
2fdck New (small and big crystal)
Isotonitazene cas 14188-81-9
Fluetizolam CAS: 40054-88-4
Bromazolam CAS: 71368-80-4
Protonitazene (hydrochloride) CAS: 119276-01-6
Flubrotizolam CAS: 57801-95-3
Metonitazene CAS: 14680-51-4
We specialize in exporting high quality Research chemical, medical intermediate, Pharmaceutical chemicals and so on. Products are exported to USA, Canada, France, Korea, Japan, Russia, Southeast Asia and other countries.
Buy weed in Dubai, Buy weed in Abu Dhabi, Buy weed in Sharjah, Buy weed in Ras Al Khaimah, Buy weed in UAE.Signal::607218704)
Buy Weed, Cocaine, Heroin and Shrooms in France, Germany, Poland Serbia, Romania, Ukraine. Signal::(34)607218704)
Buy Weed, Cocaine, Heroin and Shrooms in Dubai UAE Malaysia Oman Kuwait Bahrain Saudi Arabia Qatar.Signal::+(34)607218704)
Contact General support
Email:::([email protected])
Signal:::(@Realjames.39)
whatsap/Signal::+(34)607218704)
Whatsapp:::::+(237)672564181)
Germany,bestalloy wheel cleaner Europe,alloy wheel cleaner ebay uk,alloys wheels clean up,best alloy wheel cleaner uk,gbl alloy wheelcleaner USA,best alloy wheel cleaner uk 2026,buy gbl online in australia,where to buy gbl in australia,gamma butyrolactone for sale,gamma butyrolactone home depot,where to buy gbl cleaner,how to clean the alloy wheels,alloy wheel cleaner used drug,alloys wheels clean up,best alloy wheel cleaner Ireland,can you buy gbl in australia?buy gbl cleaner,buy gbl in canada, buy gbl in australia,where to buy gbl in canada,best place to buy gbl, buy gbl online usa,where to buy gbl,buy gbl bitcoin,buy gbl,buy gbl online, buy gbl in europe, buy gbl cleaner in australia,buy gbl wheel in cleaner, buy gbl in uk,where to get gamma butyrolactone,products that contain gamma butyrolactone,gamma butyrolactone sold in usa,gamma butyrolactone cleaner,where to buy gbl cleaner,gbl alloy wheel cleaner Germany,best alloy wheel cleaner Europe,alloy wheel cleaner ebay uk,alloys wheels clean up,best alloy wheel cleaner uk,gbl alloy wheel cleaner USA,best alloy wheel cleaner uk 2021,alloy wheel cleaner ebay UAE,good alloy wheel cleaner Australia,bute drugbute drugbute drugbute drugbute drugbute drugbute drug
We sell high-quality products from the best producers.Signal::607218704)
Offered goods are available in the warehouse.Signal::(34)607218704)
Shipments are very well packed.Signal::607218704)
Shipment is always realized at the express pace.Signal::(34)607218704)
We are a legally operating company.bute drugbute drugbute drugbute drug. Signal::+(34)607218704)
You always get a receipt or invoice for the goods purchased.bute drugbute drugbute drugbute drugbute drugbute drugbute drugbuy bute drugbute drugbute drug
Contact General support
Email:::([email protected])
Signal:::(@Realjames.39)
whatsap/Signal::+(34)607218704)
Whatsapp:::::+(237)672564181)
Buy METHYLAMINE HYDROCHLORIDE
Buy 2-BROMOVALEROPHENONE
Buy PROPIOPHENONE
Buy PMK ethyl glycidate
Buy 1-Bromo-5-fluoropentane ≥98.0%
Buy 1-(4-Fluorophenyl)-2-nitropropene ≥97.0% Crystals
Buy 1-Bromopentane
BUY 1-METHYL-2-PYRROLIDONE
Buy 1-Naphthoyl chloride
Buy 1,4-Butanediol ≥99.5%
Buy 2-Bromo 4-methylpropiophenone
Buy 2-Bromo-1-phenylpentan-1-one
Buy 2,4-Dinitrophenol ≥99.9%
Buy 2,5-Dimethoxybenzaldehyde ≥99%
Buy 3-(1-Naphthoyl)indole
Buy 3,4-Methylenedioxyphenyl-2-nitropropene ≥97.0% Powder
Buy 3,4-methylenedioxypropiophenone
Buy 3,4,5-Trimethoxybenzaldehyde ≥98%
buy 4-Fluorobenzaldehyde ≥97.5%
Buy 4-METHYLPROPIOPHENONE
Buy 5-Bromo-1-pentene ≥98.0%
Buy Acetic Acid, ACS Reagent, ≥99.7%
buy Acetone
Buy Acetonitrile, Reagent ACS, ≥99.5%
Buy Ammonium Hydroxide Solution, ACS Reagent, 28.0 – 30.0%
Buy Ammonium Nitrate ACS Reagent
Buy benzaldehyde
Buy Benzocaine Powder ≥99.0%
Buy BMK ethyl glycidate
Buy BMK methyl glycidate
Buy Butyric acid
Buy Chloroform, Reagent ACS, ≥99.8%
Buy Cyclohexylamine ≥99.9%
Buy Dutasteride Powder
Buy Phenyl-2-nitropropene 99.0%
Buy Phosphorus Red
Buy PMK methyl glycidate
Buy Potassium Cyanide 96% ACS Reagent
Buy Pyrrolidine
Buy Tadalafil Powder
nitroethane
nitroethane for sale
nitroethane
nitroethane synthesis
nitroethane buy
nitroethane poland
nitroethane purchase
phenyl nitroethane
piperonal nitroethane
Buy Nitroethane C2H5NO2 CAS: 79-24-3
Buy Nitroethane CAS: 79-24-3
Купити нітроетан CAS: 79-24-3
Нітроетан CAS: 79-24-3
CONTACT US:
Email…([email protected])
Email:([email protected])
Signal:::(@Realjames.39)
whatsap/Signal::+(34)607218704)
Whatsapp:::::+(237)672564181)
BUY ALL TYPES OF GUNS BULLETS ETC,Reloads World, Reloading Primers, 50 BMG Primers, Large Pistol Primers, Large Rifle Primers, Magnum Pistol Primers, Large Pistol Magnum Primers, Small Pistol Magnum Primers, Magnum Rifle Primers, Large Rifle Magnum Primers, Small Rifle Magnum Primers, Shotshell Primers, Small Pistol Primers, Small Rifle Primers, Black Powder, American Pioneer Powder, Elephant Black Powder, Goex Black Powder, Graf Black Powder, Kik Black Powder, Schuetzen Black Powder, Shooters World Black Powder, Skirmish Black Powder, SuperFine Black Rifle Powder, Swiss Black Powder, Black Powder Cannon, Military Surplus Powder, Musket Caps, Percussion Caps, Reloading Manuals, Reloading Presses, Arbor Presses, Area 419 Presses, Dillon Presses, Forster Presses, Hand Presses, Hornady Presses, Lee Presses, Lyman Presses, Mec Presses, Progressive Presses, RCBS Presses, Redding Presses, Shotshell Presses, Single Stage Presses, Turret Presses, Reloading Trays, Smokeless Gunpowder, Accurate Powder, ADI Powder, Alliant Powder, Fort Smith Arms & Ammunition Plant (FSAAP) Propellants, Hodgdon Powder, IMR Powder, Lovex Powder, Norma Powder, Ramshot Powder, Shooters World Powder, Vectan Powder, Vihtavuori Powder, Winchester Powder, #10 Percussion Caps, #11 Percussion Caps, 1 1/2F Black Powder, 1 1/2FG Black Powder, 1.5F Black Powder, 1.5FG Black Powder, 1F Black Powder, 1FG Black Powder, 209 Muzzleloader Primers, 2F Black Powder, 2FG Black Powder, 3F Black Powder, 3FG Black Powder, 4F Black Powder, 4FG Black Powder, Aguila Primers, American Pioneer Powder Sticks, Bench Rest Primers, Berdan Primers, Black Powder Substitutes, Boxer Primers, Cannon Black Powder, CCI Benchrest Primers, CCI Musket Caps, CCI Percussion Caps, CCI Primers, Centerfire Primers, Cheddite Primers, F Black Powder, F.S.A.A.P. ( Fort Smith Arms & Ammunition Plant ) Primers, Federal Black Powder Substitute, Federal Match Primers, Federal Primers, FF Black Powder, FFF Black Powder, FFFF Black Powder, FFFFG Black Powder, FFFG Black Powder, FFFG Black Powder Substitute, FFG Black Powder, FFG Black Powder Substitute, FG Black Powder, FG Black Powder Substitute, Fiocchi Primers, Fort Smith Powders, Fort Smith Primers, Four Wing Musket Caps, FSAAP Powders, FSAAP Primers, Geco Primers, Hodgdon Black Powder Substitute, Hodgdon Pyrodex Powder, Hodgdon Triple Se7en Black Powder Pellets, Inline Muzzleloader Primers, Inline Primers, Jim Shockey Black Powder Sticks, Jim Shockey’s Black Powder, Lead Free Primers, Magnum Percussion Caps, Magtech Primers, Match Primers, Military Primers, Nobel Sport Primers, Olde Eynsford Black Powder, PMC Primers, Reenactor Black Powder, Remington Benchrest Primers, Remington Percussion Caps, Remington Primers, Rio Primers, RWS #11 Percussion Caps, RWS Musket Caps, RWS Percussion Caps, Schuetzen Musket Caps, Sellier and Bellot Primers, Servicios and Aventuras Primers, Six Wing Musket Caps, Swiss Caviar Black Powder, TulAmmo Primers, Unis Ginex Primers, Wano Black Powder, Winchester Match Primers, Winchester Percussion Caps, Winchester Primers, Wolf Primers, ‘Fort Smith’ (FSAAP) .308 & 54R Berdan Primers, ‘Fort Smith’ (FSAAP) 50 BMG Boxer Primers, ‘Fort Smith’ (FSAAP) 7.62×39 Berdan Primers, ‘Fort Smith’ (FSAAP) Large Pistol Boxer Primers, ‘Fort Smith’ (FSAAP) Large Rifle Boxer Primers, ‘Fort Smith’ (FSAAP) Lead-Free Large Pistol Boxer Primers, ‘Fort Smith’ (FSAAP) Lead-Free Small Pistol Boxer Primers, ‘Fort Smith’ (FSAAP) Small Pistol Boxer Primers, ‘Fort Smith’ (FSAAP) Small Rifle Boxer Primers, 1-F Swiss Caviar Ball Black Powder, 1.5-F Swiss Caviar Ball Black Powder, 2-F Swiss Caviar Ball Black Powder, 209 Shotshell – Wolf Performance Primers, 3-F Swiss Caviar Ball Black Powder, Accurate 1680 Smokeless Gun Powder, Accurate 2015 Smokeless Gun Powder, Accurate 2200 Smokeless Gun Powder, Accurate 2230 Smokeless Gun Powder, Accurate 2460 Smokeless Gun Powder, Accurate 2495 Smokeless Gun Powder, Accurate 2520 Smokeless Gun Powder, Accurate 2700 Smokeless Gun Powder, Accurate 4064 Smokeless Gun Powder, Accurate 4100 Smokeless Gun Powder, Accurate 4350 Smokeless Gun Powder, Accurate 5744 Smokeless Gun Powder, Accurate 8700 Smokeless Gun Powder, Accurate LT-30 Smokeless Gun Powder, Accurate LT-32 Smokeless Gun Powder, Accurate MagPro Smokeless Gun Powder, Accurate MR 3100 Smokeless Powder, Accurate Nitro 100 Smokeless Gun Powder, Accurate No. 11FS Smokeless Gun Powder, Accurate No. 2 Smokeless Gun Powder, Accurate No. 5 Smokeless Gun Powder, Accurate No. 7 Smokeless Gun Powder, Accurate No. 9 Smokeless Gun Powder, Accurate Solo 1000 Smokeless Gun Powder, Accurate TCM Smokeless Gun Powder, ADI AR2206H Powder, ADI AR2207 Powder, ADI AR2208 Powder, ADI AR2209 Powder, Aguila Small Pistol Primers #1-1/2 Box of 1000, Alliant 20/28 Smokeless Gun Powder, Alliant 2400 Smokeless Gun Powder, Alliant 410 Smokeless Gun Powder, Alliant American Select Smokeless Gun Powder, Alliant AR-Comp Smokeless Gun Powder, Alliant BE-86 Smokeless Gun Powder, Alliant Blue Dot Smokeless Gun Powder, Alliant Bullseye Smokeless Gun Powder, Alliant Clay Dot Smokeless Gun Powder, Alliant e3 Smokeless Gun Powder, Alliant Extra Lite Smokeless Gun Powder, Alliant Green Dot Smokeless Gun Powder, Alliant Herco Smokeless Gun Powder, Alliant Power Pistol Smokeless Gun Powder, Alliant Power Pro 1200-R Smokeless Powder, Alliant Power Pro 2000-MR Smokeless Gun Powder, Alliant Power Pro 300-MP Smokeless Gun Powder, Alliant Power Pro 4000-MR Smokeless Gun Powder, Alliant Power Pro Varmint Smokeless Gun Powder, Alliant Pro Reach Smokeless Gun Powder, Alliant Promo Smokeless Gun Powder, Alliant Red Dot Smokeless Gun Powder, Alliant Reloder 10X Smokeless Gun Powder, Alliant Reloder 15 Smokeless Gun Powder, Alliant Reloder 16 Smokeless Gun Powder, Alliant Reloder 17 Smokeless Gun Powder, Alliant Reloder 19 Smokeless Gun Powder, Alliant Reloder 22 Smokeless Gun Powder, Alliant Reloder 23 Smokeless Gun Powder, Alliant Reloder 25 Smokeless Gun Powder, Alliant Reloder 26 Smokeless Gun Powder, Alliant Reloder 33 Smokeless Gun Powder, Alliant Reloder 50 Smokeless Gun Powder, Alliant Reloder 7 Smokeless Gun Powder, Alliant Reloder TS 15.5 Smokeless Gun Powder, Alliant Sport Pistol Smokeless Gun Powder, Alliant Steel Smokeless Gun Powder, Alliant Unique Smokeless Gun Powder, American Pioneer Black Powder Substitute 50 Caliber 100Gr Super Sticks 30PK, American Pioneer Black Powder Substitute 50 Caliber 50 Grain Sticks 100PK, American Pioneer FFFg Black Powder Substitute 1 lb, American Pioneer FFFg Black Powder Substitute 100 Grain Pre-Measured Tube 25PK, American Pioneer FFFg Premium Grade Smokeless Gun Powder 1 lb, American Pioneer FFg Black Powder Substitute 1 lb, American Pioneer FFg Black Powder Substitute 100 Grain Pre-Measured Tube 25PK, American Pioneer FFg Premium Grade Smokeless Gun Powder 1 lb, American Pioneer Jim Shockey’s Gold Black Powder Substitute 50 Caliber 150 Grain Sticks 30PK, American Pioneer Jim Shockey’s Gold Black Powder Substitute 50 Caliber 50 Grain Sticks 100PK, American Pioneer Jim Shockey’s Gold FFFg Black Powder Substitute 1 lb, American Pioneer Jim Shockey’s Gold FFg Black Powder Substitute 1 lb, American Pioneer Jim Shockey’s Gold Super Black Powder Substitute 1 lb, American Pioneer Super Black Powder Substitute 1 lb, American Pioneer Super Powder Premium Grade Smokeless Gun Powder 1 lb, Area 419 Zero Reloading Press Gen 2 with 7/8″ Turret Head, Armstrong 6 – Life-sized traditional cannon barrel replica, Blackhorn 209 High Performance Muzzleloading Black Powder, CCI Four Wing Musket Percussion Caps, CCI Large Pistol Magnum Primers #350, CCI Large Pistol Primers #300, CCI Large Rifle 7.62mm NATO-Spec Military Primers #34, CCI Large Rifle Bench Rest Primers #BR2, CCI Large Rifle Magnum Primers #250, CCI Large Rifle Primers #200, CCI Mil-Spec #35 .50 BMG Primers, CCI Percussion Caps #10, CCI Percussion Caps #11, CCI Percussion Caps Magnum #11, CCI Primers #209 Muzzleloading, CCI Primers #209 Shotshell, CCI Primers #209M Shotshell Magnum, CCI Six Wing Musket Percussion Caps, CCI Small Pistol Magnum Primers #550, CCI Small Pistol Primers #500, CCI Small Rifle 5.56mm NATO-Spec Military Primers #41, CCI Small Rifle Bench Rest Primers #BR4, CCI Small Rifle Magnum Primers #450, CCI Small Rifle Primers #400, Cheddite Shotshell Primer #209, CSB-1 Powder (For Pistol like “TiteGroup”), Dillon Precision RL550C Progressive Reloading Press, Dillon Precision XL750 Progressive Reloading Press, Elephant Cannon Black Powder 1lb, Elephant FFFFg Black Powder 1 lb, Elephant FFFg Black Powder 1 lb, Elephant FFg Black Powder 1 lb, Elephant Fg Black Powder 1 lb, Federal Fusion Primers #209 Muzzleloading, Federal Large Pistol Magnum Primers #155, Federal Large Pistol Primers #150, Federal Large Rifle Magnum Primers #215, Federal Large Rifle Primers #210, Federal Premium Gold Medal AR Match Grade Small Rifle Primers #GM205MAR, Federal Premium Gold Medal Large Pistol Magnum Match Primers #155M, Federal Premium Gold Medal Large Pistol Match Primers #150M, Federal Premium Gold Medal Large Rifle Magnum Match Primers #215M, Federal Premium Gold Medal Large Rifle Match Primers #210M, Federal Premium Gold Medal Small Pistol Magnum Match Primers #200M, Federal Premium Gold Medal Small Pistol Match Primers #100M, Federal Premium Gold Medal Small Rifle Match Primers #205M, Federal Premium Primers #209 Muzzleloading, Federal Primers #209A Shotshell, Federal Small Pistol Magnum Primers #200, Federal Small Pistol Primers #100, Federal Small Rifle Primers #205, Federal™ Firestick Muzzleloader Primers – 100 & 120 Grain Triple 8 Powder – 10 Count, Fiocchi Large Pistol Primers, Fiocchi Large Rifle Primers, Fiocchi Primers #209 Shotshell, Fiocchi Small Pistol Magnum Primers, Fiocchi Small Rifle Magnum Primers, Fiocchi Zero Pollution Small Pistol Primers – Lead Free, Fiocchi Zero Pollution Small Rifle Primers Lead Free, Forster Co-Ax Single Stage Reloading Press, Forster Co-Ax XL Single Stage Reloading Press, Frankford Arsenal Precision Single Stage Reloading Press, Frankford Arsenal Precision Turret Reloading Press, FSP-680 Powder (For Rifle like ‘H4198’), FSP-747 Powder (For Rifle like ‘BL-C(2)’), FSP-749 Powder (For Rifle like ‘Reloder 15’), FSP-759 Powder (For Rifle like ‘H380’), Geco – Primers Small Pistol, Geco – Primers Small Rifle, Ginex 50 BMG Primers (Box of 136 Primers), Ginex Small Pistol Primers, Goex Cannon Black Powder 1 lb, Goex Cartridge Black Powder 1 lb, Goex Cowboy Black Powder 1 lb, Goex FFFFg Black Powder 1 lb, Goex FFFg Black Powder 1 lb, Goex FFg Black Powder 1 lb, Goex Fg Black Powder 1 lb, Goex Olde Eynsford 1-1/2F Black Powder 1 lb, Goex Olde Eynsford 1F Black Powder 1 lb, Goex Olde Eynsford 2F Black Powder 1 lb, Goex Olde Eynsford 3F Black Powder 1 lb, Goex Pinnacle FFFg Black Powder Substitute 1 lb, Goex Reenactor Black Powder 1 lb, GRAF CLASSIC BLACK POWDER 1F 1LB 25/CS, GRAF CLASSIC BLACK POWDER 2F 1LB 25/CS, GRAF CLASSIC BLACK POWDER 3F 1LB 25/CS, GRAF CLASSIC BLACK POWDER 4F 1LB (PRIMING) 25/CS, GRAF CLASSIC BLACK POWDER REENACTOR 1LB 25/CS, Gray Ops CNC Block Aluminum Reloading Tray, Hodgdon 2025 Annual Reloading Manual, Hodgdon Benchmark Smokeless Gun Powder, Hodgdon BLC2 Smokeless Gun Powder, Hodgdon CFE 223 Smokeless Gun Powder, Hodgdon CFE BLK Smokeless Gun Powder, Hodgdon CFE Pistol Smokeless Gun Powder, Hodgdon Clays Smokeless Gun Powder, Hodgdon H1000 Smokeless Gun Powder, Hodgdon H110 Smokeless Gun Powder, Hodgdon H322 Smokeless Gun Powder, Hodgdon H335 Smokeless Gun Powder, Hodgdon H380 Smokeless Gun Powder, Hodgdon H414 Smokeless Gun Powder, Hodgdon H4198 Smokeless Gun Powder, Hodgdon H4350 Smokeless Gun Powder, Hodgdon H4831 Shortcut Smokeless Gun Powder, Hodgdon H4831 Smokeless Gun Powder, Hodgdon H4895 Smokeless Gun Powder, Hodgdon H50BMG Smokeless Gun Powder, Hodgdon H870 Smokeless Gun Powder, Hodgdon Hi-Skor 700-X Smokeless Gun Powder, Hodgdon Hi-Skor 800-X Smokeless Gun Powder, Hodgdon High Gun Smokeless Gun Powder, Hodgdon Hornady LEVERevolution Smokeless Gun Powder, Hodgdon Hornady Superformance Smokeless Gun Powder, Hodgdon HP38 Smokeless Gun Powder, Hodgdon HS6 Smokeless Gun Powder, Hodgdon Hybrid 100V Smokeless Gun Powder, Hodgdon International Smokeless Gun Powder, Hodgdon Lil’ Gun Smokeless Gun Powder, Hodgdon Longshot Smokeless Gun Powder, Hodgdon Perfect Pattern Smokeless Gun Powder, Hodgdon Pyrodex Black Powder Substitute 44 Caliber 30 Grain Pellets Package of 100, Hodgdon Pyrodex Black Powder Substitute 50 Caliber 50 Grain Pellets, Hodgdon Pyrodex P Black Powder Substitute 1 lb, Hodgdon Pyrodex RS Black Powder Substitute 1 lb, Hodgdon Pyrodex Select Black Powder Substitute 1 lb, Hodgdon Retumbo Smokeless Gun Powder, Hodgdon Titegroup Smokeless Gun Powder, Hodgdon Titewad Smokeless Gun Powder, Hodgdon Trail Boss Smokeless Gun Powder, Hodgdon Triple Seven Black Powder Substitute 45 Caliber 50 Grain Pellets (50 Pack), Hodgdon Triple Seven Black Powder Substitute 50 Caliber 30 Grain Pellets (24PK/100PK), Hodgdon Triple Seven Black Powder Substitute 50 Caliber 50 Grain Pellets (24PK/100PK), Hodgdon Triple Seven Black Powder Substitute 50 Caliber Magnum 60 Grain Pellets Package of 50, Hodgdon Triple Seven Black Powder Substitute FFFg, Hodgdon Universal Clays Smokeless Gun Powder, Hodgdon US 869 Smokeless Gun Powder, Hodgdon Varget Smokeless Gun Powder, Hornady Handbook of Cartridge Reloading: 11th Edition Reloading Manual, Hornady Lock-N-Load AP Progressive Reloading Press, Hornady Lock-N-Load Classic Single Stage Reloading Press Kit, Hornady Universal Reloading Tray 50-Round Plastic Red, IMR 3031 Smokeless Gun Powder, IMR 4007 SSC Smokeless Gun Powder, IMR 4064 Smokeless Gun Powder, IMR 4166 Smokeless Gun Powder, IMR 4198 Smokeless Gun Powder, IMR 4227 Smokeless Gun Powder, IMR 4320 Smokeless Gun Powder, IMR 4350 Smokeless Gun Powder, IMR 4451 Smokeless Gun Powder, IMR 4831 Smokeless Gun Powder, IMR 4895 Military Surplus Gunpowder, IMR 4895 Smokeless Gun Powder, IMR 4955 Smokeless Gun Powder, IMR 5010 Military Surplus Gun Powder, IMR 7383 Military Surplus Gunpowder, IMR 7828 Smokeless Gun Powder, IMR 7828 SSC Smokeless Gun Powder, IMR 7977 Smokeless Gun Powder, IMR 8133 Smokeless Gun Powder, IMR 8208 XBR Smokeless Gun Powder, IMR Blue Smokeless Gun Powder, IMR Green Smokeless Gun Powder, IMR PB Smokeless Gun Powder, IMR Red Shotgun / Pistol Military Powder, IMR Red Smokeless Gun Powder, IMR SR4756 Smokeless Gun Powder, IMR SR4759 Smokeless Gun Powder, IMR SR7625 Smokeless Gun Powder, IMR Target Smokeless Gun Powder, IMR Unequal Smokeless Gun Powder, IMR White Hots Black Powder, K&M Arbor Reloading Press, K&M Arbor Reloading Press with Standard Force Pack Full Kit, Kik FFg Black Powder 1 lb, L.E. Wilson Billet Block Aluminum Reloading Tray, L.E. Wilson Precision Arbor Reloading Press, L.E. Wilson Single Stage Reloading Press, Large Pistol – Wolf Performance Primers, Large Pistol Magnum – Wolf Performance Primers, Large Rifle – Wolf Performance Primers, Large Rifle Magnum – Wolf Performance Primers, Lee Breech Lock Hand Reloading Press, Lee Breech Lock Hand Reloading Press Handloader Kit, Lee Breech Lock Reloader Single Stage Reloading Press, Lee Challenger Breech Lock Single Stage Reloading Press Kit, Lee Classic Loader, Lee Load-All 2 Shotshell Reloading Press 12 Gauge 2-3/4″, 3″ with Nobel Powder Bushing, Loadbooks USA Reloading Manual, Lovex D032 Powder, Lovex D040 Powder, Lovex D060 Powder, Lovex D070 Powder, Lyman Brass Smith All-American 8 Station Turret Reloading Press, Lyman Shotshell Reloading Handbook: 6th Edition Reloading Manual, Lyman Ultimate Reloading Press Kit System, Magtech Large Pistol Primers #2-1/2, Magtech Large Rifle Primers #9-1/2, Magtech Small Pistol Magnum Primers No. 5 1/2, Magtech Small Pistol Primers #1-1/2, Magtech Small Rifle Primers #7-1/2, Mark 7 Reloading Apex 10 Progressive Reloading Press, MEC 600 Jr. Mark 5 Single Stage Shotshell Reloading Press 12 Gauge 2-3/4″, 3″, MEC Marksman Single Stage Reloading Press, MR-8600 Military Surplus Gunpowder, MTM Universal Reloading Tray 50-Round Plastic Red, NobelSport Primers #209 Shotshell, Norma 200 Smokeless Gun Powder, Norma 201 Smokeless Gun Powder, Norma 202 Smokeless Gun Powder, Norma 203-B Smokeless Gun Powder, Norma 204 Smokeless Gun Powder, Norma 217 Smokeless Gun Powder, Norma MRP Smokeless Gun Powder, Norma MRP2 Smokeless Gun Powder, Norma R-1 Smokeless Gun Powder, Norma R-123 Smokeless Gun Powder, Norma URP Smokeless Gun Powder, Parrott Rifle – cannon barrel replica, Pirate Cannon Life Size Replica 68.5″, PMC Small Pistol Magnum Primers, PMC Small Rifle Magnum Primers, Ramshot Big Game Smokeless Gun Powder, Ramshot Competition Smokeless Gun Powder, Ramshot Enforcer Smokeless Gun Powder, Ramshot Grand Magnum Rifle Smokeless Gun Powder, Ramshot Hunter Smokeless Gun Powder, Ramshot LRT Smokeless Gun Powder, Ramshot Magnum Smokeless Gun Powder, Ramshot Silhouette Smokeless Gun Powder, Ramshot TAC Smokeless Gun Powder, Ramshot True Blue Smokeless Gun Powder, Ramshot Wild Boar Powder 1lb (454g) Bottle, Ramshot X-Terminator Smokeless Gun Powder, Ramshot ZIP Smokeless Gun Powder, RCBS Rock Chucker Supreme Single Stage Reloading Press, RCBS Summit Single Stage Reloading Press, Redding Big Boss II Single Stage Reloading Press, Redding T-7 Turret Reloading Press, Remington #10 Percussion Caps, Remington #11 Percussion Caps, Remington EtronX Electronic Primers Box of 1000 (10 Trays of 100), Remington Kleanbore 209ML Muzzleloader Primers, Remington Large Pistol Primers #2-1/2, Remington Large Rifle Magnum Primers #9-1/2M, Remington Large Rifle Primers #9-1/2, Remington Premier STS Primers #209 Shotshell, Remington Small Pistol Magnum Primers #5-1/2, Remington Small Pistol Primers #1-1/2, Remington Small Rifle Bench Rest Primers #7-1/2, Remington Small Rifle Primers #6-1/2, Rio 209 G-1000 & G-600 Shotshell Primers, RWS 1055 no.55 Percussion Caps, RWS 1075 Percussion Caps #11, RWS 1075 Plus Percussion Caps #11, RWS 1081 Musket Caps – 4-Flange, RWS 1218 Musket Caps – 6-Flange, SB-620 Pistol Powder, SCHUETZEN BLACK POWDER 1F 1LB 25/CS, SCHUETZEN BLACK POWDER 1LB (REENACTOR) 25/CS, SCHUETZEN BLACK POWDER 2F 1LB 25/CS, SCHUETZEN BLACK POWDER 3F 1LB 25/CS, SCHUETZEN BLACK POWDER 4F 1LB (PRIMING) 25/CS, Schuetzen Four Wing Musket Caps, SchuetzenWano Black Powder 2 FA, SchuetzenWano Black Powder 4 FA, SchuetzenWano Black Powder 5 FA,
CONTACT US:
Email…([email protected])
Signal:::(@Realjames.39)
whatsap/Signal::+(34)607218704)
Whatsapp:::::+(237)672564181)
Suppressor Silencer Shop, Silencer Shop, Suppressor Shop, Silencers for sale, Suppressors for sale, Silencer Suppressor Shop, Suppressed Firearms, Firearms For Sale Online, Any Other Weapon, Suppressed AOWs For Sale, Machine Guns For Sale, Transferable Machine Guns, Short Barrel Rifles For Sale, SBR Rifles For Sale, Short Barrel Shotguns, Short Barrel Shotguns For Sale, Firearms Suppressor Parts, Firearms Suppressor Parts For Sale, Suppressor Barrels, Barrels For Sale, Buttstocks For Sale, Buy Buttstocks Online, Complete Uppers, Complete Uppers For Sale, Buy Complete Uppers Online, Lower Receivers For Sale, Buy Lower Receivers Online, Lower Receivers Parts For Sale, Buy Lower Receivers Parts Online, Gun Magazines For Sale, Gun Clips For Sale, Suppressor Pistons, Suppressor Mounts, Suppressor Thread Adapters, Thread Adapters For Sale, Buy Threaded Barrels Online, Threaded Barrels For Sale, Upper Receiver Parts, Buy Upper Receiver Parts Online, Suppressor Gears, Gun Gears For Sale, Suppressor Pouches, Suppressor Covers, Suppressor Swag, Suppressor Tools, Buy Suppressor Tools Online, Suppressor Services, Suppressor Accessories, Silencer Accessories, Buy Ammunition Online, Ammo For Sale, Ear Protection For Shooting, Ear Protection For Sale, EarPro For Sale, Flash Hiders, Flash Hiders For Sale, Illumination Accessories, Buy Illumination Accessories Online, Knives For Sale, Buy Knives Online, Muzzle Brakes, Muzzle Brakes For Sale, Pistol Accessories, Buy Pistol Accessories Online, Rifle Accessories, Rifle Accessories For Sale, Rimfire Accessories, Buy Rimfire Accessories Online, Shotgun Accessories, Shotgun Accessories For Sale, Buy Suppressors Online, Buy Silencers Online, Large Bore Suppressors, Large Bore Silencers, Multi Caliber Suppressors, Multi Caliber Silencers, Pistol Suppressors, Pistol Silencers, Rifle Suppressors, Rifle Silencers, 556 Suppressors, 223 Suppressors, 223 Silencers For Sale, Buy 556 Silencers Online, 762 Suppressors, 308 Suppressors, 762 Silencers For Sale, Buy 308 Silencers Online, Rimfire Suppressors, Rimfire Silencers, Shotgun Suppressors, Shotgun Silencers, Specialty Suppressors, Specialty Silencers, 1/2-28 TO 5/8-24 ADAPTER, 22LR AR CONVERSION KIT, BRAVO, W/3 MAGAZINES, BLK, 5-Cell Pouch, AAC 300-TM, AAC 51T BLACKOUT FLASH HIDER, AAC 51T S.T.A.M.P. MOUNT, AAC 556-SD, AAC 762-SD, AAC 762-SDN-6, AAC 90T MK13-SD Muzzle Brake, AAC 90T MUZZLE BRAKE, AAC 90t Ratchet Taper Flash Hider, AAC 90t Ratchet Taper Muzzle Brake, AAC CYCLOPS, AAC CYCLOPS MUZZLE BRAKE, AAC ELEMENT 2, AAC Flash Hider Removal Tool, AAC HALCYON, AAC ILLUSION 9, AAC JAEGER 30, AAC M4-2000, AAC MINI-4, AAC MK13-SD, AAC MUZZLE BRAKE 51T RATCHET SUPPRESSOR MOUNT, AAC RANGER 5, AAC RANGER 7, AAC S.T.A.M.P. 51t Mount Adapter, AAC SR-5, AAC SR-7, AAC TI-RANT 45 PISTON, AAC Ti-RANT 45/m Fixed Barrel Spacer, AAC TI-RANT 45M, AAC Ti-RANT 9 / EVO-9 Piston, AAC Ti-RANT 9 / Illusion 9 Fixed Barrel Spacer, AAC TI-RANT 9 PISTON, AAC TI-RANT 9M, AAC TI-RANT 9M HD CONVERSION PISTON, AAC TI-RANT 9M-HD, AAC Ti-RANT Triad 3-Lug Adapter, AAC TITAN-QD, AB F4 – 9MM, AB F4L – 9MM, AB LITTLE BIRD, AB MELB RUGER PRECISION RIMFIRE – .22LR, AB RAPTOR 10 – .338/8.6MM, AB RAPTOR 10 – .375/MULTI-CAL, AB RAPTOR 10 – 7.62MM, AB RAPTOR 6 – 5.56MM, AB RAPTOR 8 – 7.62MM, AB RAPTOR ADAPTER, AB RAPTOR FLUSH MOUNT, AB TITANIUM FLASH HIDING END CAP, AB WARTHOG – 5.56MM, AB WARTHOG – 7.62MM, ADAMS ARMS VDI BARREL 1911 GOVT, ADIAN RAPTOR-SD CHARGING HANDLE AR10 – BLACK, AERO PRECISION AR 308 AMBI CHARGING HANDLE BLACK – LARGE LEVER, AERO PRECISION AR 308 AMBI CHARGING HANDLE BLACK – SMALL LEVER, AERO PRECISION AR15 BREACH AMBI CHARGING HANDLE BLACK – LARGE LEVER, AERO PRECISION AR15 BREACH AMBI CHARGING HANDLE BLACK – SMALL LEVER, AERO PRECISION LAHAR-30, AERO PRECISION LAHAR-30K, AERO PRECISION LAHAR-30L, AGUILA 45 ACP 230Gr FMJ, Aguila 5.56 NATO 62gr FMJ, Allen Arms AR-15 Lower Receiver, Allen Engineering AEM5-30K, Allen Engineering AEMB Muzzle Brake Mount, AMERICAN 180 .22 LR W/ 177RD METAL DRUM REFURB BY E&L MFG, ANGSTADT ARMS UDP9 – RUGGED OBSIDIAN 9 COMBO, AR-15 Lower Parts Kit, AR-15/M16 Carbine Recoil Buffers, Armageddon Gear Mirage Covers, Armageddon Gear Suppressor Mirage Cover – 1.5″ x 7.0″, Armageddon Gear Suppressor Mirage Cover – 1.5″ x 9.0″, Armageddon Gear Suppressor Mirage Cover – 1.8″ x 10.375″, Armageddon Gear Suppressor Pouch, Armalite Corporation Factory Original AR-18 5.56mm NATO C&R Eligible Transferable Machine, Armaspec AR-15 Gunbuilder Lower Parts Kit, Armaspec AR-15 Standard Lower Parts Kit, At Home Fingerprint Kit, ATF Form 1 Service, B&T .22 SUPPRESSOR, B&T 8.6 APR – Advanced Precision Rifle, B&T 9mm 30rd Magazine with Bumper – TP9 / APC9, B&T APC 223/300 Telescopic Brace Adapter, B&T APC 45 25rd Magazine, B&T APC Tailhook Adapter, B&T APC45 PRO-SD SBR, B&T APC9 SD-C + Suppressor, B&T APC9-SD PRO PISTOL, B&T APC9-SD PRO PISTOL – GLOCK LOWER, B&T APC9-SD/MP5-SD, B&T APC9/45 Telescoping Brace w/ Tailhook Adapter, B&T APC9/SPC9/GHM9 Compact RBS Suppressor, B&T Arm Brace Stock Adapter Kit, B&T BWC9, B&T Flash Hider with Rotex Interface, B&T Folding / Retractable Stock – APC9 / APC45, B&T Folding Brace Kit – APC, B&T Folding Stock Assembly – GHM9 Gen 1, B&T Folding Stock Assembly – TP9 / MP9 / GHM9 / KH9 / P26, B&T Folding Stock for APC, B&T GHM9 Telescoping Brace w/ Tailhook Adapter, B&T GHM9/45 Telescoping Stock, B&T IMPULS-IIA, B&T KH9 Telescopic Stock, B&T MBT Folding Stock, B&T Monoblock Magnum, B&T MP7 LMX Suppressor, B&T MP7 Suppressor, B&T OEM SMG/PDW – CZ Scorpion, B&T QD Compact SMG / PDW, B&T QD SMG/PDW – 45, B&T QD SMG/PDW – 9mm, B&T RBS 7.62MM ROTEX/SF, B&T RBS APC9/SPC9/GHM9, B&T RBS COMPACT SF 7.62, B&T RBS MP9-N/TP9-N, B&T RBS NATO 7.62, B&T RBS QD 5.56MM ROTEX/SF, B&T RBS QD NATO A2 5.56mm, B&T RDQ Compact Legacy 9mm, B&T Rotex 556 Compact, B&T Rotex 556 Ti Full Size, B&T Rotex X Compact 5.56mm, B&T ROTEX-X 5.56MM, B&T ROTEX-X 7.62MM, B&T RQD COMPACT LEGACY 9MM, B&T SPC9 PDW SBR SD GLOCK LOWER – TELE STOCK, B&T SPC9 SBR SD GLOCK LOWER – TELE STOCK, B&T SPC9-PDW SD SBR, B&T SRBS 762 Ti Full Size, B&T Starlite Compact, B&T STATION SIX-45, B&T STATION SIX-9, B&T Tailhook Brace, B&T Telescopic Brace Kit for SPC9 PDW, B&T Telescopic Stock – APC223 / APC300, B&T Telescopic Stock – APC9 / APC45, B&T Telescopic Stock for MP5, B&T Telescopic Stock for MP5K, B&T Telescopic Stock Kit for SPC9 PDW, B&T TP9 RBS, B&T UMP 45 Suppressor, B&T USW 30 Round Magazine, B&T USW Conversion Kit for Glock G17/G19 Pistols, B&T USW-320 Polymer Lower w/ Stock Kit, BAD-ASS Short Throw Ambidextrous Safety Selector, Barrel Thread Protector, BARRETT AM MUZZLE BRAKES, BARRETT AM338, BARRETT QDL, BLACKOUT DEFENSE KEYMO FG42 MUZZLE BRAKE, BLACKOUT DEFENSE KEYMO FLASH HIDER, BLACKOUT DEFENSE KEYMO HYBRID MUZZLE BRAKE, BOOTLEG FOUR POSITION ADJUSTABLE BOLT CARRIER – AR .308, BOOTLEG FOUR POSITION BOLT CARRIER GROUP, BOWERS ASP 45, BOWERS ATAS INSERT (USS .22 AND ASP .45), BOWERS ATAS INSERT (USS .22), BOWERS BITTY, BOWERS CZ SCORPION 1/2X28 ADAPTER, BOWERS ICON .22, BOWERS STANDARD WRENCH, BOWERS UNIVERSAL WRENCH, BOWERS USS 22, BOWERS VERS 30, BOWERS VERS 30T, BOWERS VERS 45, BOWERS VERS 458, BOWERS VERS 50, BOWERS VERS 9, BOWERS VERS 9S, BOWERS VERSADAPT, BOWERS VERSADAPT – UZI MOUNT, BROWNING HIPOWER REGISTERED BY HTA WITH COMP AND STOCK 9MM, Browning Model 1919A4 .30-06SPR Belt-fed Machine Gun by Inland Arms Co. w/ Anti-Aircraft Tripod, Mount, and Belted Ammunition, Burn Proof Kevlar Hank, Burn Proof Rail-Rap, Burn Proof Suppressor Cover Heavy, BUSHMASTER XM-15 E2 SENDRA REGISTERED RECEIVER 5.56MM COMMANDO, Capitol Armory AR-15 Builder’s Kit, Capitol Armory AR-15 Forged Lower Receiver, Capitol Armory Glock Compatible Threaded Barrels, Castle Nut, CAT Alley Cat .308, CAT Alley Cat 22LR, CATCO 1919 BELTFED 7.62MM WITH TRIPOD, CGS – The Official Qube, CGS 3 LUG MOUNT, CGS 3-Lug Mount – Mod9 / Nautilus / Kraken, CGS 9MM PISTONS, CGS FIXED BARREL SPACER, CGS FRONT CAP, CGS HEKATE-DT 338, CGS HEKATE-DT 338 5/8X24, CGS HELIOS DT, CGS HELIOS QD, CGS HELIOS QD TI, CGS HYDRA-AL, CGS HYDRA-SS, CGS HYDRA-SS BLACK, CGS HYPERION, CGS HYPERION K, CGS Hyperion QD 762, CGS HYPERION THREAD ADAPTER, CGS KERES 50, CGS MOD-9, CGS MOD-9SK, CGS Nautilus Piston, CGS Piston – Mod9 / Nautilus / Kraken, CGS QUBE, CGS SCI-SIX, CGS SUPPRESSOR REAR CAP, CGS TAKEDOWN TOOL, Cherry Bomb by Q – 8.6 Blackout, CMMG 22ARC Magazine (25 Round), CMMG 22LR Bolt and 4.5″ Barrel, CMMG 22LR Bolt and 9″ Barrel, CMMG 22LR Magazine Loader, CMMG AR-15 Ejection Port Cover Assembly, CMMG AR15 LOWER PARTS KIT, CMMG BANSHEE MK10 PISTOL 10MM, CMMG BANSHEE MK4 .22LR 4.5″ MIDNIGHT BRONZE, CMMG BANSHEE MK4 300BLK 8″ – NORTHERN LIGHTS, CMMG BANSHEE MK4 300BLK 8″ ARMOR BLACK, CMMG BANSHEE MK4 300BLK 8″ MIDNIGHT BRONZE, CMMG BANSHEE MK4 300BLK 8″ TITANIUM, CMMG BANSHEE MK47 7.62X39MM PISTOL, CMMG BANSHEE MK57 5.7X28MM, CMMG BANSHEE MK57 SBR, CMMG BANSHEE MKG .45 ACP SBR – ARMOR BLACK, CMMG BANSHEE MKGS 9MM – NORTHERN LIGHTS, CMMG BANSHEE MKGS 9MM PISTOL, CMMG BANSHEE MKGS SBR 9MM ARMOR BLACK, CMMG DEFAN 9 (9MM, QD 1/2-36), CMMG DEFCAN 2 TI, CMMG DEFCAN 2 TI-QD, CMMG DEFCAN 22, CMMG DEFCAN 3 TI, CMMG DEFCAN 3 TI-QD, CMMG DEFCAN 45, CMMG DEFCAN 9 QD, CMMG DEFCAN FLASH HIDERS, CMMG DISSENT MK4 300BLK – ARMOR BLACK, CMMG DISSENT MK4 5.56MM PISTOL – NORTHERN LIGHTS, CMMG DISSENT MK4 5.7X28MM – ARMOR BLACK, CMMG DISSENT MK57 PISTOL – NORTHERN LIGHTS, CMMG FNH PS90 10.4″ Barrel, CMMG FNH PS90 Thread Adapter, CMMG Forward Assist Assembly, CMMG Full Lower Parts Kit, CMMG Gas Tube Kit, CMMG Gun Builder’s Lower Parts Kit, CMMG LOWER PARTS KIT, AR15, GUNBUILDER’S KIT, CMMG LR308 Mk3 Lower Parts Kit, CMMG Survival Kit, Cole-Tac Corset Suppressor Covers, Colt ACR Advanced Combat Rifle 5.56mm Duplex Transferable Machine Gun w/ Military Elcan Sight, Colt ACR Advanced Combat Rifle M16A2 5.56mm Duplex Transferable Machine Gun w/ Experimental Serial Number, COLT AR-15 SP1 REGISTERED RECEIVER 223 REM 20 INCH, Colt LE6945 CQB 10.3″ SBR, COLT M-16 20 INCH 223 5 MIL SERIAL RANGE, COLT M-16A1 W/M203 40MM GRENADE LAUNCHER FACTORY CUTAWAY!, COLT M16A1 9MILLION RANGE 20 INCH RIFLE MINT, COLT M16A1 FACTORY 14.5 CARBINE 5.56MM, Colt M16A2 LMG Light Machine Gun 5.56mm NATO Factory Transferable Machine Gun w/ Rare Experimental Serial Number, Colt M4 Carbine 6920 – Enhanced Patrol Rifle, Colt M4 Carbine CR6920, Colt M4 Commando CR6933 11.5″ SBR, Colt M4A1 SOCOM Carbine, COLT SP1 REGISTERED RECEIVER CONVERSION 5.56MM 16 INCH M4 UPPER, COLT SP1 REGISTERED TRANSFERABLE MACHINE GUN 223 REM, COLT THOMPSON 1921 45 ACP ALL ORIGINAL MFG 1921, Completed Fingerprint Cards, CZ SCORPION EVO 3 S1 PISTOL ARM BRACE KIT, CZ SCORPION EVO 922R Parts and Folding Stock Kit, Daewoo Precision Industries Model K2 5.56mm NATO Transferable Machine Gun, Dakota Tactical D54K-N MP5 SBR, Dakota Tactical MP5 D54-N SBR, Dakota Tactical MP5 D54-SD SBR + Suppressor, Dakota Tactical MP5 D54R-N SBR, DANIEL DEFENSE DD4 MK18 RIII SBR – BLACK, DANIEL DEFENSE DD4 MK18 RIII SBR – FDE, DANIEL DEFENSE DD4 RIIIS – FDE, DANIEL DEFENSE DD5 SBR, DANIEL DEFENSE DDM4 300 S .300 BLK 10.3″ 1:8 BLACK RIFLE, Daniel Defense DDM4 300S SBR, Daniel Defense DDM4 PDW 7″ 300 BLK SBR, DANIEL DEFENSE DDM4 PDW PISTOL 300, DANIEL DEFENSE DDM4 PDW SBR 300, DANIEL DEFENSE DDM4 PDW SBR 300 COBALT, DANIEL DEFENSE DDM4 PDW SBR 300 FDE, DANIEL DEFENSE DDM4ISR UPPER RECEIVER GROUP, DANIEL DEFENSE DDM4V4 S, DANIEL DEFENSE DDM4V7 PISTOL, DANIEL DEFENSE DDM4V7 PRO URG – 5.56MM, Daniel Defense DDM4v7 S SBR, Daniel Defense ISR – Gen 2 300BLK, Daniel Defense ISR- GRN, Daniel Defense ISR-Black, Daniel Defense ISR-Milspec+, Daniel Defense M4 Carbine MK18 SBR, DANIEL DEFENSE M4 V7 SBR, Daniel Defense MK18 Milspec + SBR, DANIEL DEFENSE MK18 PISTOL – FDE, DANIEL DEFENSE MK18 SBR-BLACK, DANIEL DEFENSE MK18 SBR-FLAT DARK EARTH, DANIEL DEFENSE MK18 SBR-MILSPEC, Daniel Defense MK18RIII SBR, Daniel Defense SoundGuard SG-30, Daniel Defense SoundGuard SG-30Ti, Daniel Defense SoundGuard SG-556, Danish Madsen M50 9x19mm Parabellum Transferable Submachine Gun, DEAD AIR 1/2X28 SPACER, Dead Air 3-Lug Adpater, DEAD AIR 3-LUG MOUNT, DEAD AIR ADAPTER GSG 1911, DEAD AIR BOOSTER ASSEMBLIES, Dead Air E-Brake, DEAD AIR FIXED BARREL SPACER, DEAD AIR FLASH HIDER, DEAD AIR FLASH HIDER END CAP, Dead Air Flash Hider Front Cap, Dead Air Front Cap Tool, DEAD AIR FRONT CAP TOOL – GHOST/MASK SERIES, Dead Air Front End Cap, Dead Air Ghost Front Cap, DEAD AIR GHOST-M, DEAD AIR GHOST/WOLFMAN FIXED MOUNT, DEAD AIR HUB FIXED MOUNT, DEAD AIR HUB TO P-SERIES ADAPTER, DEAD AIR KEY MOUNT MUZZLE BRAKE, DEAD AIR KEY-MICRO BRAKES, DEAD AIR KEY-MO “O” MOUNT PYRO MUZZLE BRAKE, DEAD AIR KEY-MO O MOUNT (OMEGA), DEAD AIR KEY-MO S MOUNT (SAKER), DEAD AIR KEYMICRO ADAPTER, DEAD AIR KEYMICRO FLASH HIDER, DEAD AIR KEYMO FLASH HIDER, DEAD AIR KEYMO MUZZLE BRAKE, DEAD AIR MASK 22 HD, Dead Air Mojave 9, DEAD AIR NOMAD E-BRAKE, Dead Air Nomad L-Ti XC, DEAD AIR NOMAD TI, DEAD AIR NOMAD-30, DEAD AIR NOMAD-L, DEAD AIR NOMAD-LT, Dead Air Nomax 33, DEAD AIR ODESSA FIXED MOUNT, DEAD AIR ODESSA PISTONS, DEAD AIR ODESSA-9, DEAD AIR PISTONS, DEAD AIR PRIMAL, DEAD AIR PYRO 2.0 ENHANCED MUZZLE BRAKE, Dead Air Pyro Blast Shield Insert, DEAD AIR PYRO ENHANCED MUZZLE BRAKE, DEAD AIR SANDMAN / WOLFMAN FRONT CAP TOOL, DEAD AIR SANDMAN E-BRAKE, DEAD AIR SANDMAN FRONT CAP TOOL, DEAD AIR SANDMAN FRONT CAPS, DEAD AIR SANDMAN MUZZLE BRAKE, DEAD AIR SANDMAN-K, DEAD AIR SANDMAN-L, DEAD AIR SANDMAN-S, DEAD AIR SANDMAN-TI, DEAD AIR SHIM KITS, DEAD AIR SIERRA 5 WITH KEYMO ADAPT, DEAD AIR SIERRA 5 WITH XENO ADAPT, DEAD AIR SIQ MOSQUITO ADAPTER, DEAD AIR SUPPRESSOR AND ACCESSORY TOOL PACK, DEAD AIR SWITCHSIGHTS, DEAD AIR THREAD PROTECTOR 1/2X28, Dead Air Wipe Cap Assembly, DEAD AIR WOLF-9SD, DEAD AIR WOLFMAN, DEAD AIR WOLFMAN NAKED, DEAD AIR WOLVERINE, DEAD AIR WOLVERINE HUB ADAPTER, DEAD AIR WOLVERINE THREAD INSERT, Dead Air Xeno 3 Prong Flash Hider, DEAD AIR XENO ADAPTER, DEAD AIR XENO PISTOL WEE BRAKE, DEAD AIR XENO XERO MOUNT, Diligent Defense DTF-LTi, Diligent Defense Enticer S-Ti, Diligent Defense Road Hunter, Diligent Defense Wolf Hunter, DPMS AR15 / M16 Standard Buffer – A2, EA Thunder Beast Bravo Mount, El Camino by Q™, ELITE IRON BRAKE & COVER 1/2X28, ENERGETIC ARMAMENT – VOX WRENCH, ENERGETIC ARMAMENT ARX, ENERGETIC ARMAMENT DIRECT THREAD ADAPTER, Energetic Armament Ferox 5.56, ENERGETIC ARMAMENT FLASH HIDING END CAP, Energetic Armament Front Cap, ENERGETIC ARMAMENT LUX – 6.5MM, ENERGETIC ARMAMENT LUX – 7.62MM, ENERGETIC ARMAMENT NYX – BEAD BLAST, ENERGETIC ARMAMENT NYX – BLACK CERAKOTE, ENERGETIC ARMAMENT NYX MOD2 – BEAD BLAST, ENERGETIC ARMAMENT NYX MOD2 – BLACK CERAKOTE, Energetic Armament Peak 30, ENERGETIC ARMAMENT SOB MUZZLE DEVICE, ENERGETIC ARMAMENT SONUS 9, ENERGETIC ARMAMENT TB COMPATIBLE MOUNT, ENERGETIC ARMAMENT TITANIUM END CAP 7.62MM, ENERGETIC ARMAMENT VOX BLOX, ENERGETIC ARMAMENT VOX K, ENERGETIC ARMAMENT VOX K2, ENERGETIC ARMAMENT VOX S, ENERGETIC ARMAMENT VOX STAINLESS END CAP 5.56MM, Erector by Q™, F-1 FIREARMS BDRX-15 PISTOL BLACK, F-1 FIREARMS BDRX-15 PISTOL TITANIUM SHADOW CAMO, F1 APOLLO ELITE, F1 TOMBSTONE COMPENSATOR, F1 VOYAGER ELITE, F1 VOYAGER SNIPER, Factory Original Chinese Communist Type 56 7.62×39 Transferable AK-47 Machine Gun, Vietnam Amnesty Registered, FD-258 Paper Fingerprint Packet, Federal American Eagle 300 BLK 150gr FMJ, FN 509 MIDSIZE TACTICAL, FN 509 TACTICAL PISTOL, FN FIVE-SEVEN ADAPTER, FN FNC Paratrooper Carbine .223REM/5.56mm 16″ bbl Transferable S&H Arms Sear Machine Gun, FN FNC Rifle .223REM/5.56mm 17.7″ bbl Transferable S&H Arms Sear Machine Gun, FN Magazine FN P90, PS90 5.7×28 FN Polymer, FN PS90 Carbine, FN PS90 SBR, FN RUSH 9TI, FN SCAR 17S .308 / 7.62, FN SCAR® Barrel 16S CQC – 10″, FN SCAR® Barrel 17S CQC – 13″, FNH PS90 10.4″ Barrel, Fortis QD End Plate, GEMTECH 1/2X28 ONE THREADMOUNT, GEMTECH 3-LUG MOUNT, Gemtech 5 Suppressor Pouch, GEMTECH 7.62 FLASH HIDER, GEMTECH ABYSS – 5.56MM, Gemtech Arrow Tri-Lug Quickmount, GEMTECH AURORA 2, GEMTECH BLAST JACKET, GEMTECH CZ ADAPTER 22, GEMTECH DAGGER, GEMTECH GM-22, GEMTECH GM-45, Gemtech GM-45 / Lunar / Blackside Threadmount, GEMTECH GM-45 PISTONS, GEMTECH GM-45 THREAD MOUNTS, GEMTECH GM-9, GEMTECH GM-9 PISTONS, GEMTECH GMT-300BLK, GEMTECH GVAC UPPER RECEIVER GROUP – 5.56 NATO, GEMTECH HALO-GMT, GEMTECH INTEGRA 15-22 SUPPRESSED UPPER, GEMTECH INTEGRA UPPER, GEMTECH INTEGRAL MIST-22 SUPPRESSOR, GEMTECH INTEGRAL MIST-22 TAKEDOWN, GEMTECH LUNAR 45, GEMTECH LUNAR 9, GEMTECH LUNAR-9 WITH QD 3-LUG MOUNT, GEMTECH MIST-22V SUPPRESSED BARREL, GEMTEC
CONTACT US:
Email…([email protected])
Signal:::(@Realjames.39)
whatsap/Signal::+(34)607218704)
Whatsapp:::::+(237)672564181)
CONTACT US:
Email…([email protected])
Signal:::(@Realjames.39)
whatsap/Signal::+(34)607218704)
Whatsapp:::::+(237)672564181)
Psilocybin Magic Mushrooms, Magic Mushrooms Delivery, Magic Mushrooms Canada, Mushroom Dispensary Near Me, Canadian Magic Mushrooms, Buy Magic Mushrooms Online, Buy Psilocybin Mushrooms Online, Buy Psychedelic Mushrooms Online, Magic Mushroom Dispensary, Buy Psilocybe Mushrooms Online, Buy Psilocin Mushrooms Online, Canada Mushroom Store, Buy Hallucinogenic Mushrooms Online, Magic Mushrooms For Sale, Canada Magic Mushroom Shop, Psychedelic Mushrooms For Sale, Buy Cocaine Online Canada, Buy Dose Psilocybin, Buy LSD Online, Buy LSD Edibles Online, Buy LSD Microdose Online, Buy LSD Tea Online, LSD Tabs For Sale, Buy MDMA for sale, Dmt Products, Dmt Carts, DMT MICRODOSE, Dmt Pre Roll, Flowers, how to make magic shroom tea, Magic Mushrooms, Moon Chocolate Bar, Mushroom Capsules, Mushroom Edibles For Sale, Promethazine Codeine Lean, AKORN PROMETHAZINE CODEINE SYRUP, COUGH SYRUP, LEGAL LEAN SYRUPS, PROMETHAZINE CODEINE SYRUP, Shroom Gummies, 10000mg Floral Peaches Tea, 1000mg Shroom Tea – Trippy Monkey, 2 Salty Dark Chocolate Bars w/ Functional Mushroom Extracts, 2000mg Mango Dragon Fruit Tea, 5 Meo DMT Crystals (freebase), 5-Meo-DMT Cartridge and Battery .5mL, 7500mg Strawberry Lemonade Tea, A+ Magic Mushrooms, AAA+ Gold Bars 260mg Dutch MDMA, Actavis promethazine codeine, African Transkei Magic Mushrooms, AKA LEAN, Akorn Codeine Oral Solution, Akorn Promethazine Cough Syrup, Akorn Promethazine Hydrochloride, Akorn Promethazine Hydrochloride with Codeine, Alacabenzi Magic Mushrooms, Albino A+ Magic Mushrooms, Albino Cambodians Magic Mushrooms, Albino Louisiana Magic Mushrooms, Albino Penis Envy Magic Mushrooms, Albino Treasure Coast Magic Mushrooms, Albino Zilla Magic Mushrooms, Amazonian Magic Mushrooms, APEX Magic Mushrooms, Arenal Volcano Magic Mushrooms, Avery’s Albino Magic Mushrooms, Aztec God Magic Mushrooms, B+ Magic Mushrooms, B+ Magic Mushrooms, Ban Thurian Magic Mushrooms, Bells Codeine Linctus 200ml, Big Mex Magic Mushrooms, BLACKBERRY GUMMIES, Blue Magnolia Rust Magic Mushrooms, Blue Meanie Magic Mushrooms, Blue Philipp Plein Ecstasy Pills, Blue Pulaski, Blue Punishers MDMA Ecstasy Pills AAA+ (300mg), Brazilian Magic Mushrooms, Bright Future Nootropic Gummies Raspberry Daiquiri, Burmese Magic Mushrooms, Burmese Magic Mushrooms, Buy 2C-B Pink Cocaine online Canada, Buy 4-ACO DMT, Buy 5 Bromo DMT, Buy 5 Meo DMT, Buy 8 Ball of Cocaine Online Canada, Buy Amnean online, Buy Ayahuasca powder, Buy Bio Cocaine Online Canada, Buy Blasted Toffee Moon Bars 250mg, Buy Blue Dolphin Ecstasy Pills, Buy Blue Punisher MDMA Ecstasy Pills, Buy Brain Capsules (50mg-200mg), Buy Bright Future Nootropic Gummies, Buy Changa DMT online, Buy Colombian Cocaine Online In Canada, Buy Cosmic Cappuccino Moon Bars, Buy Crack Cocaine Online In Canada, Buy Creeper Magic Mushrooms, Buy DMT 3 Cartridges 1mL, Buy DMT Cartridges pack of 6, Buy Dmt Crystal Online, BUY DMT PILLS, Buy Dmt Powder, Buy Dose macro envy macrodose psilocybin capsules, Buy Euphoria Psychedelics Grape Gummy 1000mg, Buy Euphoria Psychedelics Orange Gummy 1000mg, Buy Euphoria Psychedelics Watermelon Gummy 1000mg, Buy Flake Cocaine Online in Canada, Buy Green MDMA, Buy HillBilly Magic Mushrooms, Buy Huautla Magic Mushrooms, Buy Jack Frost Magic Mushrooms, Buy Jedi Mind Fuck Magic Mushrooms, Buy Jerry Garcia Magic Mushrooms, Buy Kind Stranger Gummy Passion Gummy, Buy Koh Samui Magic Mushrooms, Buy Koh Samui Super Strain Magic Mushrooms, Buy laugh now cry later MDMA, Buy Legal Lean Grape Syrup, Buy Leucistic Burma Magic Mushrooms, Buy Lizard King Magic Mushrooms, Buy Magic Mushroom Sampler Kit / Tasting Menu, Buy Makilla Gorilla Magic Mushrooms, Buy Malabar Magic Mushrooms, Buy Malaysian Magic Mushrooms, Buy Mastermind Blue Raspberry Gummy Frogs, Buy Mastermind Gummy Hearts 3000mg, Buy Mazatapec Magic Mushrooms, Buy McKennaii Magic Mushrooms, BUY MDMA ECSTASY, Buy MDMA Ecstasy Molly Online, Buy Melmac (Homestead Penis Envy) Magic Mushrooms, Buy Mexican – Mimosa hostilis Inner Root Bark, Buy Microdose 4-AcO-DMT deadhead chemist, Buy MIMOSA HOSTILIS INNER ROOT BARK, Buy Moons Psilocybin Gummies Passionfruit 3000mg, Buy Muti – Dark Chocolate Sea Salt bar – 3000mg, Buy Mycology Blue Raspberry Gummies (2000mg), Buy Mycology Cherry Gummies (1600mg), Buy Mycology Cherry Gummies 2000mg, Buy Mycology Strawberry Gummies 1600mg, Buy Mycology Watermelon Gummies 1600mg, Buy Mystery Fatass Magic Mushrooms, Buy N,N-DMT, Buy Nepal Chitwan Magic Mushrooms, Buy One up Mushroom Chocolate Bar, Buy Panama Magic Mushrooms, Buy Penis Envy 6 (PE6) Magic Mushrooms, Buy Penis Envy Magic Mushrooms, Buy Penis Envy XL Magic Mushrooms, Buy Pink MDMA, Buy Polkadot Mushroom Chocolate Bars, Buy Proscaline Microdose Online, Buy Psilocybe Aztecorum Magic Mushrooms, Buy Puerto Rican Magic Mushrooms, Buy Pure DMT (Dimethyltryptamine), Buy Pure MDMA Ecstasy Capsules, buy quagen cough syrup online, Buy Rocket Fudge Moon Bars, Buy Rolls Royce MDMA Pills, Buy Rusty Whyte Magic Mushrooms, Buy Shakti (Albino Malabar) Magic Mushrooms, Buy Shakti (Albino Malabar) Magic Mushrooms, Buy Shepherds Cut Penis Envy Magic Mushrooms, Buy Shroomies Grape Sour Stars 3000mg, Buy Shroomies Microbites 3000mg Assorted Psilocybin, Buy Shroomies Very Berry Sour Bears 1000mg, Buy Smurf Snacks Magic Mushroom Cookies, Buy South American Magic Mushrooms, Buy Syzygy Magic Mushrooms, Buy Texas Yellow Cap Magic Mushrooms, Buy Thrasher Magic Mushrooms, Buy Tidal Wave Magic Mushrooms, Buy Trans Envy Magic Mushrooms, Buy Transkei Magic Mushrooms, Buy Treasure Coast Magic Mushrooms, Buy Tri-Color Ecuadorian Magic Mushroom (Premium), Buy Tri-Colour Ecuadorian Magic Mushrooms, Buy Trinity Magic Mushrooms, Buy Trippy Treats Mushroom Chocolate Bar, Buy Vietnamese Magic Mushrooms, Buy Wollongong Magic Mushrooms, Buy Wonder Bar Mushroom Chocolate, Buy Wonder Psilocybin Gummies Blackberry 3000mg, Buy Wonder Psilocybin Gummies Cranberry 3000mg, Buy Wonder Psilocybin Gummies Watermelon 3000mg, Clarity Capsules (50mg-200mg), Codeine Linctus Cough Syrup, Costa Rican Blue Magic Mushrooms, Daddy Long Legs Magic Mushrooms, Dames Gummy Co. – Shroom Gummies (1500mg), Dancing Tiger Magic Mushrooms, Deadhead Chemist 5-Meo-DMT (Cartridge) .5mL, Death Bubba, Diabetic Tussin Maximum Strength Cough & Chest Congestion, DMT 1ml 800mg DMT Vape, DMT 1ml Purecybin – 700mg DMT, DMT 1ml Purecybin – 700mg DMT, DMT disposable half gram Pen, DMT Disposable Paradise Pen, DMT Disposable Third Eye Pen, DMT Pre Roll, DMT Vape & Cartridge 1ml 400mg, DMT Vape 400mg (Vice City Labs) .5ml, DMT Vape Kit 800mg (Cartridge + Battery), DMT Vape Pen 1g, Dmt vape pen double blind, Dose MICRO Microdose Psilocybin Capsules, Dose Neurogenesis No.3 Microdose Psilocybin Capsules, Dose PURE Golden Teacher Microdose Psilocybin Capsules, Dream Machine Vape Cartridge DMT 1ml, Escondido Magic Mushrooms, Euphoria Psychedelics Red Cherry Gummy 1000mg, Euphoria Psychedelics – Galaxy Capsules 6000MG, Euphoria Psychedelics – Micro Dose Vegan Capsules 6000MG, Euphoria Psychedelics – Micro Glow Capsules 2000MG, Euphoria Psychedelics – Micro Immune Capsules 2000MG, Euphoria Psychedelics – Skywalker Capsules 1500MG, Eves Eden Spore co, Flying Saucer, Golden Teachers Magic Mushrooms, Goldmember Shrooms, Granddaddy Purple, Haven – Blue Raspberry and Grape – 3500mg, Haven – Cherry Lemonade Mushroom Gummies, Hi-Tech Promethazine Cough Syrup, King Dong Magic Mushroom, King Kong Magic Mushrooms, Legal Lean Cherry Syrup, Legal Lean Syrup Blue Raspberry, Legal Lean Syrup Quali, LSD Edible 100ug Cola Bottle Deadhead Chemist, LSD Edible 100ug Cola Bottle Deadhead Chemist, LSD Edible 100ug Fuzzy Peach Deadhead Chemist, LSD Edible 100ug Fuzzy Peach Deadhead Chemist, LSD Edible 100ug Gummy Bear Deadhead Chemist, LSD Edible 100ug Gummy Bear Deadhead Chemist, LSD Edible 100ug Sour Blue Raspberry Deadhead Chemist, LSD Edible 100ug Sour Blue Raspberry Deadhead Chemist, LSD Edible 100ug Sour Key Deadhead Chemist, LSD Edible 100ug – Kit Cat – Schwifty Labs, LSD Edible 100ug – Milk Chocolate – Schwifty Labs, LSD Edible 100ug – Peanut Butter Cup – Schwifty Labs, LSD Edible 200ug – Juicy Banana – Schwifty Labs, LSD Edible 200ug – Sour Grape – Schwifty Labs, LSD Microdose Gummy Bears 100ug Deadhead Chemist, Lucid DMT Vaporizer (N, N- Di-Methyl-Tryptamine), Magic Mushroom Capsules 500mg, Magic Mushroom French Vanilla – 2000MG – Mushee, Magic Vegan Chocolate Bar, Master Mind Variety Gummy Squares (3000mg), MDMA Capsules, MDMA Crystals, MDMA Daily Microdose Capsules, Mindfuck Sour Apple Mushroom Gummies – 5000mg, Mindfuck Sour Blueberry Mushroom Gummies – 5000mg, Mindfuck Sour Cherry Mushroom Gummies – 5000mg, Mindfuck Sour Strawberry Mushroom Gummies – 5000mg, Molly Bear MDMA Gummies – Blackberry Mango, Molly Bear MDMA Gummies – Lemon Cola, Molly Bear MDMA Gummies – Peach Mint, Molly Bear MDMA Gummies – Pineapple Jalapeno, Molly Bear MDMA Gummies – Raspberry Lemonade, Monster Penis Envy Magic Mushroom, Moon Chocolate Bar MegaDose Wholesale, Moon Chocolate Bar – Berry Blasters, Moon Chocolate Bar – Berry Blasters Mini Bar, Moon Chocolate Bar – Blasted Toffee Mini Bar, Moon Chocolate Bar – Blasted Toffee., Moon Chocolate bar – Cherry Blasters Mini Bar, Moon Chocolate Bar – Cosmic Cappuccino Mini Bar, Moon Chocolate Bar – Cosmic Cappuccino | Sativa, Moon Chocolate Bar – Peppermint Parallax | Hybrid, Moon Chocolate Bar – Pumpkin Orbit | Hybrid, Moon Chocolate Bar – Rocket Fudge | Hybrid, Moon Chocolate Bars – Spaceman Mints | Indica, Mycodium – Symptom Relief 250MG, N,N DMT (Cartridge) 1mL Deadhead Chemist, N,N-Dimethyltryptamine, NN DMT(Cartridge and Battery) 1mL Deadhead Chemist, NN-DMT (Cartridge) 1mL 800MG MMD Cosmo, OG Melmac, One Up Chocolate Bar | Psilocybin Mushrooms | 3.5g, PHENERGAN ELIXIR SYRUP, PMG Green Syrup for sale, PolkaDot Mushroom Chocolate Bars | 1000mg Magic Blend, Portal DMT Vape Cartridge – N,N DMT – .5ml, Powder DMT for sale, promethazine and dextromethorphan (Delsym), Promethazine Dm syrup, Promethazine VC Plain Syrup, Psilocybe Mexicana Mushrooms, Pumpkin Orbit Moon Bars – Mega Dose Chocolate Bars (250mg THC), Pure Blue MDMA, Pure LSD Tab Albert Einstein, Pure LSD Tab Alice in Wonderland, Pure LSD Tab Dancing Bears, Pure LSD Tab Dancing Condos, Pure LSD Tab Dr. Seuss, Pure LSD Tab Homer, Pure LSD Tab Orange Sunshine, Pure LSD Tab Rick and Morty, Pure MDMA, Pure N,N DMT crystals(freebase), Pure Orange MDMA, Pure Pink MDMA, Pure Purple MDMA, Qualitest Promethazine Codeine Syrup, Red Bull MDMA Dutch AAA+ Ecstasy Pills 260mg, Room 920 Mushroom Chocolate Bar, Schwifty Labes DMT (Cartridge) .5mL, Schwifty Labs DMT (Cartridge) 1mL – 750mg, Schwifty Labs – 5-Meo-DMT(Cartridge) .5mL – 200mg., Schwifty Labs – 5-Meo-DMT(Cartridge) 1mL – 400mg, Soul Herbs: Buy Ayahuasca | Ayahuasca Online for Sale, Spaceman Mints Moon Bars – Mega Dose Chocolate Bars (250mg THC), Spore Wellness (Reset) Macrodosing Mushroom Capsules, Spore Wellness Microdosing Mushroom Capsules – The Micro Bundle (Cognitive, Energy, & Immune), Stilpane syrup Online, Texas Yellow Caps Magic Mushrooms, Thc vape juice, Tidal Wave Magic Mushrooms, Toad Shroom Bursts – Blue Raspberry 4000mg, Toad Shroom Bursts – Cola 4000mg, Toad Shroom Bursts – Green Apple 4000mg, Toad Shroom Bursts – Mango 4000mg, Top Tier 5MEO DMT .5ML, Top Tier 5MEO DMT 1ML Cartridge, Tripnotik Cherry Mushroom Gummies – 4000mg, Tripnotik Grape Mushroom Gummies – 4000mg, Tripnotik Lemon Lime Mushroom Gummies – 4000mg, Tripnotik Mango Mushroom Gummies – 4000mg, Tripnotik Orange Mushroom Gummies – 4000mg, Tripnotik Pineapple Mushroom Gummies – 4000mg, Tripnotik Raspberry Mushroom Gummies – 4000mg, Tripnotik Strawberry Mushroom Gummies – 4000mg, Tris Promethazine Codeine Cough Syrup, Vice City Labs – Blue Raspberry MDMA Gummy Bears – 250MG, Vice City Labs – Blue Raspberry MDMA Gummy Bears – 500MG, Vice City Labs – Grape MDMA Gummy Bears – 250MG, Vice City Labs – Grape MDMA Gummy Bears – 500MG, White Rabbit, wockhardt cough syrup for sale, wocklean for sale, Wonder – Psilocybin Gummies – Cherry Cola – 3000mg
Green , Coke , DMT , Shrooms , MDMA , Ket , Dexies or LSD .thc vape juice Europe Mushroom Chocolate Bars Buy psychedelic online California, Texas, Australia, Ireland ,Cubensis Norway, Europe
thc vape juice Europe Mushroom Chocolate Bars Buy psychedelic online California, Texas, Australia, Ireland ,Cubensis Norway, Europe Mushroom Chocolate BarBuy DMT Cartridges for sale online Vape and full 1mg cartridge. where / how to buy DMT carts, cart buy this DMT vape pens, 4 ACO / 5 MEO DMT.GBL for sale Newcastle, Australia GBL for sale Townsville, Australia GBL Gamma Butyrolactone for sale Cairns, Australia GBL Gamma
Available For Shipping Worldwide!!!!!!
DMT Tags: best dmt vape pen, Buy DMT Cartridge Online, Buy DMT Powder Online, buy dmt vape pen, Buy DMT vape pens for sale online, buy N, can you smoke dmt with a vaporizer, dmt cart, dmt cartridge for sale, dit carts, dmt in vape reddit, dmt pen for sale, dmt pen vape, dmt temperature vaporization, dmt through vape pen, dmt vape, dmt vape cartridge, dmt vape juice, dmt vape pen, DMI vape pen cartridges, drt vape pen la , dmt vape pen where to buy, dmt vape pens, dmt vape temp, DMT Vaporiser Pen for sale; Dit Vaporizer Pen, N-Buy DMT Cartridges Australia, buy dmt carts Australia, Buy DMT carts NZ, Buy DMT pen NZ, buy dmt vape, buy dmt vape Australia, Buy DMT Vape NZ, buy dmt vape online, buy dmt vape online australia , buy dmt vape pen, buy dmt vape pen and cartridges, buy dmt vape pen and cartridges Australia, buy dmt vape pen and
Buy LSD online in Australia buy Isd blotters online Qld, Buy Isd acid tabs NSW, Isd sheets for sale Victoria, LSD buy Sydney, where to Buy Isd Melbourn
LSD BlottersBicycle Day Albert Hofmann’s first intentional LSD trip, bicycle day is a psychedelic holiday celebrated the world over. This is our collection of blotter art and posters celebrating this special time in our history.LSD Gel Tabs Cocaine. 1 gram. “8 ball” = ⅛ ounce (3.5 grams). $350. $1100 – $1600. 0.5g typical session. 1g high-use session. MDMA (ecstasy) Capsule “cap” = 0.1 – 0.2 grams.Falls, Wylie 3mmc 3MMC 3CMC Research ChemicalsBuy 99% purified 3mmc 3MMC 3CMC Chemicals Bigwhite CrystalsWhere to buy 3-MMC?3-MMC or 3- Methylmethcathinone, Buy high quality 3-MMC 4mmc on the internet Where buying 3-MMC is safe. Where to buy 3 MMC?
3-MMC Crystals fine Order online – Designer Chemicals
3MMC Buy, Buy 3-MMC, 3-MMC effects, 3 mmc legal
3-MMC Crystal -Pharmaceuticals Acid (GHB)
3mmc4cmc .com – 3-CMC, 3-MMC, 4-CMC, pirkite 4-cmc
Order 3-MMC In Pure Qualitybuy dmt online usa, buy dmt vape pen, DMT Vape Cartridge, dmt cartridges, dmt pen, dmt pens, dmt vape, DMT Vape Pen, DMT vape pen for sale online, dmt vape pens
Dmt cart available in stock at discount prices 100% safe delivery, dmt cart, dmt cartridges, dmt carts, dmt nexus, how to smoke dmt, dmt pen, dmt pupe, dmt vape.
3MMC buy / Buy 3-MMC Crystal dmt cart for sale | dmt carts for sale | dmt carts for sale usa | dmt carts reddit for sale | dmt vape cart for sale | dmt vape carts for sale |
buy 5 meo dmt online | buy 5-meo-dmt | buy 5 meo dmt usa | 5 meo dmt where to buy | buy 5-meo-dmt online usa | can you buy 5 meo dmt | where can i buy 5 meo dmt | 5-meo-dmt buy | buy 5 meo dmtcanada | buy 5-meo-dmt online | buy research chemicals 5-meo-b kopenplace to buy san pedro cactus Australia, buy adderall aus, buy adderall australia, buy adderall in australia, buy adderall nz, buy adderall online australia, buy cocaine australia. Australia psychedelic shop answers all your questions such as, buy cocaine nz, buy cocaine online australia, buy cocaine online nz, buy cocaine sydney, buy diazepam 10mg australia, buy diazepam 5mg australia, buy diazepam australia, buy diazepam in australia, buy diazepam nz , buy diazepam online australia, buy diazepam online paypal australia, buy dmt australia. buy dmt online in australia, buy dmt cart, buy dmt in australia, buy dmt nz, buy dmt online australia, buy dmt online New Zealand, buy dmt perth, buy dmt sydney, buy dmt vape, buy ecstasy Australia, buy ecstasy New Zealand , buy ecstasy online, buy ecstasy pills, buy ecstasy pills Australia, buy ketamine australia, buy ketamine hydrochloride Australia.buy psychedelics australia, buy ketamine in australia, buy ketamine New Zealand, buy lsd acid, buy lsd australia, buy lsd blotter, buy lsd blotters Australia, buy lsd liquid, buy lsd melbourne, buy lsd microdose, buy lsd near me Australia, buy lsd online australia, buy lsd online New Zealand, buy lsd sheets online, buy lsd sydney, buy magic mushroom Australia, buy magic mushroom grow kits australia. Australian Psychedelic Society, b
CONTACT US:
Email…([email protected])
Signal:::(@Realjames.39)
whatsap/Signal::+(34)607218704)
Whatsapp:::::+(237)672564181)
CONTACT US:
Email…([email protected])
Signal:::(@Realjames.39)
whatsap/Signal::+(34)607218704)
Whatsapp:::::+(237)672564181)
K2 for sale, k2 paper for sale, k2 paper online, k2 spice for sale, k2 spice for sale online, k2 paper, K2 online, Paper online, Paper for sale, DMT Vape Pen, Herbal Ecstasy, HERBAL INCENSE, K2 For Sale, K2 paper for sale, K2 Spray, Liquid K2, Liquid K2 On Paper100% Natural Exotic Herbs Aroma Therapy,24K Monkey Herbal Incense,500 pages strongest k2 paper book,7H Hawaiian Punch 5ml,AK 47 Adios Premium Liquid Incense 5ml,ALOHA Tangerine Liquid Incense 5ml,Angry Birds Liquid Incense,Annihilation 2,Atomic Potpourri Herbal Incense,Bizarro Fresh Liquid Incense 5ml,Bizarro Incense Online,Bizarro Liquid Incense 5ml,Black Diamond Herbal Incense 10g,Black Label k2 Paper,Black Lion Herbal Incense,black mamba liquid k2 on paper online,Blazing Blueberry Liquid Incense 5ml,Blue Caution Extra Extra Potent Legal highs A4 soaked paper 10 sheetBlue Giant 5G Herbal incense,Blue Lily Smart Liquid 5ml,Blue Lily Smart Liquid 5ml,Brain Freeze k2 by Naked 100 E-liquid-60ml,Buy 5F-AKB48 c liquid,Buy Crazy Jacks Herbal Ecstasy,Buy Diablo Botanical Herbal Incense,Buy Hemp Oil Sweet Leaf 1ml,Buy Hemp Oil Sweet Leaf 1ml,Buy K2 e liquid,Buy k2 paper in jail -10 sheets,Buy K2 Powder,Buy Klimax Berry Liquid Incense 5ml,Buy Lined K2 Spice Paper,Buy LSD Infused Paper Online,Buy Shine Gold Infused Papers,Buy xXx Splash Liquid Incense 5ml,Buzz Liquid Incense – 5 ml,Cannabinoid c-Liquid 5ml,Cannabis Infused Rolling Papers,Caution Super Strong IncenseCherry Bomb Herbal Incense,Cloud 9 Mad Hatter Online,Cloud 9 Peach Sherbert 5ml,Cloud Nine Liquid Incense 5ml,Code 69 Liquid Incense 5ml,Code black BLUE LABEL liquid incense,Crazy Monkey Incense,Dance-e,diablo k2 powder,Diablo Liquid Incense 5ML,Diablo Smoking Alcohol,DMT Vape Cartridges,DMT Vape Pen for sale,DOGGIE SNAX INCENSEe-Dance Pack,e-Happy Pack,Energy-e,Euphor-e,Flower Power Herbal Ecstasy pillsFunky Vape Additive,Get Real Blazing Blueberry 5ml,Green Giant Liquid Incense,Henectus tincidunt,Herbal Incense Diablo,I miss you liquid infused k2 paper,Incredible Hulk Kush,Joker Liquid Incense,Joker liquid k2 infused paper,Jungle Juice Liquid Incense 10ml,K2 Clear Paper Spray,K2 Clear Paper Spray,k2 E Liquid Code Red,K2 E-LIQUID 42 DEGREES – 5 ml,K2 E-LIQUID ROLE PLAY – 5 ml,k2 spray for sale,Klimax Berry Colada 5ml,Kratom Meang Da Liquid Incense 5ML,Kratom X Blue Lilly liquid – 5 ML,Kush Liquid Incense 5ml,Kush Liquid Incense 5ml,Lemon-x,Liquid k2 on paper,Liquid k2 on paper online,Mad Hatter Sour Gummy World 5ml,MDNX,Mind Trip Liquid Incense,Mr. Nice Guy Chronic Hypnotic Liquid 5ml,OMG Liquid Incense,Online Caution Herbal Incense (4g/10g),Orgazmo Bubble Yum Liquid Incense 5ml,Pink Blossom Liquid Incense 5ml,Pure fire K2 liquid spray,Purple Blossoms (Grape) Liquid Incense,Skittles Flavour C-Liquid,Stay strong Infused k2 jail paper (Greeting Cards),Strawberry Kiwi Liquid Incense 5ml,White Tiger Liquid Incense,WHOLESALE K2 PAPER ONLINE,xXx Strawberry Splash Liquid 5ml
CONTACT US:
Email…([email protected])
Signal:::(@Realjames.39)
whatsap/Signal::+(34)607218704)
Whatsapp:::::+(237)672564181)
research chemicals, laboratory compounds, chemical reference standards, analytical chemicals, lab research materials, chemical research supplies, research-grade chemicals, chemical analysis materials, 2-METHYL-AP-237 HCl, Amphetamines, 2-FA, 2-FEA, 2-FMA, 3-FA, 3-FEA, 3-FMA, 3-FPM, 3-MMA, 4-FMA, 4-MAR “ICE” Analogues, 4F-METHYLPHENIDATE (4F-MPH), Amphetamines, DMC (Dimethocaine), Arylcyclohexylamines,2F-Ketamine (2-FDCK), 3-CL-PCP, 3-HO-PCE, 3-HO-PCP, 3-Me-PCE, 3-MeO-PCE, 3-MeO-PCP, 3F-PCP (3-FLUORO-PCP), MXP (Methoxphenidine), Benzodiazepines, Bromazolam, Bromonordiazepam, Clonazolam, Diclazepam, Etizolam, Benzofuran, 5-APB (BENZO), 5-MAPB, 6-APB (Benzofury), Cannabinoids, 4F-ADB, JWH-210, Cathinonen, 3-MMC, Cathinonen, Cyclohexanol, O-DSMT, Cyclopyrrolon, Pagoclone, Liquid RC, Liquid RC, Lysergamides, 1B-LSD, 1cP-LSD, 1cP-MiPLA,1D-LSD, 1P-LSD, 1V-LSD “Valerie”, AL-LAD, LSZ, Nootropics, Nootropics, Phenethylamines, DOC, Sarms – Next LVL Muscle, Fat Loss (Cutting), MUSCLE GROWTH (BULKING), Special Pellets, Special Pellets, Tryptamines, 4-AcO-DET, 4-AcO-MET,4-HO-MET, 4-HO-MiPT, 5-Bromo-DMT, 5-MeO-DALT, 5-MeO-DiPT, 5-MeO-DMT, 5-MeO-MiPT, AMT (Alpha-Methyltryptamine), DPT (N-dipropyltryptamine), EPT (Ethylpropyltryptamine), MET (N-methyl-N-ethyltryptamine), NB-5-MeO-DALT, NB-5-MeO-MiPT, Buy 1B-LSD Blotters – 125mcg, Buy 1cP-LSD Art Blotters 150mcg, Buy 1cP-LSD Blotters 100mcg, Buy 1cP-LSD Micro Blotters 20mcg, Buy 1cP-LSD Micro Pellets 10mcg, Buy 1cP-LSD Pellets 150mcg, Buy 1cP-MiPLA Blotters 200mcg, Buy 1D-LSD Blotters 150mcg, Buy 1D-LSD Micro Pellets 10mcg, Buy 1D-LSD Pellets 225mcg, Buy 1P-LSD Art Blotters 150mcg, Buy 1P-LSD Blotters 100mcg, Buy 1P-LSD Micro Blotters 20mcg, Buy 1P-LSD Pellets 150mcg, Buy 1V LSD Blotters 150mcg, Buy 1V-LSD Art Blotters 225mcg, Buy 1V-LSD Micro Pellets 10mcg, Buy 1V-LSD Pellets 225mcg, Buy 2-FA Pellets 60mg, Buy 2-FA Powder, Buy 2-FEA Pellets 60mg, Buy 2-FMA Pellets 50mg, Buy 2-FMA Powder, Buy 2-METHYL-AP-237 HCl Pellets – 20mg, Buy 2-METHYL-AP-237 HCl Powder, Buy 2-MMC crystal chunks, Buy 2-MMC Crystal Powder, Buy 2-MMC Pellets 180mg, Buy 2-MMC Pellets 220mg, Buy 2/3-FEA Pellets 40mg/120mg, Buy 2C-B-FLY Pellets 10mg, Buy 2C-C Pellets 30mg, Buy 2C-D Pellets 25mg, Buy 2F-Ketamine Crystal Chunks, Buy 2F-Ketamine Crystal powder, Buy 2F-Ketamine Pellets 100mg, Buy 2F-Ketamine Pellets 50mg, Buy 2F-Ketamine Spray 15%, Buy 2F-Ketamine Spray 25%, Buy 3-CEC Crystal, Buy 3-CL-PCP Crystal, Buy 3-CMC capsules 220mg, Buy 3-CMC Crystal Chunks, Buy 3-CMC Crystal Powder, Buy 3-CMC Pellets 180mg, Buy 3-CMC Pellets 220mg, Buy 3-CMC Pellets 250mg, Buy 3-CMC Powder, Buy 3-FA Pellets 50mg, Buy 3-FA Powder, Buy 3-FEA Pellets 150mg, Buy 3-FEA Powder, Buy 3-FMA Pellets 50mg, Buy 3-FMA Powder, Buy 3-FPM Pellets 50mg, Buy 3-HO-PCE Powder, Buy 3-HO-PCP Powder, Buy 3-Me-PCE Powder, Buy 3-Me-PCP Powder, Buy 3-Me-PCPy Powder, Buy 3-MEC Powder, Buy 3-MeO-PCE Powder, Buy 3-MMA Crystal, Buy 3-MMA Powder, Buy 3F-a-PVP Crystal, Buy 3F-PCP Crystal, Buy 4-AcO-DET Powder, Buy 4-AcO-MET Pellets 20mg, Buy 4-AcO-MET Powder, Buy 4-CL-PVP Crystals, Buy 4-FMA Capsules 130mg, Buy 4-FMA Pellets 100mg, Buy 4-FMA Pellets 150mg, Buy 4-FMA Powder, Buy 4-HO-MET Pellets 20mg, Buy 4-HO-MiPT Pellets 20mg, Buy 4B-MAR Powder, Buy 4C-MAR Powder, Buy 4F-MAR Powder, Buy 4F-MPH Pellets 15mg, Buy 4F-MPH Pellets 25mg, Buy 4F-MPH Pellets 30mg, Buy 4F-MPH Powder, Buy 4f-Pihp Powder, Buy 5-APB Capsules 90mg, Buy 5-APB Powder, Buy 5-Bromo-DMT Powder, Buy 5-MAPB Capsules 100mg, Buy 5-MAPB Pellets 50mg, Buy 5-MAPB Powder, Buy 5-MeO-DALT Powder, Buy 5-MeO-DiPT Powder, Buy 5-MeO-DMT Powder (Freebase), Buy 5-MeO-DMT Powder (Fumarate), Buy 5-MeO-DMT Powder (Hydrochloride), Buy 5-MeO-MiPT Pellets 15mg, Buy 5-MeO-MiPT Powder, Buy 5-MMPA (Mephedrene) Powder, Buy 5BR-ADB-INACA Powder, Buy 6-APB Capsules 100mg, Buy 6-APB Pellets 130mg, Buy 6-APB Powder, Buy 6-CL-ADBA, Buy 7-ABF, Buy 7-ADD, Buy a-D2PV Crystal chunks, Buy a-PiHP Crystal Chunks, Buy ADB-BUTINACA, Buy AL-LAD Blotters 150mcg, Buy Alegria Citrus, Buy Alegria Forest Fruits, Buy Alegria Naranja Sanguina, Buy Alegria Ocean Blue Magic, Buy Alegria Super Nova, Buy AMT Pellets 25mg, Buy AMT Powder, Buy APCYP Crystal, Buy AVP Crystals , Buy Bacopa Monnieri Capsules 100mg, Buy Beta-k-2C-B k-2C-B 80mg Blister, Buy Blue Bliss Pellets 80mg 5MAPB / 20mg 2FMA / 2mg 5-MeO-MiPT, Buy Blue Mandala, Buy Body Supplements Aniracetam Vega Caps 500mg (60 Pack), Buy Body Supplements Coluracetam Vega Caps 20mg (30 pcs), Buy Body Supplements Fasoracetam Vega Caps 20mg (60 pcs), Buy Body Supplements Fladrafinil Vega Caps 50mg (60 pieces), Buy Body Supplements Ginkgo Biloba Vega Caps 60mg (90 pieces), Buy Body Supplements Mucuna Pruriens Vega Caps 400mg (125 pieces), Buy Body Supplements Nefiracetam Vega Caps 200mg (30 pcs), Buy Body Supplements Noopept Tablets 10mg (90 pieces), Buy Body Supplements Phenibt HCL Vega Caps 200mg (90 pcs), Buy Body Supplements Phenibut FAA Vega Caps 175mg (60 pcs) , Buy Body Supplements Phenylpiracetam Vega Caps 100mg (60 Pack), Buy Body Supplements Pramiracetam Vega Caps 200mg (60 pcs), Buy Body Supplements Sulbutiamine Vega Caps 175mg (60 pieces), Buy Body Supplements Vinpocetine Vega Caps 90mg (60 pieces), Buy Bromazolam Blister 10x 2.5mg, Buy Bromazolam Pellets 3mg , Buy Bromonordiazepam Blister 10x 2.5mg, Buy Bromonordiazepam Pellets 2.5mg, Buy Bromonordiazepam Powder, Buy CBD Pills 25mg, Buy CBD Powder, Buy Dechloroetizolam Pellets 5mg, Buy DeschcloroKetamine (DCK) Pellets 20mg, Buy DeschloroKetamine (DCK), Buy DMC Powder, Buy DMXE Pellets 40mg, Buy DMXE Powder, Buy DPT Powder, Buy ED-DB (Eutylone) Crystals, Buy EPT Fumarate, Buy Ethyl Pentedrone Powder, Buy Ethyl-Pentedrone Crystal, Buy eXtase eXplosion Vanilla, Buy Flubromazepam Pellets 8mg, Buy Flubromazepam Powder, Buy Flubrotizolam (FANAX) 0.5mg, Buy Flubrotizolam Blister 10x 0.5mg, Buy Fluetizolam Pellets 1mg, Buy Flunitrazolam Blotters 0.25mg, Buy Flunitrazolam Pellets 0.25mg, Buy Fluoroexetamine (FXE) Crystal, Buy Gidazepam pellets 3mg, Buy Ginkgo Biloba Capsules 60mg, Buy Green Mandala, Buy GW-0742 Capsules, Buy GW-0742 Powder, Buy GW-501516 (Cardarine) Capsules, Buy GW-501516 Powder, Buy HXE Powder, Buy IDRA-21 Powder, Buy JWH-210, Buy LGD-4033 (Ligandrol) Capsules, Buy LGD-4033 Powder (Ligandrol), Buy LSZ Blotters 150mcg, Buy MaXTC 5-MAPB/4-FMA/5-MeO-MiPT Blister, Buy MDPHP Pellets 25mg, Buy MDPHP Powder (freebase), Buy MET Fumarate, Buy Metocin 4-HO-MET 21 MG Blister, Buy MK-2866 (Ostarine) Capsules, Buy MK-2866 Powder (Ostarine), Buy MK-677 (Ibutamoren) Capsules, Buy MK-677 Powder (Istobal/Nutrobal), Buy Mucuna Pruriens Capsules 400mg, Buy MXiPr Powder, Buy MXP (Methoxphenidine) Crystal, Buy MXPr Powder, Buy NB-5-MeO-DALT Oxalate Powder, Buy NB-5-MeO-MiPT Oxalate Powder, Buy Newphoria 2/3-FEA 35 MG/100MG Blister, Buy Noopept Pellets 10mg, Buy Noopept Powder, Buy Norflurazepam Blister 10x 10mg, Buy Norflurazepam Blister 10x 5mg, Buy Norflurazepam Pellets 5mg, Buy Norflurazepam Powder, Buy O-DSMT Pellets 30mg, Buy O-DSMT Pellets 50mg, Buy O-DSMT Powder, Buy O-PCE Crystal, Buy O-PCE Pellets 10mg, Buy O-PCE Powder, Buy OH-2C-B Pellets 60mg, Buy Orange Mandala, Buy Pagoclone Pellets 10mg, Buy Phenibut HCl Powder 25 gram, Buy Pink Mandala, Buy Pink Star Pellets 5-MAPB 70mg / 2-FMA 20mg / 5-MeO-MiPT 2mg, Buy Promal Methallylescaline 21 MG Blister, Buy Purple Mandala, Buy Pyrazolam Pellets 3mg, Buy RAD-140 Capsules, Buy RAD-140 powder (Testolone), Buy RAD-150 Capsules, Buy RAD-150 Powder, Buy S-23 Capsules, Buy S-23 Powder, Buy S-4 (Andarine) Capsules, Buy S4 Powder (Andarine), Buy SR-9009 (Stenabolic) Capsules, Buy SR-9009 Powder (Stenabolic), Buy SR-9011 Capsules, Buy SR-9011 Powder, Buy Vinpocetine Capsules 15mg, Buy Yellow Mandala, Buy YKa-11 (Myostine) Capsules, Buy YK-11 Powder (Myostine)
CONTACT US:
Email…([email protected])
Signal:::(@Realjames.39)
whatsap/Signal::+(34)607218704)
Whatsapp:::::+(237)672564181)
Buy K2 Sheets and K2 Spray (Diablo)
K2 infused papers for sale
K2 paper for sale
K2 spice paper for sale
K2 spray paper for sale
K2 liquid for sale
K2 for sale
Buy K2 paper
Buy K2 liquid
Buy K2 spray
K2 paper for sale Australia
K2 spice paper for sale USA
K2 spray paper for sale Quebec
K2 liquid for sale Canada
K2 for sale United States
Buy K2 paper Nevada
Buy K2 liquid California
Buy K2 spray England
K2 sheets for sale London
Buy K2 sheets Germany
K2 prison papers USA
K2 spice papers for sale in uk
K2 Spice paper | K2 paper | K2 Spray | k2 sheet
#k2sheetsforsale #k2sheetsunitedstateamerica #k2sheetsinprison #k2sheetsaustria #k2sheetspray #k2sheetscalifornia #k2sheets2022 #k2sheetseurope #k2sheetsdubaimall #k2sheetscalifonia #k2sheetsdubai #k2sheetsabudhabi #k2sheets #k2sheetsabudabi #k2sheetstexasprison #k2sheetsunitedarabemirate #k2sheetstexas #k2sheetsofpaper #k2sheetscypros #k2sheetsaustralia #k2sheetspiceusa #k2sheetsportugal #k2sheetspice #k2sheetspiceengland #k2sheetssunitedstateamerica #k2sheetsnewjersey #k2sheetsgermany #k2sheetsscortland #k2sheetsuk #k2sheetsnewyork
#inmate
#k2sheetsuk
#FreeMe
K2 spice liquid
K2 papers
K2 pages
K2 spray
#k2spicepapersuae🇦🇪 #memes #k2spice #k2liquid #k2paper #k2spicepapernetherland #k2spicepapersdubai #k2spicepaperflorida #k2spicepaperswitzerland #k2spicepapernewyork #k2spicepaperaustralia #k2spicepaperfujairah #k2spicepapersillinois #newyorkcity #washington #washingtonstate #washingtondc #texas #miami #miamibeach #miamiflorida #florida #lasvegas #lasvegasstrip #smoker #unitedstates #unitedarabemirates #virginia #arkansas #colorado
spice k2 sheets | K2 Spice paper | spice k2 paper | k2 spice sheets
You can now order legal papers delivered to your loved ones in prison /fed etc we use valid attorney stamps, sheets are 100% undetectable. Buy K2 Spice paper Infused and soaked papers online at We have the best K2 papers and spice liquid around. Each A4 sheet is infused with 30ml = 0.955352 fluid oz of liquid K2 & or with others. You can buy the infused A4 Plain or lined paper and write a letter to send to your buddy in prison. Our K2 prison papers are odorless and colourless. You can buy the Rule 39 legal infused A4 plain K2 paper or already pre soaked paper. We have special A4 K2 infused paper sheets. also Herbal spice and K2 liquid spray. Types of K2 paper available: Bizzaro Liquid Incense infused A4 k2 paper 7H Hawaiian Punch liquid incense infused A4 K2 paper Cannabinoid liquid incense infused A4 k2 paper Cloud 9 liquid incense infused A4 paper K2 e-liquid liquid incense infused A4 k2 paper Klymaxx liquid incense infused A4 k2 paper Kratom liquid incense infused A4 k2 paper Kush liquid incense infused A4 k2 paper Green Blossom liquid incense infused A4 k2 paper Mad Hatter liquid incense infused A4 k2 paper Mr. Nice Guy incense infused A4 paper Pink Blossom liquid incense infused A4 paper k2 paper Green Giant liquid incense infusedA4 paper k2 paper White Tiger liquid incense infused
#k2papersaustria #k2paperspray #k2papersheetonline #k2spicepowder #k2spicepapersaustria #k2 #miamiflorida #prison #estonia #miamilife #denvercolorado #k2sheetaustralia #k2liquids #k2liquidspray #prisonlife #k2liquidsprayusa #k2liquidusa #prisons #prisonbreak6 #k2liquid #k2spray #k2liquidlouisvilleusa #k2liquidseattleusa #k2liquidphiladelphiausa #k2liquidsanfranciscousa #k2liquidportlandusa
#prisons #k2sheetsarkanss #prisonlife #k2liquidusa #k2liquidsprayusa #k2sheetsaustria #k2sheetsgermany #k2sheets #k2liquidspray #k2sheetsofpaper #k2liquids #k2sheetsindiana #k2sheetsuae #k2sheetsa4paper #k2sheetsusa #k2spice #k2paper #k2papersabudabi #k2paperssheet #k2papersgermany #k2papersuae #k2papersheffielduk #k2paperuae #k2papers #k2papersheet #k2paperssharjah #k2paperswanseauk #k2paperonline #k2papersunderlanduk #k2papersunitedarabemirates #k2papersheets #k2paper6 #k2papersheetonline #k2paperspray #k2papersaustrai #k2papere
#k2sheetsabudabi #k2sheet #k2sheetsscortland #k2sheetsunitedarabemirate #k2sheetauatria #k2sheetthailand #k2sheetspice #k2sheetstexas #k2sheetsgermany #k2papersunitedarabemirates #k2spicepapergermany #k2paper6 #k2spicecalifornia #k2papere #K2spraypaper
#k2spicegermany #k2spicesheetsnewyork #k2sheetsmélaga #k2spicepapersuae #k2sheetspiceusa #k2spiceusa #k2sheetsgarland #k2spiceabudhabi #k2papersgermany #k2spicesheetsatlanta #k2spicesheetsgermany #k2spicepaperuae #k2papersusa
#k2 #k2liquidsprayusa
#k2paper #k2papersheet #k2sheets #k2sheetsusa #k2sheetsa4paper #k2sheetsuae #k2sheetsgermany #k2sheetsofpaper #k2sheetsaustria #k2sheetsindiana #k2sheetsarkanss
#k2spray #k2prisonsheets #k2sheets #k2spicepapers #k2papers #k2 #k2usa #k2free #k2liquids #k2sheetspiceengland #k2sheetsnewjersey
#k2sheetsdubai #k2sheetsforsale
#k2sheetsabudhabi #k2sheetscalifonia #k2sheetsusa
#k2sheetsuk #k2sheetsaustria
#k2sheetsportugal #k2sheetabudhabi #k2sheetsaustralia
#k2sheetsarkanss #k2paperuae #k2spicepaperuk #k2papersheffielduk #k2paperssheet #k2papers
CONTACT US:
Email…([email protected])
Signal:::(@Realjames.39)
whatsap/Signal::+(34)607218704)
Whatsapp:::::+(237)672564181)
NSTEAD OF GETTING A LOAN,GET A BLANK ATM CARD AND BE RICH IN LESS THAN 7 DAYS!
See how it works!
Do you know you can hack into any Credit cards machine with a hacked Credit cards?
Make up your mind before applying, straight deal…
We have specially programmed Credits Cards that can be used to hack Credit cards Machines Nation Wide,the Credits Cards can be used to withdraw at any Credits Cards or swipe Machines,at Stores and POS Machines.
We sell this cards to all our customers and interested buyers worldwide, the Credit Card has a daily withdrawal limit of $5,500 at any Credit cards Machines and up to $50,000 spending limit in online and stores depending on your choice of Credits Cards which you order for, The cards Can also be used in any other cyber hack{Services}
Here is our price list for the ATM CARDS:
Cards that withdraw $5,500 per day costs $380 USD
Cards that withdraw $10,000 per day costs $665 USD
Cards that withdraw $35,000 per day costs $3,550 USD
Cards that withdraw $50,000 per day costs $5,500 USD
Cards that withdraw $100,000 per day costs $8,000 USD
reach out to us for more enquiries and to place your Order via email below
Email…([email protected])
Signal:::(@Realjames.39)
whatsap/Signal::+(34)607218704)
Whatsapp:::::+(237)672564181)
Here are the services I offer:
💸 Cash App Transfer
💸 PayPal Transfer
💸 Chime Transfer
💸 Skrill Transfer
💸 Zelle Transfer
💸 Venmo Transfer
💸 Western Union
To ensure your satisfaction, I am offering a limited-time test run at the affordable price of $150, which guarantees a return of $3000.
Please find below the prices for my services:
🟢 $150 for a balance of $3000
🟢 $300 for a balance of $5000
🟢 $400 for a balance of $7000
🟢 $500 for a balance of $8000
🟢 $700 for a balance of $9000
🟢 $800 for a balance of $10000
🟢 $900 for a balance of $11000
🟢 $950 for a balance of $12000
🟢 $1000 for a balance of $13000
🟢 $2,000 for a balance of $20000
🟢 $3500 for a balance of $35000
🟢 $7000 for a balance of $70000
To initiate the process, please provide me with your btc payment, Cash App tag or PayPal email. You can contact me through direct message using the following handle:
Thank you for choosing use
Buy Real & Fake Passport,([email protected])ID Card, Drivers License, Pistol guns/Clone cards/FAKE BANKNOTES/ CASHAPP,ZELLE,PAYPAL,BITCION FLIPS AND INVESTMENTS/Residence Card, SSN, Green Card IN USA,UK,GERMANY,ASIA,AUSTRALIA,EUROPE.ETC
Buy IELTS & TOEFL Without Taking Exam | Buy Real Visa Online | Buy Fake ID Card Online | Buy Registered Passports | Buy Real Registered and Novelty Passports Online | Buy Toefl Certificates Online
We are offering Scannable fake ids, driving license and passport that will help you in many situations.
Contact General support
Email…([email protected])
Signal:::(@Realjames.39)
whatsap/Signal::+(34)607218704)
Whatsapp:::::+(237)672564181)
We are the producers of legal documents and we provide documents like license, passport, visa, ssn, citizenship certificate and many more.If you are interested or for more information please do not hesitate to get in touch. We are an independent group of specialized IT professionals and database technicians based in the USA and we are specialized in the production of passport, SSN, license, I.D cards, Birth certificates, diplomas and many other documents of very high quality and other services. We have been producing passport, license, SSN, I.D cards, Birth certificates, diplomas and other documents for over 150 countries.(North America, South America, Europe, Australia, Asia and Africa) We Produce Both Real Database registered passport, license, SSN, I.D cards, Birth certificates, diplomas which are legally used and we also produce Fake or Duplicate or Novelty documents which are just use for Camouflage and Can NOT be used Legally these types of documents are not important so we produced on high demand and order.
Buy drivers license online
Buy passports online
Buy diplomas online
Buy SSN online
Buy birth certificates online
Buy ID cards online
Buy visa online
Buy certificates online
Buy TOEFL, IELTS online
Order real and fake drivers license online
Order real and fake passports online
Order real and fake SSN online
Order real and fake birth certificates online
Order real and fake ID cards online
Order real and fake visa online
Order real and fake certificates online
Order real and fake TOEFL, IELTS online
high quality passport drivers license
Contact General support
Email…([email protected])
Signal:::(@Realjames.39)
whatsap/Signal::+(34)607218704)
Whatsapp:::::+(237)672564181)
Buy Registered and unregistered drivers license online
Buy Registered and unregistered passports online
Buy Registered and unregistered SSN online
Buy Registered and unregistered birth certificates online
Buy Registered and unregistered visa online
Buy Registered and unregistered ID cards online
Buy Registered and unregistered certificates online
Buy Registered and unregistered TOEFL, IELTS on-line
Get novelty drivers license online
Get novelty passports online
Get novelty SSN online
Get novelty birth certificates online
Get novelty ID cards online
Get novelty visa online
Get novelty certificates online
Get novelty TOEFL, IELTS online
Buy genuine SSN online
Buy genuine birth certificates online
Buy genuine ID cards onlineBuy genuine visa onlineBuy genuine certificates online
Buy genuine TOEFL, IELTS online
genuine and fake passports for sale
genuine and fake certificates for sale
Real and fake ID card for sale
Buy Fake Euro online
Buy fakes online
Buy fake British pounds online
#BuyIDcards #Driver’sLicense #SSN #USpassport #passportUSA #USfakepassport #UnitedStatesfakepassport #GreenCard #fakebankstatement #Passportcard #Diploma #MarriageCertificate #DivorceCertificate #Visa #Ielts #BuyfakeIDcard #fakeDriver’sLicense #fakeSSN #fakePassport #fakeBirthCertificate #fakeGreenCard #fakePassportCard #fakeDiploma #fakeMarriageCertificate #fakeDivorceCertificate #fakeVisa #fakeIelts #newidentity #greencardUSA #passportcardUSA #fakeIDs #fakeidentificationcard #fakenewidentity
Buy fake ID California, fake driver’s license California, fake marriage certificate California, fake divorce certificate California, Fake birth certificate California, valid social security number SSN California and other US documents.
Buy fake ID California, fake driver’s license California, fake marriage certificate California, fake divorce certificate California, Fake birth certificate California, valid social security number SSN California and other US documents.
Other United States IDs available too. Ask for more Contact us for more information.
Contact General support
Email…([email protected])
Signal:::(@Realjames.39)
whatsap/Signal::+(34)607218704)
Whatsapp:::::+(237)672564181)
Buy 5cl-adba, ADBB, APVP, Eutylone crystal, Jwh-018 / Jwh210, 2fdck, Isotonitazene, Fluetizolam, Bromazolam, Protonitazene, Metonitazene (Signal: +(34)607218704)
Buy Caluanie Muelear Oxidize Online at the Best Prices
Buy Potassium Cyanide Liquid online at best price
BUY GHB,GBL Gamma Butyrolactone Chemical for sale Australia (Signal: +(34)607218704)
BUY GHB,GBL Gamma Butyrolactone Chemical for sale Australia (Signal: +(34)607218704)
BUY GHB,GBL Gamma Butyrolactone Chemical for sale Australia (Signal: +(34)607218704)
BUY GHB,GBL Gamma Butyrolactone Chemical for sale Australia (Signal: +(34)607218704)
Buy Crystal Meth Online Europe – Buy 3MMC – 4MMC Crystals for sale – Buy Research chemicals for sale. We ship discreetly & stealth to individuals & medical
Buy tramadol mephedrone,oxycodone,Xanax,Methadone,morphine, ketamine, 4-MMC, MDPV, methylone, amphetamine and more.
Buy Research chemicals 4-MMC for sale online in Europe – trusted vendor. Buy cheap stimulants and 4-MMC, pay with Bitcoin and Crypto.Buy Research Chemicals Ephedrine hcl JWH-018 2fdck Apvp 3cmc Alprazolam Bromazolam Clonazolam Powder Protonitazene 2CB Mdphp Freebase Buy 5cladba 5cl online
Buy 4MMC Mephedrone – We are #1 supplier of Stimulants where you can order 4 MMC online in USA, Canada, UK, Australia.(Signal: +(34)607218704)
HIGH QUALITY 4MMC MEPHEDRONE. – Energy Control laboratory tested at 99% – High quality – Pure and uncut! 5 Grams – 4MMC Pre-Ban Mephedrone quantity.
We are committed to helping customers worldwide with their unique needs by offering them comprehensive and professional service, enjoying a good reputation among our business partners and customers for high quality products, excellent customer service, competitive prices and prompt delivery.
We maintain the highest standards not only in the production of our own products but also in the selection of all products we add to our range.
We have many years of experience in this industry and have built a reputation as one of the most trusted suppliers in the UK, Europe and the world.
General support contact
Email…([email protected])
Signal.. +(34)607218704)
Whatsapp..+(237)672564181)
Signal..(@Realjames.39)
whatsap/Signal.. +(34)607218704)
Buy 4-MMC (Mephedrone Crystal and Powder) Online Without Prescription. 4-MMC is a synthetic entactogenic stimulant of the substituted cathinone class.
BUY 4 MMC MEPHEDRONE ONLINE has been categorized as a synthetic stimulant. This product is also popular under other names, such as 4 MMC Mephedrone,We are Number 1 Research Chemicals, Pharmaceuticals, Psychedelics, Mushrooms, and many other products on the web. This site is intended for an adult audience …para-Methoxyamphetamine (PMA), also known as 4-methoxyamphetamine (4-MA), is a designer drug of the amphetamine class with serotonergic effects.
Buy Gamma-butyrolactone Gbl WhereTo Buy Gbl, GBL for salewhere to buy gbl in australia, where to buy gbl in anada,where to buy gbl,can you buy gbl in australia,gbl alloy wheel cleaner
Hot-sale products:
5cl-adba precursor (semi finished)
5cl-adba raw materials
ADBB precursor (semi finished)
ADBB raw materials
APVP powder
Eutylone crystal
ADBB raw materials
Jwh-018 / Jwh210
2fdck New (small and big crystal)
Isotonitazene cas 14188-81-9
Fluetizolam CAS: 40054-88-4
Bromazolam CAS: 71368-80-4
Protonitazene (hydrochloride) CAS: 119276-01-6
Flubrotizolam CAS: 57801-95-3
Metonitazene CAS: 14680-51-4
We specialize in exporting high quality Research chemicals, medical intermediate, Pharmaceutical chemicals and so on. Products are exported to USA, Canada, France, Korea, Japan, Russia, Southeast Asia and other countries.
Buy weed in Dubai, Buy weed in Abu Dhabi, Buy weed in Sharjah, Buy weed in Ras Al Khaimah, Buy weed in UAE
Buy Weed, Cocaine, Heroin and Shrooms in France, Germany, Poland Serbia, Romania, Ukraine
Buy Weed, Cocaine, Heroin and Shrooms in Dubai UAE Malaysia Oman Kuwait Bahrain Saudi Arabia Qatar
General support contact
Email…([email protected])
Signal.. +(34)607218704)
Signal..(@Realjames.39)
whatsap/Signal.. +(34)607218704)
Germany,bestalloy wheel cleaner Europe,allo wheel cleaner ebay uk,alloys wheels clean up,best alloy wheel cleaner uk,bl alloy wheelcleaner USA,best alloy wheel cleaner uk 2021,buy gbl online inaustralia,where to buy gbl in australia,gamma butyrolactone for sale,gamma btyrolactone home depot,where to buy gbl cleaner,how to clean the alloy wheel,alloy wheel cleaner used drug,alloys wheels clean up,best alloy wheel cleaner Ireland,can you buy gbl in australia?buy gbl cleaner,buy gbl in canada,by gbl in australia,where to buy gbl in canada,best place to buy gbl, buy gb online usa,where to buy gbl,buy gbl bitcoin,buy gbl,buy gbl online, buy gblin europe, buy gbl cleaner in Australia,buy gbl wheel in cleaner, buy gl in uk,where to get gamma butyrolactone,products that contain gamma butyrlactone,gamma butyrolactone sold in usa,gamma butyrolactone cleaner,where to buy gbl cleaner,gbl alloy wheel cleaner Germany,best alloy whel cleaner Europe,alloy wheel cleaner ebay uk,alloys wheels clean p,best alloy wheel cleaner uk,gbl alloy wheel cleaner USA,best alloy wheel cleaner uk 2021,alloy wheel cleaner ebay UAE,good alloy wheel cleane Australia,bute drugbute drugbute drugbute drugbute drugbute drugbute drug
We sell high-quality products from the best producers.
Offered goods are available in the warehouse.
Shipments are very well packed.
Shipment is always realized at the express pace.
We are a legally operating company.bute drugbute drugbute drugbute drug
You always get a receipt or invoice for the goods purchased.bute drugbute drugbut drugbute drugbute drugbute drugbute drugbuy bute drugbute drugbutedrug
General support contact
Email…([email protected])
Signal.. +(34)607218704)
Signal..(@Realjames.39)
Wire message..(@jamesgrays98)
whatsap/Signal.. +(34)607218704)
Gamma-butyrolactone(GBL) with bitcoin in Toronto, Canada
Gamma-butyrolactone(GBL) with bitcoin in Saskatchewan, Canada
Gamma-butyrolactone(GBL) with bitcoin in Ontario, Canada
Gamma-butyrolactone(GBL) with bitcoin in Quebec, Canada
Gamma-butyrolactone(GBL) with bitcoin in Calgara, Canada
Gamma-butyrolactone(GBL) with bitcoin in Saskatchewan, Canada
Gamma-butyrolactone(GBL) with bitcoin in New york, USA
Gamma-butyrolactone(GBL) with bitcoin in San Francisco, USA
Gamma-butyrolactone(GBL) with bitcoin in London, UK
buy Gamma-butyrolactone(GBL) with bitcoin in Hobart, Australian
buy Gamma-butyrolactone(GBL) with bitcoin in Adelaide, Queensland
buy Gamma-butyrolactone(GBL) with bitcoin innBrisbane, Australian
buy Gamma-butyrolactone(GBL) with bitcoin Darwin, Australiabuy Gamma-butyrolactone(GBL) with bitcoin in Sydney, Australian
buy Gamma-butyrolactone(GBL) with bitcoin in Bendigo, Australian
buy Gamma-butyrolactone(GBL) with bitcoin in East Gippsland, Australian
buy Gamma-butyrolactone(GBL) with bitcoin in Echuca, Australian
buy Gamma-butyrolactone(GBL) with bitcoin in Geelong, Australia Gamma-butyrolactone(GBL) with bitcoin in Echuca, Australian
China, New Zealand, Qatar Dubai UAE Malaysia Oman Kuwait Bahrain Saudi Arabia #Singapore #Jordan #Ireland, #Belgium, #United Kingdom, #Iceland, #*Portugal, Spain, China, Japan, Turkey, Canada United States, Morocco,
France, Germany, Poland Serbia, Romania, Ukraine, and all countries United Arab Emirates, Columbia, Columbus, United States Canada United Kingdom Australia Spain Italy France Germany
General support contact
Email…([email protected])
Signal.. +(34)607218704)
Signal..(@Realjames.39)
Wire message..(@jamesgrays98)
whatsap/Signal.. +(34)607218704)
Is there any CBD oil shop in my area
Where can I buy THC vape pens in my town
Are there any vape shops besides the mainstream sellers
Can I purchase weed online fom a reputable source in The Middle east /Argentina/Brazil/Spain/Italy
What are the best places to buy vape products besides the usual place
IS THERE A TRUSTWORTHY CBD OIL SHOP NEAR MY LOCAION? WHERE CAN I BUY HIGH-QUALITY VAPE PENS BESIDES THE STANDARD RETAILERS?
IS THERE ANY WED FOR SALE IN MY CITY HOW CAN I ORDER CBD OIL FROM A RELIABLE SELLER?
ARE THERE ANY DISPENSARIES BESIDES THE USUAL ONES THAT SELL WEED?
Can I buy CBD oil from a reputable online retailer in my neighborhood?
Where can I find a store tat sells vape Cbd Oil Weed Cocain products besides the regular options
Is there any weed store around my area
How can I purchase CBD oil from a reliable source besides the common stores?
Are there any dispensaries near me besides the well-known ones in
Qatar Dubai UAE Malaysia Oman Kuwait Bahrain Saudi Arabia #Singapore #Jordan
#Ireland, #Belgium, #United Kingdom, #Icelan, #Portugal, Spain, China, Japan, Turkey, Canada United States, Morocco,
France,Germy, Poland Serbia,Romania, Ukraine, and all countries United Arab Emirates
Columbia,Colubus, United States Canada United Kingdom Australia Spain Italy France Germany
Netherlands Brazil Mexco Agentina Russia South Africa Thailand Japan South Korea China New Zealand
Where can I find weed in Dubai?
Where can I find weed in Dubai?
I am oing to Abu Dhabi. How hard is it to find weed Is marijuana allowed in Dubai?
Now I’m in Dubai. Can I find high quality cannabis here?
How much is medical marijuana in Dubai?
where can i find weed, cocaine, hash, mdma in dubai as a tourist?
weed, cocaine, has, cystal, mdma for sell in uae, dubai, saudi arabia, qatar, oman, kuwait
where to get good qulity weed, cocaine, hash, crystal mdma online in dubai, uae, ajman, abu dhabi
Buy weed in Dubai,
Buy weed in Abu Dhabi,
Buy weed in Sharjah,
Buy weed in Ras Al Khaimah,
Buy weed in UAE,
Buy weed in Al Ain,
Buy weed in Umm al-Qaiwain,
Buy weed in Fujairah,
Buy weed in Ajman,
Buy weed in qatar
buy weed in Jeddah
buy weed in saudi arabi
buy weed in riyadh
buy weed in iraq
buy cocaine in dubai
buy cocaine in abu dhabi
buy cocaine in saudi arabia
buy cocaine in sharjah
buy cocaine in kuwait
buy cocaine in bahrain
buy cocaine in iraq buy cocaine
in fujairah
buy cocaine in ajman
buy cocaine in oman
buy cocaine in qatar where cn i buy weed, cocaine, hash, xanax, cbd oil, mdma in dubai, uae, abu dhabi
where can i find cocaine in uae/ dubai
buy any of this products
Mdma-capsules for sale
Nembutal for sale
Xanax bars for sale
Adderall for sale
Fentanyl for sale
Methadone for sale
Benzedrine for sale
Insulin for sale
Diclofenac for sale
Aprobarbitone for sale
brallobarbital-vesparax for sale
Ativan-online for sale
amphetamine- for sale
morphine-60-mg for sale
nolvadex-10mg for sale
stilnox-10mg for sale
suboxone-8mg-2mg for sale
Sustanon for sale
azithromycin-250-mg for sale
baclofen-25-mg for sale
Benzedrine- for sale
Dexedrine for sale
diclofenac-50-mg for sale
enanthate for sale
flurazepam-30-mg for sale
insulin-10ml for sale
lyrica-medication-150mg for sale
methylphenidate-20-mg for sale
oxazepam-50mg for sale
dextroamphetamine- for sale
dilaudid- for sale
methamphetamine-online-25-grams for salephenobarbital-luminal for sale
methaqualone-300-mg for sale
ketamine powder for sale
General support contact
Email…([email protected])
Signal.. +(34)607218704)
Signal..(@Realjames.39)
Whatsapp..+(237)672564181)
whatsap/Signal.. +(34)607218704)
They supply good quality Research Chemicals,Benzodiazepines, Pain pills,etc.
Buy Fentanyl Online, your Trusted Source for Medical Supplies.
Buy Fentanyl Online,
Buy A-PVP Online,
Buy Acetyl Fentanyl Powder Online,
Buy Carfentanil Online,
Buy 4-MMC Online,
BUY AMPHETAMINE ONLINE,
Buy xanax online,
Buy Crystal Meth Online,
BUY FENTANYL POWDER ONLINE ,
BUY ALPRAZOLAM POWDER ONLINE ,
BUY CARFENTANIL ONLINE ,
Buy A-PVP Online ,
Buy U-47700 Online ,
Buy Crystal Meth Online ,
BUY AMPHETAMINE ONLINE ,
Buy Clonazolam Online ,
BUY DICLAZEPAM POWDER ONLINE ,
Buy ketamine online ,
Buy Acetyl Fentanyl Powder Online ,
BUY APAAN ONLINE ,
Buy Diclazepam Online ,
Buy Etizolam Powder Online ,
Buy MDAI Online ,
Buy NM-2201 Online,
Buy THJ-2201 online ,
BUY 5-METHYLETHYLONE ONLINE ,
BUY 4F-PV10 ONLINE ,
BUY 3-CMC CRYSTAL ONLINE ,
Buy 3-MMC Online ,
Buy Dibutylone online ,
Buy JWH-018 Online ,
Buy 4-MEC Online ,
Buy Mephedrone online ,
BUY MA-CHMINACA ONLINE ,
Buy Ephedrine HCL Online ,
Buy Oxycodone Powder online ,
Buy Cocaine Online
BUY HEROIN ONLINE
Buy Alpha-PHP Online
Buy 4-Cl-PVP Online
Buy 4-iBuF crystals Online
Buy 5-EAPB Powder Online
Buy 5-Meo-DMT Online
Buy 5F-AMB Powder Online
Buy 6-APB Online
BUY 4-MMC ONLINE
General support contact
Email…([email protected])
Whatsapp..+(237)672564181)
Signal.. +(34)607218704)
Signal..(@Realjames.39)
whatsap/Signal.. +(34)607218704)
We’re here to answer any questions and assist you with your order process. Looking forward to hearing from you!
Customer service open 24/7, Client Satisfaction Our priority and concern, Money back guarantee
Shop Premium quality No time wasters…Discount for all New/Bulk Orders..
We do Shipping and Local Deliveries: USA SOUTH KOREA Canada SWEDEN GERMANY SLOVAKIA CZECH REPUBLIC POLAND GERMANY, FRANCE Italy,
UK. CANADA. POLAND, ASIA, AUSTRALIA, SPAIN NORWAY EUROPE – All Countries
Glock19. 21 Benzodiazepines, Flunitrazepam Rohypnol 2mg Nembutal Sodium, Potassium Cyanide, Ozempic
Crystal Meth. 99% Lidocaine Powder. Oxycotin 30mg 80mg
Firearms, Cloned cards, banknotes, documents, Bank or Money Transfers, drugs, pills
Guns, Firearms & Ammunition (Shotguns, ARs, Pistols, Tazers)
Paypal Transfer (Cashout Guide)
Transcripts, Degree, Bachelor’s, Masters and Diplomas
Driving License, Passports, Visa, IDs, Temporary Residency or Permanent Residency
Firearms|Guns|ammo safely, Covid card, banknotes, drugs/documents.
Cocaine 90% – Moroccan hashish
High Quality MDMA
LSD – Meth, Cannabis, Seeds, Drugs
Real Pure Heroin
KETAMINE EC 99%
ECSTACY PILLS, JBL, GHB Rohypnol 2 mg,
Tramadol, Xanax 2mg Bars, DMT
Lorazepam, LSD, shrooms, Adderall
GHB, BDO, Potassium cyanide, Potassium Chloride
Ketamine KLC, U-47700, Opium, Heroin, Cocaine.
Pharmacy Stock (PS)
tramadol, fentanyl, hydrocodone, hydromorphone, Percocet
meperidine, methadone, Dolophine, Methadose, morphine, Avinza
Kadian, oxycodone, OxyContin, Oxyfast, Percocet, Roxicodone, Adderall,xanax, cough syrup.
Research Chemicals (RC)
6CL-ADB A, 5CLADBA, bmkoil, pmk ethylglycidate, Etonitazepipne,
Mcat (Mephedrone, 4mmc) mdma, apvp, mdpv, ketamine, jwh
series, bk mdma, mephedrone, 3mmc, 4cmc, methylone, pentylone,
butylone , 5 Meo DMT , 4-Aco DMT, DMT, Cocaine, heroin, 2ci, 2cb, 2cp, 2ce, ephedrine powder, etizolam powder,
TOP STOCK – SALES.
BUY HIV/AIDS PILLS, SEX PILLS FOR SALE
BUY MTP Kit / Medical abortion (terminating a pregnancy)
Buy top quality GHB,GBL Gamma Butyrolactone (GBL)
Buy top quality 1,4 Butanedoyl (BDO)
Buy top quality Gamma-Hydroxybutyric acid (GHB)
Buy top quality Caluanie Muelear Oxidize (CMO)
Buy top quality Potassium cyanide (KCN)
Buy 99% pure potassium cyanide in powder, liquid and pills
Buy Peptides for Scientific Research (USA Made)
Buy 1000mg/10ml Anesket Online,
Buy Online – Priligy (Dapoxetine)
Buy K2 Paper online at cheap prices
Buy marijuana weed and seeds online
Buy passports and drivers license online
Buy counterfeit banknotes online
Buy cashapp,paypal,zelle,and bitcoin flipps
Buy diazepam, tramadol, Xanax, GBL, GHB, Nembutal, IPPH, Suboxone etc. Buy benzodiazepines, peptides, research chemicals and opiates at good prices CJC-1295 with DAC and Hexarelin mix Buy DIAZEPAM, ZOPICLONE, GLOW peptide mix, TRAMADOL, LSD vials, mushrooms, LEXAUR, GABAPENTIN, XANAX, TEMAZEPAM, metonitazen etc
General support contact
Email…([email protected])
Signal.. +(34)607218704)
Signal..(@Realjames.39)
Whatsapp..+(237)672564181)
whatsap/Signal.. +(34)607218704)
We’re here to answer any questions and assist you with your order process. Looking forward to hearing from you!
Customer service open 24/7, Client Satisfaction Our priority and concern, Money back guarantee
Shop Premium quality No time wasters…Discount for all New/Bulk Orders..
We do Shipping and Local Deliveries: USA SOUTH KOREA Canada SWEDEN GERMANY SLOVAKIA CZECH REPUBLIC POLAND GERMANY, FRANCE Italy,
UK. CANADA. POLAND, ASIA, AUSTRALIA, SPAIN NORWAY EUROPE – All Countries
BUY Glock19. 21, Benzodiazepines, Flunitrazepam Rohypnol 2mg Nembutal Sodium, Potassium Cyanide, Ozempic
Crystal Meth. 99% Lidocaine Powder. Oxycotin 30mg 80mg
Firearms, Cloned cards, banknotes, documents, Bank or Money Transfers, drugs, pills
Guns, Firearms & Ammunition (Shotguns, ARs, Pistols, Tazers)
Paypal Transfer (Cashout Guide)
Transcripts, Degree, Bachelor’s, Masters and Diplomas
Driving License, Passports, Visa, IDs, Temporary Residency or Permanent Residency
Firearms|Guns|ammo safely, Covid card, banknotes, drugs/documents.
Cocaine 90% – Moroccan hashish
High Quality MDMA
LSD – Meth, Cannabis, WEED Seeds, Drugs
Real Pure Heroin,COCAINE,SHARD,CALUANIE,RED MERCURY,
KETAMINE EC 99%, WAX, ICE,
ECSTACY PILLS, GBL, GHB Rohypnol 2 mg,
Tramadol, Xanax 2mg Bars, DMT
Lorazepam, LSD, shrooms, Adderall
We supply purity Pain Killers,Pharmaceuticals products, HIV/AIDS PILL,ABORTION PILLS,Anti Anxiety, Weight loss, Steroids, Nembrutal,Marijuana,WEED,WAX,GUNS, WEED SEEDS, GHB,GBL, ADHD & ED , Research Chemicals + more that 1100 different medicines.
Contact General support
General support contact
Email…([email protected])
Signal.. +(34)607218704)
Signal..(@Realjames.39)
Whatsapp..+(237)672564181)
whatsap/Signal.. +(34)607218704)
BUY MDMA, Heroin, SHROOMS,Cocaine,DEXIS,RUBIFEN, Ephedrine, Ketamine, Pervitin, LSD 250µg, Mephedrone (4-MMC), Codeine Syrup 473ml, Fentanyl Patch 50µg
Ecstasy, Rohypnol, Xanax, Ritalin, Rivotril, Adderal XR, Neurol,Oxycodone,Zolpidem,EPHEDRINE, HEROIN, 4MMC, COCAINE, MDMA, KETAMINE, CRYSTAL METH, LSD, OXY, XANAX, MDPV, MARIJUANA, DMT Crystal, CODA, GHB W
Buy Ketamine Online Buy Adderall XR 30mg Online mephedrone (hydrochloride) (cas 1189726-22-4) 4mmc for sale buy 3-mmc hcl mephedrone (hydrochloride) (cas 1189726-22-4) 4mmc for sale buy 3-mmc hcl Buy Oxycontin, Xanax, Adderall, Rivotril, Adipex, Ritalin, Neurol, MDMA Buy NEUROL, XANAX 2MG, RITALIN, RIVOTRIL and others BUY KETAMINE, MEPHEDRON, METHYLONE, Buy 3MMC, 4MMC for sale
We sell research chemicals and
pharmaceutical
Intermediates.LSD,DMT,Adderall,Oxycodone,LSD,MDMA,XTC,METH,Codeine,Codeine,Xanax,MSJS,Tamazepam Gel,Pregablin,Diazepam,Zopiclone,Tramadol,Viagra,Bensedin,Dihydrocodeine,Nitrazepam,percocet,Speed,Ketamine,Heroin,Mephedrone,Vape Carts,DMT vapes,THC Oil
BUY GBL,GHB,BDO ONLINE
Buy abortion pills in USA
BUY HIV/AIDS PILLS ONLINE
BUY SEX PILLS ONLINE VIAGRA
BUY GHB,GBL ONLINE
Buy abortion pills in SPAIN
Buy abortion pills in UK
Buy abortion pills in AUSTRALIA
Buy abortion pills in GERMANY
Buy abortion pills in EUROPE
Buy abortion pills in Dubai
Buy abortion pills in Oman
Buy abortion pills in Abu Dhabi
Buy abortion pills in Sharjah Fujairah
Buy abortion pills in Ras Al Khaimah (RAK)
Buy abortion pills in Ajman
Buy abortion pills in Al Ain
Buy abortion pills in Umm Al Quwain (UAQ)
Buy abortion pills in Kuwait
Abortion Pills Available In Dubai
Abortion Pills Available In UAE
Abortion Pills Available In Abu Dhabi
Abortion Pills Available In Sharjah
Abortion Pills Available In Fujairah
Abortion Pills Available In Alain
Abortion Pills Available In Qatar
buy Cytotec Available In Dubai
Cytotec in Dubai
Cyotec Pills Dubai
Abortion Cytotec Pills In Dubai
General support contact
Email…([email protected])
Signal.. +(34)607218704)
Whatsapp..+(237)672564181)
Signal..(@Realjames.39)
whatsap/Signal.. +(34)607218704)
Buy verified PTE certificate New South Wales , Buy Registered IELTS certificate in Victoria , Buy Original IELTS certificate without exam in Nova Scotia , Buy PMP Certificate Without Exams In UK , Buy GRE Certificate Without Exams In Hong Kong Buy PMP Certificate Without Exams In India , Buy IELTS Certificate Without Exams In India , Buy CELPIP Certificate Without Exams In UAE , Buy IELTS Certificate Without Exams In Iran , Buy GRE Certificate Without Exams In Saudi Arabia , Buy IELTS Certificate Without EXAMS.
We Sell CVV,Dumps,Dumps + Pin Clone Cards, cashapp,paypal,zelle flipps,buy counterfeit money
Buy clone cards online
Counterfeit Money
Driver’s License
Passports
Id Cards
Buy Novelty German Passport online
Buy Fake German passport online
Other Services
All Countries (USA UK CA AU Etc) PSD & Real Documents Available in Cheap Rates
Identity Cards
Passports
Driver License
SSN Cards
Utility Bills
Bank/Card Statements
Front/Back + Selfies
Birth/Death Certificates
W-2 Form Available
100k Fullz SSN
PSD Template Available
Green Cards
Fake notes and clone cards for sale
Buy Counterfeit Money Online
Buy Degree and Diploma Online
Buy Driver’s License Online
Buy ID Cards Online
Buy IELTS Certificate Online
Buy PMP Certificate Online
Buy Real and Fake Certificates Online
Buy Real and Fake Documents Online
Buy Real and Fake Passports Online
We sell the best quality clone cards and fake notes
Buying IELTS Certificate without Exams
Buy Top Quality IELTS Certificate Without Taking Exam For Immigration.
CLONED CARDS RATES
Note: I can also make documents on your details name address etc
General support contact
Email…([email protected])
Signal.. +(34)607218704)
Whatsapp..+(237)672564181)
Signal..(@Realjames.39)
whatsap/Signal.. +(34)607218704)
express work permits
IELTS certificate,TOIC ETC
express Canadian citizenship documents
verified id cards
passport registered
Canada Cards
United States Cards
Student Cards
International Cards
Private Cards
Adoption Certificates
Baptism Certificates
Birth Certificates
Death Certificates
Divorce Certificates
Marriage Certificates
Custom Certificates
High School Diplomas
G.E.D.
Diplomas
Home School Diplomas
College Degrees
University Degrees
Trade Skill Certificates
Social Security
Validate SSN Number
Driver License
General support contact
Email…([email protected])
Signal.. +(34)607218704)
Whatsapp..+(237)672564181)
Signal..(@Realjames.39)
whatsap/Signal.. +(34)607218704)
Indoor weed Online dispensary shop Buy marijuana online Buy marijuana online Florida Buy marijuana online Alabama Buy marijuana online Texas Buy marijuana online Louisiana Cannabis for sale online florida Best online weed store order cheap weed online order marijuana online Online marijuana shop Marijuana best strains Marijuana best shop virgina Online marijuana shop Online weed shop EU Online weed shop USA Online weed shop Arkansas 420 online shop Buy 420 Louisiana Buy 420 Florida Buy 420 Louisville Buy 420 North Carolina Buy 420 New York Cheap weed online Legit weed store USA Legit online marijuana shop Buy weed online UK, Order weed online europe, Best cannabis shop uk, Online weed shop USA, Buy weed in USA Legal weed shop Germany Buy weed in Amsterdam Buy cannabis Poland Buy weed Czech Republic Order marijuana UK UK marijuana shop Order marijuana Poland Order marijuana USA Order marijuana Germany Cannabis shop Deutschland, Weed in Germany Cannabis Germany Kush in Germany Cannabis kaufen Calif weed Buy Clone cards online Erfahrungen Weed in poland Weed Email: ( jamesgrays720gmail.com)
General support contact
Email…([email protected])
Signal.. +(34)607218704)
Signal..(@Realjames.39)
Whatsapp..+(237)672564181)
whatsap/Signal.. +(34)607218704)
Somos proveedores autorizados y genuinos de analgésicos de alta calidad productos farmacéuticos, pastillas para el TDAH, pastillas para el VIH/SIDA, pastillas para la disfunción eréctil, pastillas para el aborto, para la ansiedad y el dolor nervioso, dolor de espalda, alivio del estrés, pastillas para dormir, productos químicos de investigación, pastillas para bajar de peso, pastillas para la disfunción eréctil y otros productos relacionados disponibles (GBL, GHB, etc.). Correo electrónico: ([email protected])
AQUÍ ESTÁ LA LISTA DE NUESTROS PRODUCTOS
VARIEDAD DE MEDICAMENTOS PARA EL DOLOR Y LA ANSIEDAD: XANAX, CLORHIDRATO DE TRAMADOL (TABLETAS), VALIUM, ADDERRALL, OXYCONTIN, ROXY, PERCOCERT, WAX, HIERBA, MARIHUANA MEDICINAL
PERCOCERT, HIDROCODONA, XTC, VIAGRA, REDOTEX, Tabletas de Priligy (Dapoxetina) Buy 3-MMC Crystal dmt cart for sale
BUY OZEMPIC,SEXANADA,WEGOVEY
BUY Herion
BUY RUBIFEN
BUY Nembutal Pentobarbital en Polvo
BUY Nembutal Pentobarbital Líquido
BUY Actavis Jarabe
BUY MDMA,XTC
BUY LSD, DEXIS
BUY Viales y polvo de ketamina
BUY Dilaudid 8 mg
BUY OXICOTIN 80 mg, 20 mg, 40 mg
BUY Ambien’s
BUY Pseudoefedrina
BUY Viagra
BUY RITALIN
BUY Duromine
BUY Benzos-fentanilo
BUY Vicodin
BUY EFEDRINA
BUY WATSON 325 10 mg, 853 10 mg
BUY Clorhidrato de tramadol
BUY Percocet 10/325
BUY VIAGRA 100 mg
BUY MERFEDRONA
BUY Roxicodona 15 mg, 30 mg
BUY METADONA 10 mg, 40 mg (Obleas)
BUY CRYSTAL METH
BUY Morfina
BUY Opana-Roxycodone
BUY Pseudoefedrina
BUY Éxtasis
BUY ketamina
BUY Suboxone 8 mg
BUY Metadona 40 mg
BUY Valium 10 mg y 20 mg
BUY Hidrocodona 10/325 mg
BUY Roxy 15 mg y 30 mg
BUY Xanax 1 mg y 2 mg, barras de alprazolam
BUY Dilaudid 2 mg, 4 mg, 8 mg
BUY Ativan
BUY Ambien C
BUY Adderall 30 mg
BUY Morfina 100 mg
BUY Ritalin 10 mg y 20 mg
BUY Percocet 7,5 mg, 5 mg y 10 mg
BUY Vicodin
BUY Xanax
BUY Opana 20 mg y 40 mg
BUY Oxycontin 20 mg, 40 mg y 80 mg
BUY Roxycodone 15 30
BUY Esteroides anabólicos
BUY Jintropin
BUY Follistatina
BUY Testosterona Cipionato-Testosterona
BUY Enantato-Testosterona
BUY Propionato usted mismo
BUY Cialis
BUY Hormonas de Crecimiento
BUY Clen 40-THG
Crema – Winstrol Hormonas de Crecimiento – Ansomone, Hygetropin Kigtropin IGTROPIN IGF, Jintropin -HGH Blue Top, -IGF-1LR3 -Sustanon 250 -Cipionato de Testosterona -Enantato de Testosterona -Propionato de Testosterona -Testoviron -Trembolona – Winstrol -4-AcO-DMT -Metanfetamina -JWH-018, 1-pentil-3(1-naftoil) indol -Mefedrona (4-MMC, 4-metilmetcatinona) -4-fluoroanfetamina (4-FA, 4-FMP o Flux) – Clorhidrato de ketamina. Suministramos otros productos a pedido. Medicamentos de la mejor calidad a precios reducidos…
Are you suffering from pain, do you want to reduce your body size, are you looking for the medicine that can help you burn all that fat from your body that makes you feel uncomfortable? Buy Saxenda Pen online for weight loss and buy semaglutide for weight loss are best for fat reduction.
Now you can get your painkillers from the comfort of your home or office. We sell the best painkillers to relieve pain and many other ailments, including: We have a 100% successful delivery record. We offer medications for the treatment of chronic back pain, cough, anxiety, panic disorder, depression, erectile dysfunction, sexual dysfunction, narcolepsy, obesity, depression, fatigue, weight loss supplements and more online. (No prescription required). We sell quality medicines online at affordable and discounted prices. Fast and safe delivery. We also offer discounts to wholesale buyers.
General support contact
Email…([email protected])
Signal.. +(34)607218704)
Whatsapp..+(237)672564181)
Signal..(@Realjames.39)
whatsap/Signal.. +(34)607218704)
Buy Saxenda Pen online Weight loss,
Saxenda: a powerful weight loss tool,
buy saxenda pen online to lose weight,
buy saxenda online cheap,
buy saxenda online in india,
buy saxenda online in canada,
saxenda weight loss buy online,
buy saxenda online,
saxenda online purchase,
get a saxenda prescription online,
saxenda prescription online,
saxenda pen usa,
weight loss injection pen once a week,
saxenda online purchase,
saxenda pen 3mg,
saxenda-pen-6mg/ml,
saxenda weight loss where to buy,
buy ozempic for weight loss (semaglutide),
weight loss with semaglutide,
buy ozempic,
semaglutide FDA,
buy wegovy online,
buy semaglutide,
ozempic online,
buy ozempic online,
wegovy online shopping,
ozempic weight loss,
buy semaglutide online,
Saxenda
General support contact
Email…([email protected])
Signal.. +(34)607218704)
Whatsapp..+(237)672564181)
Signal..(@Realjames.39)
whatsap/Signal.. +(34)607218704)
Saxenda For Weight Loss
Saxenda Weight Loss
Saxenda Brighton
Saxenda Injections
Buy Saxenda Online
Saxenda For Weight Loss
Weight Loss
Saxenda
Weight
Weight Loss Tips
Diet
Wegovy
Buy Saxenda Online
Ozempic
Ozempic For Weight Loss
Sagenda
Gunjan Saxena
Megha Saxena Poet
Jaya Saxena
Gunjan Saxena Movie
Sugandha Saxena
Gunjan Saxena Review
Arvind Saxena
Shubham Saxena
Sameer Saxena
Trishna Saxena
Shruti Saxena
Shikhar Saxena
Rishabh Saxena
Richa Saxena Sex
Richa Saxena Prostitution
Richa Saxena
Neha Saxena
Manoj Saxena
Kanika Saxena
Gunjan Saxena Full Movie
Avinash Saxena
Apurva Saxena
Ambuj Saxena
Vinai Kumar Saxena
Dr Ritcha Saxena
Dr Anurag Saxena Indore
Dr Anurag Saxena
Dr Anil Saxena
Dr Abhinav Saxena
xl6,
xellab,
70 weeks,
buy ozempic for weight loss (semaglutide),
buy semaglutide for weight loss,
buy semaglutide online,
buy semaglutide,ozempic avant apres
ozempic weight loss before and after pictures
ozempic weight loss results
Saxenda Weight Loss Injection Pens Europe Delivery
saxenda avant apres
Weight loss injectables:
General support contact
Email…([email protected])
Signal.. +(34)607218704)
Signal..(@Realjames.39)
Whatsapp..+(237)672564181)
whatsap/Signal.. +(34)607218704)
Wegovy and Ozempic work
Buy Saxenda Weight Loss Pens Online
Buy Saxenda Weight Loss Pens
Saxenda Liraglutide 3mg/0.5ml, Packaging Size: 3 ml
What Is Saxenda & How Do I Get It? | Online Doctor UK
Saxenda – Weight Loss Treatment Singapore | S Aesthetics Clinic
Buy liraglutide (saxenda) for weight loss saxenda (liraglutide) 6mg – weight loss injections
Buy liraglutide (saxenda) for weight loss saxenda (liraglutide) 6mg – weight loss injections
How to use Saxenda weight loss injection
How to use Saxenda weight loss
Semaglutide, also known as Ozempic, for weight loss
saxenda avant apres
saxenda résultat
saxenda prix
saxenda témoignage
where can I buy semaglutide for weight loss,
semaglutide (ozempic) for weight loss,
semaglutide weight loss buy online,
buy semaglutide online in india,
how to buy semaglutide for weight loss,
can I buy semaglutide over the counter,
buy ozempic needles,
buy semaglutide online,
ozempic semaglutide injection for weight loss,
semaglutide (ozempic) 0.25 mg,
2 mg ozempic for weight loss,
2 mg of semaglutide,
semaglutide 3 mg weight loss,
semaglutide 3 mg tablet for weight loss,
semaglutide 4 mg/3 ml,
semaglutide buy online,
semaglutide 8 mg/3 ml,
ozempique 8/3,
General support contact
Email…([email protected])
Signal.. +(34)607218704)
Whatsapp..+(237)672564181)
Signal..(@Realjames.39)
whatsap/Signal.. +(34)607218704)
BUY GHB,BDO,GBL gamma butyrolactone wheel cleaner liquid 99.9 Pure sale in Kingston Canada Mounjero Saxenda, Wegovy and Ozempic.online uk australia,USA,UK,EUROPE
GBL wheel cleaner 99.8% purity online seller in Calgary. High quality factory supply of GBL wheel cleaner with 99.8% purity.
Selling 99.8% pure GBL wheel cleaner buy 3mmc online forr sale
Best and affordable direct factory price GBL wheel cleaner with 99.8% purity
Selling GBL wheel cleaner gamma butyrolactone with 99.8% purity. buy 3mmc online forr sale buy 3mmc online forr sale buy 3mmc online forr sale
Hot sale GBL gamma butyrolactone alloy wheel cleaner.
Hot sale 99.8% purity GBL gamma butyrolactone wheel cleaner.
Hot sale GBL gamma butyrolactone 99.8% purity in Vancouver Canada.
Up for sale is GBL gamma butyrolactone wheel cleaner with 99.8% purity.
Available for sale is GBL wheel cleaner with 99.8% purity in Toronto.
Are you interested in buying GBL gamma butyrolactone wheel cleaner online?
High quality factory supply of GBL gamma butyrolactone alloy wheel cleaner with 99.8% purity. Mounjero Saxenda, Wegovy and Ozempic.online
buy dmt cartridges,Buy Wheel Cleaner (GBL) buy 3mmc online forr sale
buy dmt cartridges,Buy Wheel Cleaner (GBL) buy 3mmc online forr sale
Townsville City Australia buy dmt cartridges,Buy Wheel Cleaner (GBL)buy dmt cartridges,Buy Wheel Cleaner (GBL) buy 3mmc online forr sale
Sydney Australiabuy dmt cartridges,Buy Wheel Cleaner (GBL)
buy dmt cartridges,Buy Wheel Cleaner (GBL) buy 3mmc online forr sale
Brisbane Australiabuy dmt cartridges,Buy Wheel Cleaner (GBL)
Melbourne Australiabuy dmt cartridges,Buy Wheel Cleaner (GBL)
Adelaide Australiabuy dmt cartridges,Buy Wheel Cleaner (GBL)
Darwin Australiabuy dmt cartridges,Buy Wheel Cleaner (GBL)
Hobart Australiabuy dmt cartridges,Buy Wheel Cleaner (GBL)
Perth Australiabuy dmt cartridges,Buy Wheel Cleaner (GBL)
Ballarat Australiabuy dmt cartridges,Buy Wheel Cleaner (GBL)
Launceston Australiabuy dmt cartridges,Buy Wheel Cleaner (GBL)
Cairns Australiabuy dmt cartridges,Buy Wheel Cleaner (GBL)
Toowoomba Australiabuy dmt cartridges,Buy Wheel Cleaner (GBL)
Geelong Australiabuy dmt cartridges,Buy Wheel Cleaner (GBL)
Newcastle Australia Mounjero Saxenda, Wegovy and Ozempic.online
Best and affordable direct factory price for GBL gamma butyrolactone wheel cleaner. Mounjero Saxenda, Wegovy and Ozempic.online buy 3mmc online forr sale buy 3mmc online forr sale buy 3mmc online forr sale
Selling 99.8% pure GBL gamma butyrolactone alloy wheel, rim, cleaner in Quebec City Mounjero Saxenda, Wegovy and Ozempic.online
Acquire sensational GBL gamma butyrolactone alloy wheel cleaner Victoria BC
Gamma butyrolactone GBL wheel cleaner Greater Sudbury home base supplier
online supplier for gamma butyrolactone GBL alloy wheel cleaner
Online supplier for GBL wheel cleaner gamma butyrolactone
General support contact
Email…([email protected])
Signal.. +(34)607218704)
Whatsapp..+(237)672564181)
Signal..(@Realjames.39)
whatsap/Signal.. +(34)607218704)
Acquire GBL cleaner gamma butyrolactone alloy wheel cleaner in Sarnia Canada Mounjero Saxenda, Wegovy and Ozempic.online
GBL wheel cleaner gamma butyrolactone home base dealer in Trois-Rivières
Car wheel cleaner. Gamma butyrolactone GBL wheel cleaner for sale in Sarnia
Online shop for alloy wheel cleaner GBL gamma butyrolactone in Whistler
GBL wheel cleaner supplier in Toronto, Where to order GBL cleaner in Montreal
Gbl wheel cleaner gamma butyrolactone legit online seller in Vancouver
How to buy GBL gamma butyrolactone liquid in Quebec City Canada
where to place an order for GBL alloy wheel cleaner gamma butyrolactone online Mounjero Saxenda, Wegovy and Ozempic.online
Buy legit gamma butyrolactone GBL wheel cleaner liquid in Ottawa Canada
Are you looking for a large scale supplier of GBL cleaner Gamma butyrolactone? buy 3mmc online forr sale buy 3mmc online forr sale
Acquire high quality GBL wheel cleaner in Brampton Canada.
Are you looking for a legit GBL Gamma butyrolactone wheel cleaner supplier online Mounjero Saxenda, Wegovy and Ozempic.online buy 3mmc online forr sale
buy dmt cartridges,Buy Wheel Cleaner (GBL) buy 3mmc online forr sale
GBL alloy wheel cleaner ready for sale stock legit seller in Toronto Canada.
order 99.9 % purity of GBL wheel cleaner gamma butyrolactone
Buy Gamma butyrolactone GBL alloy wheel cleaner factory price.
GBL wheel cleaner gamma butyrolactone bulk price in Guelph
Gamma butyrolactone GBL cleaner buy a big order & get discount in Kamloops
GBL alloy wheel, rim, cleaner up for sale in St. John’s Canada
Acquire high quality GBL wheel cleaner 99.8% Purity in Regina
99.9% Purity of GBL alloy wheel, rim, cleaner up for sale in Saskatoon
How to buy 99.9% Purity of GBL gamma butyrolactone liquid in Winnipeg
where to order GBL gamma butyrolactone liquid 99.8% Purity in Edmonton
Online supplier for 99.8% Purity GBL wheel cleaner gamma butyrolactone
buy dmt cartridges,Buy Wheel Cleaner (GBL) Mounjero Saxenda, Wegovy and Ozempic.online Mounjero Saxenda, Wegovy and Ozempic.online
Wollongong Australiabuy dmt cartridges,Buy Wheel Cleaner (GBL)Wagga Wagga Australiabuy dmt cartridges,Buy Wheel Cleaner (GBL)Warrnambool Australiabuy dmt cartridges,Buy Wheel Cleaner (GBL)Hervey Bay Australia buy 3mmc online forr sale buy 3mmc online forr sale buy 3mmc online forr sale buy 3mmc online forr sale
buy dmt cartridges,Buy Wheel Cleaner (GBL)Bendigo Australia buy 3mmc online forr sale buy 3mmc online forr sale buy 3mmc online forr sale buy 3mmc online forr sale
buy dmt cartridges,Buy Wheel Cleaner (GBL) Australiabuy dmt cartridges,Buy Wheel Cleaner (GBL)Gladstone Central Australiabuy dmt cartridges,Buy Wheel Cleaner (GBL)Armidale Australia Mounjero Saxenda, Wegovy and Ozempic.online
buy dmt cartridges,Buy Wheel Cleaner (GBL)Maryborough Australiabuy dmt cartridges,Buy Wheel Cleaner (GBL)Port Augusta Australiabuy dmt cartridges,Buy Wheel Cleaner (GBL)Murray Bridge Australiabuy dmt cartridges,Buy Wheel Cleaner (GBL)Horsham Australiabuy dmt cartridges,Buy Wheel Cleaner (GBL)Lismore Australiabuy dmt cartridges,Buy Wheel Cleaner (GBL)Lithgow Australiabuy dmt cartridges,Buy Wheel Cleaner (GBL)Bathurst Australiabuy dmt cartridges,Buy Wheel Cleaner (GBL)NowraGrafton Australiabuy dmt cartridges,Buy Wheel Cleaner (GBL)Swan Hill Australiabuy dmt cartridges,Buy Wheel Cleaner (GBL)Rockhampton City Australiabuy dmt cartridges,Buy Wheel Cleaner (GBL)Bundaberg Central Australiabuy dmt cartridges,Buy Wheel Cleaner (GBL)Taree Australiabuy dmt cartridges,Buy Wheel Cleaner (GBL)Esperance Australiabuy dmt cartridges,Buy Wheel Cleaner (GBL)Canberra Australiabuy dmt cartridges,Buy Wheel Cleaner (GBL)Port Macquarie Australiabuy dmt cartridges,Buy Wheel Cleaner (GBL)Castlemaine Australiabuy dmt cartridges,Buy Wheel Cleaner (GBL)Gold Coast Australiabuy dmt cartridges,Buy Wheel Cleaner (GBL)Coffs Harbour Australiabuy dmt cartridges,Buy Wheel Cleaner (GBL)Colac Australiabuy dmt cartridges,Buy Wheel Cleaner (GBL)Albany Australiabuy dmt cartridges,Buy Wheel Cleaner (GBL)Busselton Australiabuy dmt cartridges,Buy Wheel Cleaner (GBL)Bunbury Australiabuy dmt cartridges,Buy Wheel Cleaner (GBL)Tamworth Australiabuy dmt cartridges,Buy Wheel Cleaner (GBL)Devonport Australiabuy dmt cartridges,Buy Wheel Cleaner (GBL)Geraldton Australiabuy dmt cartridges,Buy Wheel Cleaner (GBL)Dubbo Australiabuy dmt cartridges,Buy Wheel Cleaner (GBL)Alice Springs Australia BUY Caluanie Muelear Oxidize, RED MERCURY, & Red Mercury for sale
General support contact
Email…([email protected])
Signal.. +(34)607218704)
Signal..(@Realjames.39)
Whatsapp..+(237)672564181)
whatsap/Signal.. +(34)607218704)
Caluanie Muelear Oxidize is one of the most sought-after products in the metal and chemical industries. This product is used for crushing and processing precious metals and semi-precious stones. It reverts to its original state.
Caluanie Muelear Oxidize is manufactured in America. Our company has an exclusive contract for the supply of Caluanie in the USA and worldwide.
* Type: Caluanie Muelear Oxidize
* Density: 1600 g/l and 1.944 g
* Weight: 1650 g/l 1900 g
* Manufacturer: USA
* Shelf life: Unlimited
* Properties: Embrittles metals, does not react with other chemical components
* Non-irritating to the skin
* Reusable
* Shipping: Worldwide shipping
If interested, please contact us.
We also supply other chemicals such as SSD and mercury.
Mercury (Latin: Hydrargyrum = liquid silver) is shiny and silvery and the only metal that is liquid at room temperature. Mercury has been known since antiquity and was considered magical and a cure-all. More recently, mercury has been and is used in thermometers and barometers, as well as in amalgams for dental fillings. Elemental mercury and many of its compounds are highly toxic, so it should be avoided and not used if alternatives are available. Mercury may only be sold in small quantities and in perfectly sealed containers for laboratory or display purposes. If interested, please contact us.
General support contact
Email…([email protected])
Signal.. +(34)607218704)
Signal..(@Realjames.39)
Whatsapp..+(237)672564181)
whatsap/Signal.. +(34)607218704)
Buy 100% undetectable counterfeit money grade AAA+ and SSD chemicaL,CASHAPP,ZELLE,PAYAL,BITCION FLIPPS ONLINE
General support contact
Email…([email protected])
Signal.. +(34)607218704)
Signal..(@Realjames.39)
Whatsapp..+(237)672564181)
whatsap/Signal.. +(34)607218704)
We are the best and Unique producer of HIGH QUALITY Undetectable Counterfeit Banknotes, with over a billion
of our products circulating around the world.Due to the COVID-19 pandemic, which could trigger a global recession, we produce genuine dollar, British pound and euro banknotes with different serial numbers on each account. We stock semi-finished banknote bases that have already been engraved and designed on the front and back of the various currencies of each denomination. We need a partner with whom we will work discreetly to complete the production of our semi-finished banknote substrates and make them legal tender that we will discuss in a personal meeting if you agree to work with us. We will schedule an appointment to show you everything and discuss all details and prepare samples so you can pass the test to confirm authenticity. All notes will pass important test such as ultraviolet light, pencil test,
Our counterfeit bank notes are produced taking into consideration all the security features to give them the top quality customers desire. They pass the pen test, UV light test, and possess hologram features, water points.
Our bills can be used in the following places.
-Self service machines
-Markets
-Festivals / other busy places
-Bars
-Shops
-Taxi
-Restaurant
-Snackbar
-Casinos and all other places of these type
General support contact
Email…([email protected])
Signal.. +(34)607218704)
Signal..(@Realjames.39)
Whatsapp..+(237)672564181)
whatsap/Signal.. +(34)607218704)
Place your orders now and get discounts
clones card for sale with high balance instantly dispatched once order is confirmed stop being broke and start shopping everyday
UPDATED CLONED CARD RATES
CLONED CARDS
Low balance
200= balance of £ € $ 2k
300= balance of £ € $ 3k
400= balance of £ € $ 4k
500= balance of £ € $ 5k
600= balance of £ € $ 6k
800= balance of £ € $ 8k
900= balance of £ € $ 9k
Top balance
1k= balance of £ € $ 10k
2k= balance of £ € $ 20k
3k= balance of £ € $ 30k
4k= balance of £ € $ 40k
5k= balance of £ € $ 60k
7k= balance of £ € $ 90k
We have a %100 money back policy . You can opt-out for a refund when you have problems with our cards …. Your feedback is always needed for us to improve upon our services
BUY CLONED CARDS/ ATM BANK CARDS(CREDIT CARDS) ONLINE in Aberdeen Scotland Aberdeen
BUY CLONED CARDS/ATM BANK CARDS(CREDIT CARDS) ONLINE IN UK in Armagh Northern Ireland County Armagh
BUY CLONED CARDS/ATM BANK CARDS(CREDIT CARDS) ONLINE IN UK in Bangor Northern Ireland County Down
BUY CLONED CARDS/ATM BANK CARDS(CREDIT CARDS) ONLINE IN UK in BangorWales Gwynedd
BUY CLONED CARDS/ATM BANK CARDS(CREDIT CARDS) ONLINE IN UK in Bath England Somerset6 Belfast Northern Ireland County Antrim
BUY CLONED CARDS/ATM BANK CARDS(CREDIT CARDS) ONLINE IN UK in Birmingham England West Midlands
BUY CLONED CARDS/ATM BANK CARDS(CREDIT CARDS) ONLINE IN UK in Bradford England West Yorkshire
BUY CLONED CARDS/ATM BANK CARDS(CREDIT CARDS) ONLINE IN UK in Brighton and Hove England East Sussex
BUY CLONED CARDS/ATM BANK CARDS(CREDIT CARDS) ONLINE IN UK in Bristol England Bristol
BUY CLONED CARDS/ATM BANK CARDS(CREDIT CARDS) ONLINE IN UK in Cambridge England Cambridgeshire Canterbury England Kent
BUY CLONED CARDS/ATM BANK CARDS(CREDIT CARDS) ONLINE IN UK in Cardiff Wales Glamorgan
BUY CLONED CARDS/ATM BANK CARDS(CREDIT CARDS) ONLINE IN UK in Carlisle England Cumbria
BUY CLONED CARDS/ATM BANK CARDS(CREDIT CARDS) ONLINE IN UK in Chelmsford England Essex
BUY CLONED CARDS/ATM BANK CARDS(CREDIT CARDS) ONLINE IN UK in Chester England Cheshire
BUY CLONED CARDS/ATM BANK CARDS(CREDIT CARDS) ONLINE IN UK in Chichester England West Sussex
BUY CLONED ATM BANK CARDS(CREDIT CARDS) ONLINE IN UK in Colchester England Essex
BUY CLONED ATM BANK CARDS(CREDIT CARDS) ONLINE IN UK in Coventry England West Midlands
BUY CLONED ATM BANK CARDS(CREDIT CARDS) ONLINE IN UK in Derby England Derbyshire
BUY CLONED ATM BANK CARDS(CREDIT CARDS) ONLINE IN UK in Doncaster England South Yorkshire
BUY CLONED ATM BANK CARDS(CREDIT CARDS) ONLINE IN UK in Dundee Scotland Dundee
BUY CLONED ATM BANK CARDS(CREDIT CARDS) ONLINE IN UK in Dunfermline Scotland Fife
BUY CLONED ATM BANK CARDS(CREDIT CARDS) ONLINE IN UK in Durham England Durham
BUY CLONED ATM BANK CARDS(CREDIT CARDS) ONLINE IN UK in Edinburgh Scotland Edinburgh
BUY CLONED ATM BANK CARDS(CREDIT CARDS) ONLINE IN UK in Ely England Cambridgeshire
BUY CLONED ATM BANK CARDS(CREDIT CARDS) ONLINE IN UK in Exeter England Devon
BUY CLONED ATM BANK CARDS(CREDIT CARDS) ONLINE IN UK in Glasgow Scotland Glasgow
BUY CLONED ATM BANK CARDS(CREDIT CARDS) ONLINE IN UK in Gloucester England Gloucestershire
BUY CLONED ATM BANK CARDS(CREDIT CARDS) ONLINE IN UK in Hereford England Herefordshire
BUY CLONED ATM BANK CARDS(CREDIT CARDS) ONLINE in Inverness Scotland Highland
BUY CLONED ATM BANK CARDS(CREDIT CARDS) ONLINE in Kingston upon Hull England East Riding of Yorkshire
BUY CLONED ATM BANK CARDS(CREDIT CARDS) ONLINE in Lancaster England Lancashire
BUY CLONED ATM BANK CARDS(CREDIT CARDS) ONLINE in Leeds England West Yorkshire
BUY CLONED ATM BANK CARDS(CREDIT CARDS) ONLINE in Leicester England Leicestershire
BUY CLONED ATM BANK CARDS(CREDIT CARDS) ONLINE in Lichfield England Staffordshire
BUY CLONED ATM BANK CARDS(CREDIT CARDS) ONLINE in Lincoln England Lincolnshire
BUY CLONED ATM BANK CARDS(CREDIT CARDS) ONLINE in Lisburn Northern Ireland County Antrim
BUY CLONED ATM BANK CARDS(CREDIT CARDS) ONLINE in Liverpool England Merseyside
BUY CLONED ATM BANK CARDS(CREDIT CARDS) ONLINE in London England Greater London
BUY CLONED ATM BANK CARDS(CREDIT CARDS) ONLINE in Londonderry Northern Ireland County Londonderry
BUY CLONED ATM BANK CARDS(CREDIT CARDS) ONLINE in Manchester England Greater Manchester
BUY CLONED ATM BANK CARDS(CREDIT CARDS) ONLINE in Milton Keynes England Buckinghamshire
BUY CLONED ATM BANK CARDS(CREDIT CARDS) ONLINE in Newcastle upon Tyne England Tyne and Wear
BUY CLONED ATM BANK CARDS(CREDIT CARDS) ONLINE in NewportWales Newport City
BUY CLONED ATM BANK CARDS(CREDIT CARDS) ONLINE in Newry Northern Ireland County Down
BUY CLONED ATM BANK CARDS(CREDIT CARDS) ONLINE in Norwich England Norfolk
BUY CLONED ATM BANK CARDS(CREDIT CARDS) ONLINE in Nottingham England Nottinghamshire
BUY CLONED ATM BANK CARDS(CREDIT CARDS) ONLINE in Oxford England Oxfordshire
BUY CLONED ATM BANK CARDS(CREDIT CARDS) ONLINE in Perth Scotland Perth and Kinross
BUY CLONED ATM BANK CARDS(CREDIT CARDS) ONLINE in Peterborough England Cambridgeshire
BUY CLONED ATM BANK CARDS(CREDIT CARDS) ONLINE in Plymouth England Devon
BUY CLONED ATM BANK CARDS(CREDIT CARDS) ONLINE in Portsmouth England Hampshire
BUY CLONED ATM BANK CARDS(CREDIT CARDS) ONLINE in Preston England Lancashire
BUY CLONED ATM BANK CARDS(CREDIT CARDS) ONLINE in Ripon England North Yorkshire
BUY CLONED ATM BANK CARDS(CREDIT CARDS) ONLINE in Salford England Greater Manchester
BUY CLONED ATM BANK CARDS(CREDIT CARDS) ONLINE in Salisbury England Wiltshire
BUY CLONED ATM BANK CARDS(CREDIT CARDS) ONLINE in Sheffield England South Yorkshire
BUY CLONED ATM BANK CARDS(CREDIT CARDS) ONLINE in Southampton England Hampshire
BUY CLONED ATM BANK CARDS(CREDIT CARDS) ONLINE in Southend-on-Sea England Essex
BUY CLONED ATM BANK CARDS(CREDIT CARDS) ONLINE in St Albans Englandn Hertfordshire
BUY CLONED ATM BANK CARDS(CREDIT CARDS) ONLINE in St Asaph (Llanelwy) Wales Denbighshire
BUY CLONED ATM BANK CARDS(CREDIT CARDS) ONLINE in St Davids Wales Pembrokeshire
BUY CLONED ATM BANK CARDS(CREDIT CARDS) ONLINE in Stirling Scotland Stirlingshire
BUY CLONED ATM BANK CARDS(CREDIT CARDS) ONLINE in Stoke-on-Trent England Staffordshire
BUY CLONED ATM BANK CARDS(CREDIT CARDS) ONLINE in Sunderland England Tyne and Wear
BUY CLONED ATM BANK CARDS(CREDIT CARDS) ONLINE in Swansea Wales Swansea
BUY CLONED ATM BANK CARDS(CREDIT CARDS) ONLINE in Truro England Cornwall
BUY CLONED ATM BANK CARDS(CREDIT CARDS) ONLINE in Wakefield England West Yorkshire
BUY CLONED ATM BANK CARDS(CREDIT CARDS) ONLINE in Wells England Somerset
BUY CLONED ATM BANK CARDS(CREDIT CARDS) ONLINE in Westminster England Greater London
BUY CLONED ATM BANK CARDS(CREDIT CARDS) ONLINE in Winchester England Hampshire
BUY CLONED ATM BANK CARDS(CREDIT CARDS) ONLINE in Wolverhampton England West Midlands
BUY CLONED ATM BANK CARDS(CREDIT CARDS) ONLINE in Worcester England Worcestershire
BUY CLONED ATM BANK CARDS(CREDIT CARDS) ONLINE in Wrexham Wales Wrexham
BUY CLONED ATM BANK CARDS(CREDIT CARDS) ONLINE in York England
Buy Bulk PSYCHEDELIC,MDMA,CRYSTAL METH,DMT Cart,LSD,METH,THC Vape,CBD, Marijuana/Cannabis,Xanax,Molly,Weed,OXY,Crystal Ketamine,Ecstasy, Researched Chemicals, Magic mushroom,Adderall,Hash,Wax,Edibles,Pre-rolls, online.
CONTACT ———————
General support contact
Email…([email protected])
Signal.. +(34)607218704)
Signal..(@Realjames.39)
Whatsapp..+(237)672564181)
whatsap/Signal.. +(34)607218704)
we are leading suppliers of the highest quality pharmaceuticals, research chemicals,Marijuana/Cannabis and painkillers pills and tablets etc. we ship worldwide. Please include your contact number when placing your order. We sell in small/bulk quantities,with guaranteed discreet delivery on time.
#GBL
#Ketamine(FOR DEPRESSION)
#Xanax.Pfizer Long Rods
#Fentalyn Patches
#Nembutal(tablets,liquid and powder)
#Klonopin
#LSD
#valium
#Hash
#Edibles
#Pre-rolls
#Nembutal
#Ativan
#Dilaudid
#AMBIEN
#Oxycontin
#Percocet
#CBD
#THC
#Wax
#THC vapes
#Dmt
#MDMA
#Weed
#Molly
#Adderall
#Researched Chemicals
#Crystal Ketamine
#Marijuana
#Cannabis
#TEMAZEPAM
#Ecstasy
#Cocaine
#ZOPICLONE
#TRAMADOL
#Roxycodone
#Mushrooms
#Quaaludes-Methaqualone Tablets
CONTACT ———————General support contact
Email…([email protected])
Signal.. +(34)607218704)
Signal..(@Realjames.39)
Whatsapp..+(237)672564181)
whatsap/Signal.. +(34)607218704)
Scattered Spider (and allied group Scattered LAPSUS$ Hunters)
VERIFIED CARDER SELLING WU,BANK,PAYPAL,CASHAPP,SKRILL TRANSFER BANK LOGS,DUMPS+PIN,CLONED CARDS,CASHAPP,ZELLE,PAYPA,BITCION FLIPS,COUNTERFEIT BANKNOTES.
Signal: +(34)607218704) SELL CCV CANADA FULLZ FRESH SSN DOB WITH DL LIVE MAIL PASSWORD OFFICE365 PAYPAL
Signal: +(34)607218704) CVV,Fullz,Dumps,PayPal Debit/Credit Card,CashApp, Western Union, Transfer,ATM Clone Cards!!
Signal: +(34)607218704) SELL CVV FULLZ INFO GOOD USA-UK-CA-AU-INTER,PASS VBV/BIN/DOB
Signal: +(34)607218704) Sell Dumps With Pin Online . Fresh Dumps With Pin Valid CCV, WESTERN UNION,PAYPAL,CASHAPP TRANSFER
General support contact
Email…([email protected])
Signal.. +(34)607218704)
Signal..(@Realjames.39)
Whatsapp..+(237)672564181)
whatsap/Signal.. +(34)607218704)
Sell Credit Cards Cvv Fullz, Sell /Bank Login/Dumps+PIN/ Western Union transfer
Hello, I specialist in carding and transferring funds from hacked / stolen worldwide bank accounts
& credit card data to you and placing order on western union, money gram website. I can also transfer to any bank account worldwide.
Please note this is ILLEGAL and FRAUD.
It is your responsibility in regards to picking up and taking security precautions.
This is to make quick money to pay your bills, etc…
From my experience from past buyers that complained, the only issue they reported to me was that their WU information was blacklisted on the WU system
so they weren’t able to pick up or send money ever again using their name after using my services.
This happens if you keep buying my services repeatedly and picking up high volumes of money. I recommend doing this only ONCE per name In Week.
The Best Dumps Website 2025/26 Sell Dumps With Pin Online
Wellcome to the best dumps website, here we sell dumps with pin , dumps pin , cvv fullz
WE HAVE MORE THAN TWO MILLION DUMPS, CC+CVV, DUMPS+PIN
USA, CANADA, CHINA, EUROPE, ASIA, EXOTIC, WORLD
Visit My Shop to Buy Dumps , Dumps With Pin 101/201 , CVV2 , CCV :
Register dumps shop here :
General support contact
Email…([email protected])
Signal.. +(34)607218704)
Whatsapp..+(237)672564181)
Signal..(@Realjames.39)
whatsap/Signal.. +(34)607218704)
Fresh Webmail accounts All kinds with 100% inbox delivery..
Fresh Shell, PHP Mailer, SSH, Leads, SMTP, Cpanel, RDP
Private RDP and Cracked RDP added on RDP Section
_______________________________________________________
BUY ANY 3 ITEMS AND GET 1 FOR FREE
——————————————————–
Account balance:
US: (Bank of America,Chase,Wells Fargo…)
. Balance 3000$ = 120$
. Balance 6000$ = 150$
. Balance 8000$ = 200$
. Balance 12000$ = 250$
. Balance 15000$ = 300$
. Balance 20000$ = 350$
UK: (LLOYDS TSB,BARCLAYS,Standard Chartered,HSBC…)
. Balance 3000 GBP = 150$
. Balance 6000 GBP = 200$
. Balance 10000 GBP = 250$
. Balance 12000 GBP = 300$
. Balance 16000 GBP = 350$
. Balance 20000 GBP = 400$
(Other fees transfer depend on amount you want)
sell bank login uk, online bank account hacking software, sell bank login, sell bank transfer, hacking bank account, hacking bank online, hacker bank transfer, hacker bank account
Selling CCV & CCN List WESTERN UNION TRANSFER US,UK,CA,AU,EU,Asia,France,Germany,Italy and very easy to cash out African
PRICE…
– US (Visa,Master) = $5 per 1 – US (Amex,Dis) = $7 per 1 – US full(Visa,Master) = 30$
– UK (Visa,Master) = $10 per 1 – UK (Amex,Dis) = $13 per 1 – UK full(Visa,Master) = 35$
– CA (Visa,Master) = $8 per 1 – CA (Amex,Dis) = $13 per 1 – CA full(Visa,Master) = 35$
– AU (Visa,Master) = $10 per 1 – AU (Amex,Dis) = $14 per 1 – AU full(Visa,Master) = 35$
– EU (Visa,Master) = $15 per 1 – EU (Amex,Dis) = $22 per 1 – EU full(Visa,Master) = 35$
– Italy = $20 per 1
– Spain = $20 per 1
– Denmark = $25 per 1
– Sweden = $17 per 1
– France = $18 per 1
– Germany = $16 per 1
– Ireland = $16 per 1
– Mexico = $16 per 1
– Asia = $15 per 1
General support contact
Email…([email protected])
Signal.. +(34)607218704)
Signal..(@Realjames.39)
Whatsapp..+(237)672564181)
whatsap/Signal.. +(34)607218704)
—- Demo USA CVV —-
|United Kingdom||4246315290032232|06|2025|235|Justin Rapoport|
|2045 Cordero Rd|Del Mar|CA|92014|US|8582436871|
|United Kingdom||4118780076313681|04|2025|649|Urmil Kapoor|
|Kiran Kapoor86 Karen Pl|Null|Edison||08817|
—- Demo UK CVV —-
|United States||372734752263388 |12|2025|6654|Ivanna Tucker |10200 SW Commerce Circle |Wilsonville |OR |97132|
|United States||371536509524041 |02/2025 |2783|LAZARO GARCIA |9710 NW 110TH AVE,SUITE 1 |Miami |Florida |33178|
—– CREDIT CARD —–
USA (Best Seller)
UNITED KINGDOM (Best Seller)
AUSTRALIA
CANADA
FRANCE
GERMANY
CHILE
TAIWAN
SPAIN
JAPAN
ITALY
“ESCROW ACCEPTED
I Accept Bitcoin,ETH, BTC Cash
Here you can see all deals completed with me:
CONTACT DETAILS:
General support contact
Email…([email protected])
Signal.. +(34)607218704)
Signal..(@Realjames.39)
Whatsapp..+(237)672564181)
whatsap/Signal.. +(34)607218704)
Rules:
1-Payment always upfront for any deal.
2-Always prefer the Forum Escrow.
3-No test, no freebies; I will block you if you ask me for test or freebies.
4-See my minimum price at my thread.
5-After added talk me about only Business.
6-If you wanna use my services then follow my rules
Services:
• Western Union Transfer
• Bank Transfer & Bank Logs
• Money Bookers Transfer
• PayPal Transfer
• Money Gram
• Cash App
• World Remit
• Perfect Money
• Dumps
• cc, cvv, ccs, Fullz,
• Accounts
How Does Western Union Transfer Works ? :-
This is very simple deal, I will only need your first and last name, city and country information and then i will provide you Mtcn and sender information such as his first and last name, city and country. You will simply goes to Wu shop and provide them Mtcn and also sender info if they ask. In many countries they dont even asked you for ID etc.
Western Union Money Gram Transfer Rates :-
1,500$ Transfer = 120$ Bitcoins
2,000$ Transfer = 150$ Bitcoins
3,000$ Transfer = 200$ Bitcoins
4,000$ Transfer = 220$ Bitcoins
5,000$ Transfer = 250$ Bitcoins
6,000$ Transfer = 300$ Bitcoins
8,000$ Transfer = 350$ Bitcoins
Bank Transfers :-
I use clean money 100% for transfer(bank hack has been cleaned). I Can Transfer Money To Most Banks In the World.
I Transfer Any Amount Depending on your bank Account .I provide this service In a Very fast, safe And Sure manner. I make Online Transfer With Transfer Info
For Bank Transfer info Needed:
1: Account Number:
2: Iban Or Swift Code Or Routing Number Or Sort Code:
3: Bank Name:
4: Account Holder Name:
Bank Transfer Rates :-
1,500$ Transfer = 100$ Bitcoins
2,000$ Transfer = 120$ Bitcoins
3,000$ Transfer = 150$ Bitcoins
4,000$ Transfer = 200$ Bitcoins
5,000$ Transfer = 300$ Bitcoins
6,000$ Transfer = 400$ Bitcoins
8,000$ Transfer = 450$ Bitcoins
Moneybookers Transfer :-
Offering Moneybookers/Skrill transfer worldwide. It is a instant payment/transfer .I’m using safer and safer way to transfer Moneybookers so there is no chargeback and negative feedback.
1,500$ Transfer = 150$ Bitcoins
2,000$ Transfer = 170$ Bitcoins
3,000$ Transfer = 200$ Bitcoins
4,000$ Transfer = 220$ Bitcoins
Paypal Transfer :-
Using hacked and verified Paypal accounts to transfer Paypal account to account transfer .
Im doing Paypal transfer to my safe accounts first and then into customers accounts ,
So you dont have any headache to clean the money because its already clean when i transfer it into my account .
Pay Pal And Cash App Transfers rate both are same
General support contact
Email…([email protected])
Signal.. +(34)607218704)
Signal..(@Realjames.39)
Whatsapp..+(237)672564181)
whatsap/Signal.. +(34)607218704)
PAY-PAL – XOOM Cash App Transfer RATES:
1,500$ Transfer = 150$ Bitcoins
2,000$ Transfer = 180$ Bitcoins
3,000$ Transfer = 200$ Bitcoins
4,000$ Transfer = 250$ Bitcoins
5,000$ Transfer = 280$ Bitcoins
6,000$ Transfer = 300$ Bitcoins
8,000$ Transfer = 400$ Bitcoins
Bank Logins rates:-
BALANCE IN CHASE 2K TO 4K price $150
BALANCE IN BOA 5K TO 15K price $200
BALANCE IN CREDIT UNION ANY AMOUNT price $200
BALANCE IN HALIFAX price ANY AMOUNT price $200
BALANCE IN COMPASS price ANY AMOUNT price $200
BALANCE IN WELLS FARGO price ANY AMOUNT price $200
BALANCE IN BARCLAYS 3K TO 5K price $200
BALANCE IN ABBEY price 5K TO 10k price $220
BALANCE IN HSBC price 5K TO 15k price $250
Dumps information
Strong DUMPS Without Region Block Control.
24Hours Replacement Service
Minimum Order without PIN $100
Minimum Order With PIN – 150$
USA/EU/ASIA without PIN
Minimum USA order 7PCS 120$
EU/ASIA: 10PCS 150$
Canada: 7pcs 140$
Australia: 10pcs 160$
With FREE BONUS each Minimum order
Dumps track 1&2 with pin (101&201)
1. USA/ASIA/AUSTRALIA/Exotic WITH PIN: 101 201 121
2. – MasterCard| Visa Classic
3. – Visa Gold|Platinum|Corporate|Signature|BusinessMinimum Order with Pin 6pcs – 150$Minimum Order without Pin 6pcs – 100$
I Replace Decline,Error and Region block DUMPS 24HR
Payment via: ….. BITCOIN
LIST PRICE DUMPS TRACK 1 TRACK 2 + PINS :
. DUMPS TRACK 1/2 WITH PIN USA : 35$
. DUMPS TRACK 1/2 WITH PIN CANADA : 35$
. DUMPS TRACK 1/2 WITH PIN CHINA : 35$
. DUMPS TRACK 1/2 WITH PIN INDIA : 35$
. DUMPS TRACK 1/2 WITH PIN AUS : 40$
. DUMPS TRACK 1/2 WITH PIN UK : 50$
. DUMPS TRACK 1/2 WITH PIN EURO : 50$
. DUMPS TRACK 1/2 WITH PIN ASIAN : 30$
————– PAYPAL ACCOUNT Sell ATM SKIMMERS PRICE LIST ————–
WIncor with keypad 700usd
.ATM Skimmer Wincor Nixdorf 500$
.ATM Skimmer Wincor 500$
.ATM Skimmer Slimm 500$
.ATM Skimmer Slim 500$
.ATM Skimmer NCR 500$
.ATM Skimmer Diebold Opteva 500$
.ATM Skimmer Diebold 300$
.ATM Skimmer Universal 600$
.ATM Skimmer Small 400$
.Chip POS ingenico&amigo 350$
General support contact
Email…([email protected])
Signal.. +(34)607218704)
Signal..(@Realjames.39)
Whatsapp..+(237)672564181)
whatsap/Signal.. +(34)607218704)
BUY GHB,BDO,GBL gamma butyrolactone wheel cleaner liquid 99.9 Pure sale in Kingston Canada Mounjero Saxenda, Wegovy and Ozempic.online uk australia,USA,UK,EUROPE
General support contact
Email…([email protected])
Signal.. +(34)607218704)
Signal..(@Realjames.39)
Whatsapp..+(237)672564181)
whatsap/Signal.. +(34)607218704)
GBL wheel cleaner 99.8% purity online seller in Calgary. High quality factory supply of GBL wheel cleaner with 99.8% purity.
Selling 99.8% pure GBL wheel cleaner buy 3mmc online forr sale
Best and affordable direct factory price GBL wheel cleaner with 99.8% purity
Selling GBL wheel cleaner gamma butyrolactone with 99.8% purity. buy 3mmc online forr sale buy 3mmc online forr sale buy 3mmc online forr sale
Hot sale GBL gamma butyrolactone alloy wheel cleaner.
Hot sale 99.8% purity GBL gamma butyrolactone wheel cleaner.
Hot sale GBL gamma butyrolactone 99.8% purity in Vancouver Canada.
Up for sale is GBL gamma butyrolactone wheel cleaner with 99.8% purity.
Available for sale is GBL wheel cleaner with 99.8% purity in Toronto.
Are you interested in buying GBL gamma butyrolactone wheel cleaner online?
High quality factory supply of GBL gamma butyrolactone alloy wheel cleaner with 99.8% purity. Mounjero Saxenda, Wegovy and Ozempic.online
buy dmt cartridges,Buy Wheel Cleaner (GBL) buy 3mmc online forr sale
buy dmt cartridges,Buy Wheel Cleaner (GBL) buy 3mmc online forr sale
Townsville City Australia buy dmt cartridges,Buy Wheel Cleaner (GBL)buy dmt cartridges,Buy Wheel Cleaner (GBL) buy 3mmc online forr sale
Sydney Australiabuy dmt cartridges,Buy Wheel Cleaner (GBL)
buy dmt cartridges,Buy Wheel Cleaner (GBL) buy 3mmc online forr sale
Brisbane Australiabuy dmt cartridges,Buy Wheel Cleaner (GBL)
Melbourne Australiabuy dmt cartridges,Buy Wheel Cleaner (GBL)
Adelaide Australiabuy dmt cartridges,Buy Wheel Cleaner (GBL)
Darwin Australiabuy dmt cartridges,Buy Wheel Cleaner (GBL)
Hobart Australiabuy dmt cartridges,Buy Wheel Cleaner (GBL)
Perth Australiabuy dmt cartridges,Buy Wheel Cleaner (GBL)
Ballarat Australiabuy dmt cartridges,Buy Wheel Cleaner (GBL)
Launceston Australiabuy dmt cartridges,Buy Wheel Cleaner (GBL)
Cairns Australiabuy dmt cartridges,Buy Wheel Cleaner (GBL)
Toowoomba Australiabuy dmt cartridges,Buy Wheel Cleaner (GBL)
Geelong Australiabuy dmt cartridges,Buy Wheel Cleaner (GBL)
Newcastle Australia Mounjero Saxenda, Wegovy and Ozempic.online
Best and affordable direct factory price for GBL gamma butyrolactone wheel cleaner. Mounjero Saxenda, Wegovy and Ozempic.online buy 3mmc online forr sale buy 3mmc online forr sale buy 3mmc online forr sale
Selling 99.8% pure GBL gamma butyrolactone alloy wheel, rim, cleaner in Quebec City Mounjero Saxenda, Wegovy and Ozempic.online
Acquire sensational GBL gamma butyrolactone alloy wheel cleaner Victoria BC
Gamma butyrolactone GBL wheel cleaner Greater Sudbury home base supplier
online supplier for gamma butyrolactone GBL alloy wheel cleaner
Online supplier for GBL wheel cleaner gamma butyrolactone
General support contact
Email…([email protected])
Signal.. +(34)607218704)
Signal..(@Realjames.39)
Whatsapp..+(237)672564181)
whatsap/Signal.. +(34)607218704)
Acquire GBL cleaner gamma butyrolactone alloy wheel cleaner in Sarnia Canada Mounjero Saxenda, Wegovy and Ozempic.online
GBL wheel cleaner gamma butyrolactone home base dealer in Trois-Rivières
Car wheel cleaner. Gamma butyrolactone GBL wheel cleaner for sale in Sarnia
Online shop for alloy wheel cleaner GBL gamma butyrolactone in Whistler
GBL wheel cleaner supplier in Toronto, Where to order GBL cleaner in Montreal
Gbl wheel cleaner gamma butyrolactone legit online seller in Vancouver
How to buy GBL gamma butyrolactone liquid in Quebec City Canada
where to place an order for GBL alloy wheel cleaner gamma butyrolactone online Mounjero Saxenda, Wegovy and Ozempic.online
Buy legit gamma butyrolactone GBL wheel cleaner liquid in Ottawa Canada
Are you looking for a large scale supplier of GBL cleaner Gamma butyrolactone? buy 3mmc online forr sale buy 3mmc online forr sale
Acquire high quality GBL wheel cleaner in Brampton Canada.
Are you looking for a legit GBL Gamma butyrolactone wheel cleaner supplier online Mounjero Saxenda, Wegovy and Ozempic.online buy 3mmc online forr sale
buy dmt cartridges,Buy Wheel Cleaner (GBL) buy 3mmc online forr sale
GBL alloy wheel cleaner ready for sale stock legit seller in Toronto Canada.
order 99.9 % purity of GBL wheel cleaner gamma butyrolactone
Buy Gamma butyrolactone GBL alloy wheel cleaner factory price.
GBL wheel cleaner gamma butyrolactone bulk price in Guelph
Gamma butyrolactone GBL cleaner buy a big order & get discount in Kamloops
GBL alloy wheel, rim, cleaner up for sale in St. John’s Canada
Acquire high quality GBL wheel cleaner 99.8% Purity in Regina
99.9% Purity of GBL alloy wheel, rim, cleaner up for sale in Saskatoon
How to buy 99.9% Purity of GBL gamma butyrolactone liquid in Winnipeg
where to order GBL gamma butyrolactone liquid 99.8% Purity in Edmonton
Online supplier for 99.8% Purity GBL wheel cleaner gamma butyrolactone
buy dmt cartridges,Buy Wheel Cleaner (GBL) Mounjero Saxenda, Wegovy and Ozempic.online Mounjero Saxenda, Wegovy and Ozempic.online
Wollongong Australiabuy dmt cartridges,Buy Wheel Cleaner (GBL)Wagga Wagga Australiabuy dmt cartridges,Buy Wheel Cleaner (GBL)Warrnambool Australiabuy dmt cartridges,Buy Wheel Cleaner (GBL)Hervey Bay Australia buy 3mmc online forr sale buy 3mmc online forr sale buy 3mmc online forr sale buy 3mmc online forr sale
buy dmt cartridges,Buy Wheel Cleaner (GBL)Bendigo Australia buy 3mmc online forr sale buy 3mmc online forr sale buy 3mmc online forr sale buy 3mmc online forr sale
buy dmt cartridges,Buy Wheel Cleaner (GBL) Australiabuy dmt cartridges,Buy Wheel Cleaner (GBL)Gladstone Central Australiabuy dmt cartridges,Buy Wheel Cleaner (GBL)Armidale Australia Mounjero Saxenda, Wegovy and Ozempic.online
buy dmt cartridges,Buy Wheel Cleaner (GBL)Maryborough Australiabuy dmt cartridges,Buy Wheel Cleaner (GBL)Port Augusta Australiabuy dmt cartridges,Buy Wheel Cleaner (GBL)Murray Bridge Australiabuy dmt cartridges,Buy Wheel Cleaner (GBL)Horsham Australiabuy dmt cartridges,Buy Wheel Cleaner (GBL)Lismore Australiabuy dmt cartridges,Buy Wheel Cleaner (GBL)Lithgow Australiabuy dmt cartridges,Buy Wheel Cleaner (GBL)Bathurst Australiabuy dmt cartridges,Buy Wheel Cleaner (GBL)NowraGrafton Australiabuy dmt cartridges,Buy Wheel Cleaner (GBL)Swan Hill Australiabuy dmt cartridges,Buy Wheel Cleaner (GBL)Rockhampton City Australiabuy dmt cartridges,Buy Wheel Cleaner (GBL)Bundaberg Central Australiabuy dmt cartridges,Buy Wheel Cleaner (GBL)Taree Australiabuy dmt cartridges,Buy Wheel Cleaner (GBL)Esperance Australiabuy dmt cartridges,Buy Wheel Cleaner (GBL)Canberra Australiabuy dmt cartridges,Buy Wheel Cleaner (GBL)Port Macquarie Australiabuy dmt cartridges,Buy Wheel Cleaner (GBL)Castlemaine Australiabuy dmt cartridges,Buy Wheel Cleaner (GBL)Gold Coast Australiabuy dmt cartridges,Buy Wheel Cleaner (GBL)Coffs Harbour Australiabuy dmt cartridges,Buy Wheel Cleaner (GBL)Colac Australiabuy dmt cartridges,Buy Wheel Cleaner (GBL)Albany Australiabuy dmt cartridges,Buy Wheel Cleaner (GBL)Busselton Australiabuy dmt cartridges,Buy Wheel Cleaner (GBL)Bunbury Australiabuy dmt cartridges,Buy Wheel Cleaner (GBL)Tamworth Australiabuy dmt cartridges,Buy Wheel Cleaner (GBL)Devonport Australiabuy dmt cartridges,Buy Wheel Cleaner (GBL)Geraldton Australiabuy dmt cartridges,Buy Wheel Cleaner (GBL)Dubbo Australiabuy dmt cartridges,Buy Wheel Cleaner (GBL)Alice Springs Australia BUY Caluanie Muelear Oxidize, RED MERCURY, & Red Mercury for sale
General support contact
Email…([email protected])
Signal.. +(34)607218704)
Signal..(@Realjames.39)
Whatsapp..+(237)672564181)
whatsap/Signal.. +(34)607218704)
Caluanie Muelear Oxidize is one of the most sought-after products in the metal and chemical industries. This product is used for crushing and processing precious metals and semi-precious stones. It reverts to its original state.
Caluanie Muelear Oxidize is manufactured in America. Our company has an exclusive contract for the supply of Caluanie in the USA and worldwide.
* Type: Caluanie Muelear Oxidize
* Density: 1600 g/l and 1.944 g
* Weight: 1650 g/l 1900 g
* Manufacturer: USA
* Shelf life: Unlimited
* Properties: Embrittles metals, does not react with other chemical components
* Non-irritating to the skin
* Reusable
* Shipping: Worldwide shipping
If interested, please contact us.
We also supply other chemicals such as SSD and mercury.
Mercury (Latin: Hydrargyrum = liquid silver) is shiny and silvery and the only metal that is liquid at room temperature. Mercury has been known since antiquity and was considered magical and a cure-all. More recently, mercury has been and is used in thermometers and barometers, as well as in amalgams for dental fillings. Elemental mercury and many of its compounds are highly toxic, so it should be avoided and not used if alternatives are available. Mercury may only be sold in small quantities and in perfectly sealed containers for laboratory or display purposes. If interested, please contact us.
10 years of experience in this business.
Our company focuses on the export and distribution of chemical products. We provide customers with various high-quality chemicals, such as food additives, surfactants, catalysts and additives, essence and fragrances, chemical raw materials, pharmaceutical raw materials, etc.
CAS
General support contact
Email…([email protected])
Signal.. +(34)607218704)
Whatsapp..+(237)672564181)
Signal..(@Realjames.39)
whatsap/Signal.. +(34)607218704)
28578-16-7 FY
5449-12-7
49851-31-2 Y
1451-82-7
5337-93-9 Y
1009-14-9 Y
123-75-1 Y
51-05-8
59-46-1
62-44-2
94-09-7
137-58-6
5086-74-8
16595-80-5
14769-73-4
136-47-0
94-24-6
171596-29-5
139755-83-0
General support contact
Email…([email protected])
Signal.. +(34)607218704)
Signal..(@Realjames.39)
Whatsapp..+(237)672564181)
whatsap/Signal.. +(34)607218704)
BUY JWH018,5CLADBA,6CLADBA,FENTANY POWDER, JWH-073 JWH-200, JWH-250,JWH-2,ADB-BUTANICA,
buy-ketamine-powder-online/Buy JWH-018 K2 Spice Infused Paper and K2 Paper Sheets
BUY FDA,ADHD,OPIODS,PHARMACEUTICAL PRODUCTS ONLINE
Get Cyanide Pills, Powder and Liquid Online. No License Required
Buy Dexamphetamine,Dexamfetamine ,Order Clonazepam Online,buy morphine online
buy Amphetamine and Dextroamphetamine for sale, Buy Clonazepam Online No Rx Fast Shipping
buy Semaglutide Peptide weight lose online
buy Peptide Raw Powder Synthesis CAS 910463-68-2 Semaglutide
Buy CAS 910463-68-2; Semaglutide MSDS; NN 9535; NNC 0113-0217; Semaglutide acetate salt 99%
Buy Peptides for Scientific Research and Development.
Buy JWH-018 K2 Spice Infused Paper and K2 Paper Sheets
Buy new pmk ethyl glycidate cas 28578-16-7 factory price …
Buy Pentedrone Online / Buy bath salt Online
Buy 5cladba, jwh-018, 6cladba, 5cl, ADBB, adbb raw material 5cl-adb, Jwh-018, 5cladba
Potassium Cyanide both pills and powder KCN 99.99%
Order Oxycodone, Alprazolam, clonazepam, diazepam
buy KCN 90%, KCN 98% and KCN 99%. powder onlin
General support contact
Email…([email protected])
Signal.. +(34)607218704)
Signal..(@Realjames.39)
Whatsapp..+(237)672564181)
whatsap/Signal.. +(34)607218704)
6cladba, 6cl-adb-a, 5cladba, 5cl-adb-a yellow and white powder, 5F-MDA-19, 7add.Cannabinoids
6cladba, 6cl-adb-a, 5cladba, 5cl-adb-a yellow and white powder, 5F-MDA-19, 7add.Cannabinoids
6cladba, 6cl-adb-a, 5cladba, 5cl-adb-a yellow and white powder, 5F-MDA-19, 7add.Cannabinoids
6cladba, 6cl-adb-a, 5cladba, 5cl-adb-a yellow and white powder, 5F-MDA-19, 7add.Cannabinoids
6cladba, 6cl-adb-a, 5cladba, 5cl-adb-a yellow and white powder, 5F-MDA-19, 7add.Cannabinoids
6cladba, 6cl-adb-a, 5cladba, 5cl-adb-a yellow and white powder, 5F-MDA-19, 7add.Cannabinoids
Buy Online Wholesale BUY 6CLADBA , 6CL-ADB A, 5CLADBA from Supplier & Exporter in United States
Buy online BUY 6CLADBA , 6CL-ADB A, 5CLADBA at wholesale price from Metso Chemicals in United States. Metso Chemicals is the genuine Trader of product BUY 6CLADBA , 6CL-ADB A, 5CLADBA and sells it in bulk at affordable and cheapest wholesale price near you. This product may be available to import The BUY 6CLADBA , 6CL-ADB A, 5CLADBA is trending in the market in terms of quality and price list offered by the seller. The availability of product and variations including stock options at our b2b portal is subject to Metso Chemicals catalog listing and policies.
Import Wholesale BUY 6CLADBA , 6CL-ADB A, 5CLADBA for Your Business Needs
we understand that quality is paramount in the B2B sector. As updated by the seller, the BUY 6CLADBA , 6CL-ADB A, 5CLADBA is manufactured to meet rigorous industry standards, ensuring reliability and performance for your business operations. Designed with businesses in mind
Buy Nembutal, Ketamine, Oxycodone, Amphetamine online in UK
Buy Adderall, Oxycodone, Ketamine
buy painkillers (Percocets, Oxys, Dillies, Ritalin online).
Please contact us with any questions about our products.
Contact
General support contact
Email…([email protected])
Signal.. +(34)607218704)
Signal..(@Realjames.39)
Whatsapp..+(237)672564181)
whatsap/Signal.. +(34)607218704)
Nembutal capsules, Nembutal powder, oral Nembutal solution, Nembutal euthanasia, Nembutal peaceful exit, Nembutal suicide, Nembutal final exit, pentobarbital sodium
Buy Adderall Online
Buy Adipex Online
Buy Alprazolam Online
Buy Ambien Online
Buy Ativan online
Buy Carisoprodol Online
Buy Clonazepam Online
Buy Codeine Online
Buy Darvocet Online
Buy Demerol Online in wales
Buy Diazepam Online
Buy Dilaudid Online
Buy Fioricet Online in London
Buy Gabapentin Online
Buy Hydrocodone Online
Buy Hydromorphone Online in UK
Buy Klonopin Online in Liverpool
Buy Lexapro Online
Buy Lorazepam Online
Buy Lorcet Online
Buy Lortab Online in Manchester
Buy Meridia Online
Buy Methadone Online
Buy Modafinil Online in leeds
Buy Norco Online in Leicester
Buy Opana ER Online
Buy Oxycodone Online in Birmingham
Buy Oxycontin Online in London
Buy Percocet Online
Buy Phentermine Online
Buy Roxicodone Online
Buy Soma Online in UK
Buy Suboxone Online
Buy Subutex Online
Buy Tapentadol Online in ireland
Buy Tramadol Online in Scotland
Buy Valium Online in wales
Buy Viagra Online
Buy Vicodin Online
Buy Vyvanse Online
Buy Xanax Online
Buy Zolpidem Online
GHB,GBL,BDO
MDMA pills for sale:
Buy Nembutal in UK Ketamine, Oxycodone, Amphetamine
Buy Adderall, Oxycodone, Ketamine in Scotland
Please contact us with any questions about our products.
General support contact
Email…([email protected])
Signal.. +(34)607218704)
Signal..(@Realjames.39)
Whatsapp..+(237)672564181)
whatsap/Signal.. +(34)607218704)
ketamine, 4-MMC, MDPV, methylone, amphetamine for sale online.
WhatsApp Buy Nembutal, Ketamine, Oxycodone in wales Amphetamine
Buy Adderallin UK Oxycodone, Ketamine 20
buy painkillers (Percocets, Oxys, Dillies, Ritalin online
Please contact us with any questions about our product
High-quality Weed of various strains, affordable prices, discreet shipping, fast delivery/pickup/drop-off , and excellent customer service available.” Coke, vape, Ritalin, Hash, ecstasy, Oxys, edibles, disposables, carts, mdma, shrooms,lsd,mdma,shrooms,GHB,GBL,BDO,
Buy Cocaine in Malaga, Buy weed in Florence, buy vape in Tampa, buy coke in Vienna, buy weed in Bangkok, buy weed in Roma, buy weed in Kratovo, buy weed in Prilep, buy weed in Skopje, buy coke in Resen, buy pills in Vinica, buy weed in Veles, buy mushrooms in Veles, buy weed in Ohrid, buy weed in Bitola, buy weed in Strumica, buy coke in Shtip, buy mdma in Berovo, buy crystal meth in Delchevo, buy weed in Tetovo, buy coke in Kočani, buy weed in Kavadarci, buy weed in Zagreb, buy coke in Split, buy carts in Dubrovnik, buy disposables in Zadar, buy weed in Karlovac, buy weed in Šibenik, buy mushrooms in Velika Gorica, buy psychedelics in Bakar, buy psychedelics in Pula, buy weed in Trogir, buy coke in Rijeka. Buy weed in Colmar, buy weed in Lyon, buy weed in Cannes, buy weed in chartres, buy weed in annecy, buy weed in Charleston, buy weed in Columbia SC, buy weed in Mauldin, buy weed in Seneca, buy weed in Sacramento, buy weed in San Diego, buy weed in Richmond, buy weed in Charlottesville, buy weed online in Moscow, buy weed online in Paris, Weed for sale in Paris, weed online Paris, buy weed online in London, where to buy weed online in London, where to buy weed in London, buy weed in Madrid, where to buy weed in Madrid, buy weed online in Barcelona, buy weed in Saint Petersburg, buy weed in Milan, where to buy weed in Athens, buy weed in Athens, buy weed in Lisbon, where to buy weed in Lisbon, buy weed online in Manchester, weed online in kyiv, buy weed in Birmingham, where to buy weed in Kyiv, Where to buy weed in Birmingham, buy weed online in Naples, buy weed in Naples, buy weed in Brussels, where to buy weed in Brussels, buy weed online in Minsk, where to buy weed in Minsk, buy weed online in Vienna, where to buy weed in Vienna, weed for Email: ([email protected])
sale in Vienna, buy weed in Graz, buy weed in Innsbruck, buy weed online in Linz, buy weed in Salzburg, buy weed in Villach, buy weed in dornbirn, Buy Weed Cocaine In New York, Buy Weed Cocaine In Los Angeles, buy weed cocaine mushroom in Chicago, buy weed cocaine in San Antonio, Buy Weed Cocaine In Austin, buy weed cocaine hash in Phoenix, buy weed cocaine molly in Houston, buy weed in San Diego, buy weed cocaine in Philadelphia, buy weed cocaine in Dallas, buy weed cocaine in Seattle, buy weed cocaine in San Francisco, buy weed cocaine in Denver, buy weed cocaine in Columbus, buy weed cocaine in Nashville, buy weed cocaine in Las Vegas, buy weed cocaine in Atlanta, buy weed cocaine in San Jose, buy weed cocaine in Charlotte, buy weed cocaine in Baltimore, buy weed E
General support contact
Email…([email protected])
Signal.. +(34)607218704)
Whatsapp..+(237)672564181)
Signal..(@Realjames.39)
whatsap/Signal.. +(34)607218704)
cocaine in Boston, buy weed cocaine in Oklahoma City, buy weed cocaine in Milwaukee, buy weed cocaine in Raleigh, buy weed cocaine in Indianapolis, buy weed cocaine in Jacksonville, buy weed cocaine in Omaha, buy weed cocaine in Detroit, buy weed cocaine in Fort Worth, buy weed cocaine in Albuquerque, buy weed cocaine in Portland, buy weed cocaine in Memphis, buy weed cocaine in Miami, buy weed cocaine in Minneapolis,buy weed cocaine in Orlando, buy weed cocaine in Kansas City, buy weed cocaine in salt lake city, buy weed cocaine in St. Louis, buy weed cocaine in Colorado springs, buy weed cocaine in Tucson, buy weed cocaine in New Orleans, buy weed cocaine in Louisville, buy weed cocaine in Sacramento, buy weed cocaine in Madison, buy weed cocaine in Honolulu, buy weed cocaine Xanax in Fresno, buy weed cocaine Xanax in El Paso, buy weed cocaine Xanax in Tulsa, buy weed cocaine Xanax in baton rouge, buy weed cocaine Xanax in Anchorage, buy weed cocaine buy weed cocaine Xanax in Ottawa, buy weed cocaine Xanax in Vancouver, buy weed cocaine Xanax in Calgary, buy weed cocaine Xanax in Alberta, buy weed cocaine Xanax in Edmonton, buy weed cocaine Xanax in Montreal, buy weed cocaine Xanax in Quebec
Buy GBL Gamma-Butyrolactone for sale . GBL Supplier Amongst Many Other Products; GHB, DMT, MOLLY, , ADDIES AND VARIOUS RESEARCH CHEM. Buy ADHD Medications for sale, We sell FDA approved Weight loss medication(injections and pills) like Ozempic, Saxenda liraglutide, Wegovy semaglutide, Victoza and Mounjaro which are available now And many more Medications for other health issues not just weight loss available in stock.
Buy 99.8% TO 99.9% pure Mephedrone plant food here. We sell only the finest quality 4-methylmethcathinone(4-MMC).happier since we started giving them Mephedrone every weekend. We can also supply plants, cacti, mushroom spores and seeds. We send your Mephedrone plant food in a plain jiffy bag via 1st class Recorded, Next day delivery or Airmail. There is no mention of this website or product on packaging. We never supply underweight packets. We also offer Overnight Delivery . We also have the following products in stock :AM 2201 MDAI 4MEC 4-MEC Crystalline Methylone Crystals Pentedrone MDPV Buphedrone 3,4-DMMC 4-MemABP 4-FA MPA Butylone AMT 6-APB 5-APB MDAI MDMA Crystals Methoxetamine JWH-122 AM-2201 6-APB 5-APB 3,4DMMC 4MEC MDPV,BUY eutylone ,COKE, Hashish weed KU,NU, Alprazolam,Etizolam, protonitazene, metonitazene,etazene,bromazolam mdma crystals and other research chemicals at very good prices in all Countries Germany Netherlands Australia Austria Sweden Norway Japan Kuwait Dubai United Arabs Emirates Jordan Bahrain Soudi Arabia Qatar Oman Malaysia Honkong China France Belgium Poland Canada United States All Countries
General support contact
Email…([email protected])
Signal.. +(34)607218704)
Whatsapp..+(237)672564181)
Signal..(@Realjames.39)
whatsap/Signal.. +(34)607218704)
BUY HERION
BUY COKE
Buy ECSTASY Pills
BUY FLAKKA
BUY FENTANYL
BUY Alprozolam
BUY XANAX pills
BUY PERCOCET
BUY ADDERALL
BUY SECONAL
BUY PERCOCET
BUY MORPHINE
BUY ADDERALL
BUY OXYCONTIN
BUY OXYCODONE
BUY SUBOXONE
BUY RITALIN
BUY 5cl
BUY 6fa
BUY 5cladba
BUY MDMA
BUY APVP
Buy eutylone
Buy NU
General support contact
Email…([email protected])
Signal.. +(34)607218704)
Signal..(@Realjames.39)
Whatsapp..+(237)672564181)
whatsap/Signal.. +(34)607218704)
Buy KU
Buy Isotodesnitazene
Buy Protonitazene
Buy Butonitazene
Buy Fluonitazene
Buy Etodesnitazene
Buy Metodesnitazene
Buy Metazene
Buy Etodesnitazene
Buy Etazene
Buy Protodesnitazene
Buy bromazolam
Buy MDMA
Buy MAM-2201
Buy 4MMC
Buy MDAI
Buy MN-24
Buy PB-22
Buy 5F-PB-22
Buy 5F-UR
Buy 2-FA
Buy Pentetrone
Buy Methylone Crystal
Buy 5F-AKB-48
Buy Dimethocaine
Buy 4-MEC
Buy A-pvp
Buy AB-Fubinaca
Buy 5F-AB-Fubinaca
Buy AB-Piñata
Buy 5F-AB-Pinaca
Buy 5-MEO-DALT
Buy 5-MEO-MIPT
Buy MPA
Buy PB-8
Buy 5-APDB
Buy MXE
Buy Ethylpenidate
Buy JWH-250
Buy MDPV
Buy MDMA
Buy KETAMINE
BUY 5F AMB
BUY COKE
We have in stock high quality research chemicals and drugs 99.9% Pure
ketamine, mdma, cocaine, lsd, mephedrone, MDPV, MCAT, 4-MMC, MEOW, Plant
Food, Butylone, Naphyrone, Ketamine to sell. We deliver you directly in your address All our product Mephedrone, 4-MMC, 4 MMC, 4-methylmethcathinone, Mephedrone, Mephedrone, Mephedrone, M-CAT, MM-CAT & Meow/Miaow Plant food is ready to be send. Note that we can send smaller orders as samples to test before bulk. We ship through EMS,FedEx and TNT ,sometime DHL. We also supply Bath salts of very high purity grade such as Eight Ballz, White Rush and many more. Pure Mephedrone, MDPV, Plant Food, Ketamine for sale We supply and retail wide range of supreme chemicals for agricultural, industrial and pharmaceutical uses. We are selling our products at very convenient and workable prices. When you buy from us, one thing is certain. You are guaranteed of the highest quality available on the market, high purity products, secure payment, and very fast and discreet delivery. Our products include:
We are a fully licensed medical pharmacy offering Fentanyl (Transdermal Duragesic) patches for patients with a valid prescription’
General support contact
Email…([email protected])
Signal.. +(34)607218704)
Signal..(@Realjames.39)
Whatsapp..+(237)672564181)
whatsap/Signal.. +(34)607218704)
BUY ALL TYPES OF STERIODS SUPPLEMENTS,WEIGHT GAIN /WEIGHT LOSE/INJECTIONS ONLINE. Buy Anabolic–androgenic steroids and dietary supplements online/ Buy Peptides for Scientific Research and Development, STERIODS,GAIN AND LOSE WEIGHT,Buy ozempic,sexanda,wegovey,botox and other weight lose online
Peptide Sciences™ specializes in the synthesis of highly purified peptides, proteins and amino acid derivatives for scientific research and development. Peptide Sciences™ uses automated, and manual peptide synthesizers as well as solution and solid-phase peptide synthetic technology to offer the finest quality peptides and proteins that exceed 99% purity. From the initial stages of peptide synthesis to packaging and delivery, our company implements the most stringent quality control standards to ensure that all peptides arrive in their purest and most stable form. Testing at all stages of production in our analytical laboratory verifies each peptide’s sequential fingerprint for precision accuracy. This is achieved through advanced High-Performance Liquid Chromatography and Mass Spectrometry analysis, scientifically confirming the purity, accuracy, and identity of every peptide.Best place to buy peptides online
Best place to buy peptides online in USA
Best online weight loss medication
Best place to get GLP-1 online
Best site for weight loss meds
Best telehealth for weight loss
Cheapest online glp1
GLP-1 online with insurance
What is the number one peptide for weight loss?
Where can I buy peptides online?
Can I buy peptides for weight loss over the counter?
Which online company is best for GLP-1?
General support contact
Email…([email protected])
Signal.. +(34)607218704)
Signal..(@Realjames.39)
Whatsapp..+(237)672564181)
whatsap/Signal.. +(34)607218704)
What is Ozempic?
Ozempic is a brand-name version of the generic medication semaglutide, which is a type of medication called a glucagon-like peptide 1 receptor agonist. Instead of that tongue-twister of a name, we call these medications “GLP-1s” for short.
Ozempic is FDA-approved for the management of certain symptoms and risks of type 2 diabetes.
How does Ozempic work?
Ozempic works by slowing the digestion process, which can help you to feel full for longer. Ozempic, like other GLP-1 receptor agonists, acts like a hormone your body naturally makes to regulate blood sugar and may help support weight loss.
Do you prescribe Ozempic for weight loss?
Ozempic is not FDA-approved for weight loss. Ro-affiliated healthcare professionals have the discretion to prescribe a medication off-label if they believe it is an appropriate course of treatment for a particular patient.
How can Ozempic help with weight loss? It acts like a natural hormone your body uses to regulate blood sugar and appetite—key steps in resetting your biological set point to help you maintain a new, lower weight.
See if Ozempic is right for you here.
What is Ozempic’s dosing?
Ozempic dosing starts out low, then gradually increases over the first few months until a steady dose is reached. If prescribed, your Ro-affiliated provider will work with you to find the schedule and dosing that’s right for you. As an example, the lowest dose of Ozempic is 0.25 mg once a week and the maximum dose is 2.0 mg once a week.
How do you take Ozempic?
Ozempic comes in a prefilled injection pen that contains multiple doses. If prescribed, you (or someone in your household) will select the prescribed dose, then administer the injection under the skin of your stomach, thigh, or arm once a week.
While a routine injection may sound intimidating, the Ozempic pen uses a tiny needle designed to minimize discomfort. You’ll also receive clear instructions on using the injection pen, and your Ro-affiliated provider can offer additional advice.
Will my insurance cover the cost of Ozempic?
The cost of your Ozempic medication can range depending on your insurance coverage—and we’re here to help with that!
Ro’s insurance concierge will work with your insurance provider to help with the process of determining coverage for your GLP-1 medication, which is paid for separately from your Ro Body membership. Ro does not accept insurance for the Ro Body membership, which is cash pay only and does not accept insurance.
Currently, Ro can’t help coordinate coverage for GLP-1 medications for government insurance plans — but depending on your plan, you may still be able to pay out of pocket for certain cash-pay medication options. If you have Federal Employee Health Benefits Program (FEHB), you can join the Ro Body membership and access our insurance concierge.
How to get Ozempic for $25 a month
Where can I buy real Ozempic?
Can I take Ozempic without a doctor
Is there a pill version of Ozempic
Buy Ozempic online cheap
How to get Ozempic for $25
Get prescribed Ozempic online
Where to buy Ozempic without insurance
General support contact
Email…([email protected])
Signal.. +(34)607218704)
Signal..(@Realjames.39)
Whatsapp..+(237)672564181)
whatsap/Signal.. +(34)607218704)
Contact General support
CONTACT ———————Email…([email protected])
Signal..(@Realjames.39)
Whatsapp..+(237)672564181)
whatsap/Signal.. +(34)607218704)
Welcome to Good Life Bitcoin Trading/INVESTMENTS/LOANDS ONLINE Contact General support
CONTACT ———————Email…([email protected])
Signal..(@Realjames.39)
Whatsapp..+(237)672564181)
whatsap/Signal.. +(34)607218704)
I am a professional bitcoin trader, and I always win my trade with my best
trading platform, so are you looking for a professional trader or looking for
Someone that can help you invest and trade your Bitcoin for more profit to be
made? With and 8 hours of investment profit plans.
Do you know you can grow your money by investing in Bitcoin and get profit by
helping you to trade, Contact General support
CONTACT ———————Email…([email protected])
Signal..(@Realjames.39)
Whatsapp..+(237)672564181)
Wire message..(@jamesgrays98)
whatsap/Signal.. +(34)607218704)
My investment plans;
Invest $250 X 8=$2,000
Invest $500 X 8=$4,000
Invest $1,000 X 8=$8,000
Invest $1,500 X 8=$12,000
Invest $,2,000 X 8=$16,000
Invest $3,000 X 8=$24,000
Contact us today let’s teach you how you can get that done with proof on me
trading platform by investing and make your profit in 8-Hours..
Melody Good Life.
A Try We Convince You With Good Life Investment.
Have you been trying to get a blank ATM card or invest in Bitcoin and find a good hacker to help you? And have you found it difficult to find the right person to place your order? Here you can place your order today and receive the card in no time. It’s easy and affordable. We also offer CashApp, PayPal, Zelle, Bitcoin, and all currencies. Contact us now at:
Contact General support
CONTACT ———————Email…([email protected])
Signal..(@Realjames.39)
Whatsapp..+(237)672564181)
whatsap/Signal.. +(34)607218704)
We have a specially programmed ATM card with cash and Bitcoin reloads so you can cover your needs and start your own business. You can use my cards anywhere in the world, at any ATM, store, or point of sale. With a daily limit of $3,000 to $50,000.00 and available in any currency with our programmed cards. Contact me at:
Fifteen times your investment with withdrawal in 5 hours. All currencies available.
Invest $200: profit is $1,000
Invest $300: profit is $1,500
Invest $500: profit is $2,500
Invest $1,000: profit is $5,000
Invest $2,000: profit is $10,000
Invest $3,000: profit is $15,000
Invest $5,000: profit is $25,000
Cost of available cards:
$3,000 costs $200
$6,000 costs $400
$9,000 costs $600
$12,000 costs $900
$15,000 costs $1,200
$18,000 costs $1,500
$21,000 costs $1,800
$25,000 It costs $2,500
CLONED CARDS
LOW BALANCE
200= balance of £€$2k
300= balance of £€$3k
400= balance of £€$4k
500= balance of £€$5k
600= balance of £€$6k
800= balance of £€$8k
900= balance of £€$9k
HIGH BALANCE
1k= balance of £€$10k
2k= balance of £€$20k
3k= balance of £€$30k
4k= balance of £€$40k
5k= balance of £€$60k
7k= balance of £€$90k
Western Union Money Gram Transfer Rates :
$1,500 Transfer = $120 Bitcoins
$2,000 Transfer = $150 Bitcoin
$3,000 Transfer = $200 Bitcoins
$4,000 Transfer = $220 Bitcoins
$5,000 Transfer = $250 Bitcoins
$6,000 Transfer = $300 Bitcoins
$8,000 Transfer = $350 Bitcoins
Bank Transfer Rates :-
$1,500 Transfer = $100 Bitcoins
$2,000 Transfer = $120 Bitcoins
$3,000 Transfer = $150 Bitcoins
$4,000 Transfer = $200 Bitcoins
$5,000 Transfer = $300 Bitcoins
$6,000 Transfer = $400 Bitcoins
$8,000 Transfer = $450 Bitcoins
PAY-PAL – XOOM Cash App Transfer RATES:
$1,500 Transfer = $150 Bitcoins
$2,000 Transfer = $180 Bitcoins
$3,000 Transfer = $200 Bitcoins
$4,000 Transfer = $250 Bitcoins
$5,000 Transfer = $280 Bitcoins
$6,000 Transfer = $300 Bitcoins
$8,000 Transfer = $400 Bitcoins
LEGIT CASH TRANSFERS ON FIRE, All COUNTRIES MONEY ORDER AVAILABLE, No Any Risk Or Delay
Have your cash top up in minutes with no additional charges. Invest your cash in our daily loading program and earn huge balances in few minutes. How?
We make our transfers from real working spammed cards and dumps. We only work with real spammed cards containing huge balances. Card loading takes few minutes to complete. Transfer includes..
*PAY ID DEPOSIT
*BSB DEPOSIT
* Cashapp deposit
* PayPal deposit
* Skrill deposit
* Western Union deposit
* Crypto deposit
* Bank deposit
* Zelle deposit
*Chime deposit
*Revolut deposit
*Skrill deposit
DIRECT DEPOSIT RATES
$300 for balance 3000$
$350 for balance 3500$
$400 for balance 4000$
$450 for balance 4500$
$500 for balance 5000$
$550 for balance 5500$
$600 for balance 6000$
$650 for balance 6500$
$700 for balance 7000$
$800 for balance 8000$
$900 for balance 9000$
$1000 for balance 10000$
And More
If your account is active you just have to pay a fee for the transfer balance you need
Notice:: No Risk or Delay. Depot will be sent instantly once payment has been received
Message me Now
i have a %100 money back guaranteed policy. If you feel uncomfortable at any moment, you can always opt out for a
refund
Hit me up
Full Name:
Country:
Status:
Phone Number:
Date of Birth:
Home Address:
Amount Needed/Amount to Invest:
Contact General support
CONTACT ———————Email…([email protected])
Signal..(@Realjames.39)
Whatsapp..+(237)672564181)
whatsap/Signal.. +(34)607218704)
You’ll never be sure until you try it. Contact us today to place your order.
General support contact
Email…([email protected])
Signal.. +(34)607218704)
Whatsapp..+(237)672564181)
Signal..(@Realjames.39)
whatsap/Signal.. +(34)607218704)
buy top quality NN dmt carts, buy 5-meo dmt carts, looking for 5-meo dmt carts, looking to order 5-meo dmt carts, buy now 5-meo DMT carts, who sells 5-meo dmt carts, 1g 5-meo dmt carts, Psilocybin (magic mushrooms) best 5-meo Dmt carts online, lets eat Dmt vape pen, bunch of dmt vape pens today, we sell Dmt vape pen certified, legal dmt vape pen, is dmt vape pen BUY HERION BUY COKE Buy ECSTASY Pills BUY FLAKKA BUY FENTANYL BUY Alprozolam BUY XANAX pills BUY PERCOCET BUY ADDERALL BUY SECONDARY BUY PERCOCET BUY MORPHINE BUY ADDERALL BUY OXYCONTIN BUY OXYCODONE BUY SUBOXONE BUY RITALIN BUY 5cl BUY 6fa BUY 5cladba BUY MDMA BUY APVP Buy eutylone Buy NOW Buy KU Buy Isotodesnitazene Buy Protonitazene Buy Butonitazene Buy Fluonitazene Buy Etodesnitazene Buy Metodesnitazene Buy Metazene Buy Etodesnitazene Buy Etazene Buy Protodesnitazene Buy bromazolam Buy MDMA Buy MAM-2201 Buy 4MMC Buy MDAI Buy MN-24 Buy PB-22 Buy 5F-PB-22 Buy 5F-UR Buy 2-FA Buy Pentetron Buy Methylone Crystal Buy 5F-AKB-48 Buy Dimethocaine Buy 4-MEC Buy A-pvp Buy AB-Fubinaca Buy 5F-AB-Fubinaca Buy AB-Piñata Buy 5F-AB-Pinaca Buy 5-MEO-DALT Buy 5-MEO-MIPT Buy MPA Buy PB-8 Buy 5-APDB Buy MXE Buy Ethylphenidate Buy JWH-250 Buy MDPV Buy MDMA Buy KETAMINE BUY 5F AMB BUY COKE Buy 5 MeO DMT Near Me Buy gbl 5l Online DMT Online in Dubbo Buy 5 MeO DMT Near Me Buy gbl 5l Online DMT Online in Broome Buy 5 MeO DMT Near Me Buy gbl 5l Online DMT Online in Bathurst Buy 5 MeO DMT Near Me Buy gbl 5l Online DMT Online in Devonport Buy 5 MeO DMT Near Me Buy gbl 5l Online DMT Online in Alice Springs Nowra Buy 5 MeO DMT Near Me Buy gbl 5l Online DMT Online in Whyalla Buy 5 MeO DMT Near Me Buy gbl 5l Online DMT Online in Armidale Buy 5 MeO DMT Near Me Buy gbl 5l Online DMT Online in Maryborough Buy 5 MeO DMT Near Me Buy gbl 5l Online DMT Online in Murray Bridge Buy 5 MeO DMT Near Me Buy gbl 5l Online DMT Online in Albury Buy 5 MeO DMT Near Me Buy gbl 5l Online DMT Online in Mildura Buy 5 MeO DMT Near Me Buy gbl 5l Online DMT Online in Horsham Buy 5 MeO DMT Near Me Buy gbl 5l Online DMT Online in Lismore Buy 5 MeO DMT Near Me Buy gbl 5l Online DMT Online in Port Macquarie Buy 5 MeO DMT Near Me Buy gbl 5l Online DMT Online in Broken Hill Buy 5 MeO DMT Near Me Buy gbl 5l Online DMT Online in Port Lincoln Buy 5 MeO DMT Near Me Buy gbl 5l Online DMT Online in Port Pirie Buy 5 MeO DMT Near Me Buy gbl 5l Online DMT Online in Goulburn Buy 5 MeO DMT Near Me Buy gbl 5l Online DMT Online in Karratha
BUY eutylone ,COKE, Hashish weed KU,NU, Alprazolam,Etizolam, protonitazene, metonitazene,etazene,bromazolam mdma crystals and other research chemicals at very good prices in all Countries Germany Netherlands Australia Austria Sweden Norway Japan Kuwait Dubai United Arabs Emirates Jordan Bahrain Soudi Arabia Qatar Oman Malaysia Hongkong China France Belgium Poland Canada United States All Countries, BUY HERION BUY COKE Buy ECSTASY Pills BUY FLAKKA BUY FENTANYL BUY Alprozolam BUY XANAX pills BUY PERCOCET BUY ADDERALL BUY SECONDARY BUY PERCOCET BUY MORPHINE BUY ADDERALL BUY OXYCONTIN BUY OXYCODONE BUY SUBOXONE BUY RITALIN BUY 5cl BUY 6fa BUY 5cladba BUY MDMA BUY APVP Buy eutylone Buy NOW Buy KU Buy Isotodesnitazene Buy Protonitazene Buy Butonitazene WhatsApp : Buy Fluonitazene Buy Etodesnitazene Buy Metodesnitazene Buy Metazene Buy Etodesnitazene Buy Etazene Buy Protodesnitazene Buy bromazolam Buy MDMA Buy MAM-2201 Buy 4MMC Buy MDAI Buy MN-24 Buy PB-22 Buy 5F-PB-22 Buy 5F-UR Buy 2-FA Buy Pentetron Buy Methylone Crystal Buy 5F-AKB-48 Buy Dimethocaine Buy 4-MEC Buy A-pvp Buy AB-Fubinaca Buy 5F-AB-Fubinaca Buy AB-Piñata Buy 5F-AB-Pinaca Buy 5-MEO-DALT Buy 5-MEO-MIPT Buy MPA Buy PB-8 Buy 5-APDB Buy MXE Buy Ethylphenidate Buy JWH-250 Buy MDPV Buy MDMA Buy KETAMINE BUY 5F AMB BUY COKE etc.We are a fully licensed medical pharmacy offering Fentanyl (Transdermal Duragesic) patches for patients with a valid prescription. If you are a chronic pain patient or have difficulty accessing your prescribed medication, we may be able to help. Buy Adderall 30 mg without prescription Licensed to dispense controlled substances Discreet packaging and reliable delivery Professional service and consultation Contact us today to confirm availability and eligibility Valid prescription required. Legit anabolic steroids in AUSTRALIA, anabolic steroids online AUSTRALIA. Testosterone,Enanthate, Winstrol, MK677, Deca, Proviron, Somatotropin, sus250, 100% legal steroid alternatives and hardcore bodybuilding supplements for bulking, cutting and strength. CLENBUTEROL, DIANABOL, TRENBOLONE, NOLVADEX, PCT, CLOMID, STANZOLO, CARDARINE, HGH, MASTERON, TREN A, TREN E, Kamagra Oral Jelly, Anabolic steroids, TEST E, DECA, Oral steroids, TEST P, WINSTROL Free Delivery Shop Now. Oral steroids online. Create the perfect body with our store! All possible oral steroids! Buy anavar AUSTRALIA no prescription 24/7,We offer a variety of pharmaceutical products, both brand-name and generic. If you suffer from pain, anxiety, physical weakness, and insomnia, all of the drugs are now available in our pharmacy without a prescription. Fast delivery to all addresses. At the moment we offer specials and our current prices are affordable. We accept orders of small and large sizes with a minimum order of 100 tablets. Adderall, Ativan, Darvocet, Concerta, Dianabol. Ephedrine, Oxycontin, Quaaludes, Qsymia, Ritalin, Vicodin, Vyvanse, Suboxone, Oxycodone, phentermine, Alprazolam, Ambien, Tramadol, Opana ER, Lortab, Fentanyl patches online and many other medications.
We are a fully licensed medical pharmacy offering Fentanyl (Transdermal Duragesic) patches for patients with a valid prescription. If you are a chronic pain patient or have difficulty accessing your prescribed medication, we may be able to help. Buy Adderall 30 mg without prescription Licensed to dispense controlled substances Discreet packaging and reliable delivery Professional service and consultation Contact us today to confirm availability and eligibility: Valid prescription required. Legit anabolic steroids in AUSTRALIA, anabolic steroids online AUSTRALIA. Testosterone Enanthate, Winstrol, MK677, Deca, Proviron, Somatotropin, sus250, 100% legal steroid alternatives and hardcore bodybuilding supplements for bulking, cutting and strength. CLENBUTEROL DIANABOL, TRENBOLONE, NOLVADEX, PCT, CLOMID, STANZOLO, CARDARINE, HGH, MASTERON, TREN A, TREN E, Kamagra Oral Jelly, Anabolic steroids, TEST E, DECA, Oral steroids, TEST P, WINSTROL Free Delivery Shop Now. Oral steroids online. Create the perfect body with our store! All possible oral steroids! Buy anavar AUSTRALIA no prescription 24/7 , We offer a variety of pharmaceutical products, both brand-name and generic. If you suffer from pain, anxiety, physical weakness, and insomnia, all of the drugs are now available in our pharmacy without a prescription. Fast delivery to all addresses. At the moment we offer specials and our current prices are affordable. We accept orders of small and large sizes with a minimum order of 100 tablets. Adderall, Ativan, Darvocet, Concerta, Dianabol. Ephedrine, Oxycontin, Quaaludes, Qsymia, Ritalin, Vicodin, Vyvanse, Suboxone, Oxycodone, phentermine, Alprazolam, Ambien, Tramadol, Opana ER, Lortab, Fentanyl patches online and many other medications.
Contact General support
General support contact
Email…([email protected])
Signal.. +(34)607218704)
Signal..(@Realjames.39)
Whatsapp..+(237)672564181)
whatsap/Signal.. +(34)607218704)
Buy GBL Gamma-Butyrolactone for sale . GBL Supplier Amongst Many Other Products; GHB, DMT, MOLLY, , ADDIES AND VARIOUS RESEARCH CHEM. Buy ADHD Medications for sale, We sell FDA approved Weight loss medication(injections and pills) like Ozempic, Saxenda liraglutide, Wegovy semaglutide, Victoza and Mounjaro which are available now And many more Medications for other health issues not just weight loss available in stock.
Buy 99.8% TO 99.9% pure Mephedrone plant food here. We sell only the finest quality 4-methylmethcathinone(4-MMC).happier since we started giving them Mephedrone every weekend. We can also supply plants, cacti, mushroom spores and seeds. We send your Mephedrone plant food in a plain jiffy bag via 1st class Recorded, Next day delivery or Airmail. There is no mention of this website or product on packaging. We never supply underweight packets. We also offer Overnight Delivery . We also have the following products in stock :AM 2201 MDAI 4MEC 4-MEC Crystalline Methylone Crystals Pentedrone MDPV Buphedrone 3,4-DMMC 4-MemABP 4-FA MPA Butylone AMT 6-APB 5-APB MDAI MDMA Crystals Methoxetamine JWH-122 AM-2201 6-APB 5-APB 3,4DMMC 4MEC MDPV
Buy Methylone
Buy Benzo fury
Buy Flephedrone
Buy Methedrone
Buy Butylone
Buy Oxycodone,
Buy MMephedrone
Buy Testosterone
Buy JWH-018
Buy Dimethocaine
Buy Bromo DragonFly,
Buy TCB-2,
4-Aco-DMT, 4-Ho-MIPT, 4-Ho-MIPT,
We also supply Bath salts of very high purity grade such as Eight Ballz, White Rush and many more.
General support contact
Email…([email protected])
Signal.. +(34)607218704)
Signal..(@Realjames.39)
Whatsapp..+(237)672564181)
whatsap/Signal.. +(34)607218704
Sell Pure Mephedrone, MDPV, Plant Food, Ketamine, etc.
Sell Pure Mephedrone, MDPV, Plant Food,Methylone, MDMAetc. We have in stock high quality research chemicals 99.9% Pure Mephedrone, MDPV, MMCAT, 4-MMC, MEOW, Plant Food, Batylone, Naphyrone, Ketamine to sell. We deliver you directly in your address . All our product Mephedrone, 4-MMC, 4MMC, 4-methylmethcathinone, Methedrone, Methadrone, Mephadrone, M-CAT, MM-CAT & Meow/Miaow Plant food is ready to be send. Note that we can send smaller orders as samples to test before bulk. We ship through EMS ,FedEx and TNT ,sometime DHL. We also suply Bath salts of very high purity grade such as Eight Ballz, White Rush PAINKILLERS, STEROIDS, HGH, MEDICAL MARIJUANA WE HAVE BOTH INDICA, SATIVA AND HYBRID. RSO AND HASH AND HEMP OIL AND CANNABIS EDIBLES AVAILABLE. and many more.
Buy Xanax
Buy Oxycontin
Buy Codeine
Buy Methadone
Buy Oxycodone
Buy Percocet
Buy Percodan
Buy Roxicodone
Buy Tramadol
Buy adderall
Buy valium
Buy morphin
Buy Celebrex and more
CONTACT
General support contact
Email…([email protected])
Signal.. +(34)607218704)
Signal..(@Realjames.39)
Whatsapp..+(237)672564181)
whatsap/Signal.. +(34)607218704)
We have in stock high quality research chemicals and drugs 99.9% Pure
ketamine, mdma, cocaine, lsd, mephedrone, MDPV, MCAT, 4-MMC, MEOW, Plant
Food, Butylone, Naphyrone, Ketamine to sell. We deliver you directly in your address All our product Mephedrone, 4-MMC, 4 MMC, 4-methylmethcathinone, Mephedrone, Mephedrone, Mephedrone, M-CAT, MM-CAT & Meow/Miaow Plant food is ready to be send. Note that we can send smaller orders as samples to test before bulk. We ship through EMS,FedEx and TNT ,sometime DHL. We also supply Bath salts of very high purity grade such as Eight Ballz, White Rush and many more. Pure Mephedrone, MDPV, Plant Food, Ketamine for sale We supply and retail wide range of supreme chemicals for agricultural, industrial and pharmaceutical uses. We are selling our products at very convenient and workable prices. When you buy from us, one thing is certain. You are guaranteed of the highest quality available on the market, high purity products, secure payment, and very fast and discreet delivery. Our products include:
General support contact
Email…([email protected])
Signal.. +(34)607218704)
Signal..(@Realjames.39)
Whatsapp..+(237)672564181)
whatsap/Signal.. +(34)607218704)
AM-2201
AM-2233
AM-1248
T , FMPP
4-FMC
a-PVP
2C-E, 2C-I, 2C-P, 2C-B, 2C-T, 2C-D
DOC
DOI
Methylone (bk-MDMA)
Testosterone
Ephedrine Hcl Powder
MDPV (Methylenedioxypyrovalerone, MDPK)
ZZ-1
4-MEC
URB-754
RCS-4
JWH-, 018
Buy Mdma
Buy MDai
Buy MKAT
Buy Morphine
Buy Phenazepam
Buy Mephedrone 4mmc
Buy Benzo Fury
5-iai
4-FA
4-FMA
Buy Ketamine
Buy Bath Salts
Others are supplied upon request. We sell local and worldwide, and at discounted and negotiable prices. We also supply Bath salts of very high purity.
About Us
*We are leading supplier of research chemicals .
*Ship discreetly and Risk-free.
*Our products are clinically tested and pure.
*Supply health facilities and individuals.
*Our specialist are always available to respond to clients. (24/7) .
We can guarantee.
Regardless of the purpose of your purchase, we can guarantee.
High quality product*
Best price guarantee*
Discrete shipping worldwide*
Money back guarantee*
Buy 3CMC Crystals online*
General support contact
Email…([email protected])
Signal.. +(34)607218704)
Signal..(@Realjames.39)
Whatsapp..+(237)672564181)
whatsap/Signal.. +(34)607218704)
Buy Pain killers | Mdma,2CB,A-PVP,3CMC | OZEMPIC | STEROIDS (Ecstasy/Nembutal) | Heroin Cocaine (Signal: +(34)607218704)
Buy Crystal meth, Hydrocodone, Alprazolam Powder, oxycontin, gbl, tramadol, buy GBL, xanax, klonopin, Amphetamine, cocaine, ketamine,2CB , 4-CMC, 3-CMC, 4-MMC, 3-MMC,, A-PVP (FLAK) online MMC, 4MMC, 3CMC China white, P-LSD 2-FA 25I-NBOMe 4-ACO-DMT 4-FA Mdphp 4anpp. Signal: +(34)607218704)
Amphetamine Black Tar Heroin Bromadol HCl MDPV Ephedrine Eutylone Etizolam DFentanyl Flakka A-PVP Furanyl Fentanyl Mephedrone Methamphetamine Methylone Potassium Cyanide Pseudoephedrine & Other research chemicals for sale
General support contact
Email…([email protected])
Signal.. +(34)607218704)
Signal..(@Realjames.39)
Whatsapp..+(237)672564181)
whatsap/Signal.. +(34)607218704)
We are vendors for research chemicals and pharmaceutical raw. We only offer the purest of these products at 99%. Top Grade quality. All orders come in discreet packaging. Tracking number Provided 6 hrs after order. 2-ME-MAF, Fentanyl, Acetylfentanyl, carfentanil, U-48800, U-47700 Nembutal Pentobarbital,, DiaMorphine, CBD isolate Alprazolam, Bromadol Hcl, Etizolam, Clonazolam Ketamine, 2F-DCK, 4-CMC, 3-CMC, 4-MMC, 3-MMC, MDMA, A-pvp (Flakka), Bk-EBDP, 4-methylaminorex (4-MAR) Oxycodone, Roxycodone Raw Powder and many more. We supply upon customer’s request.
Medicines for weight loss: Mounjaro, Ozempic, wegovy, saxenda
We offer a wide variety of pharmacy products that contain almost everything you need. Fast and discreet shipping quality 100% guaranteed, Express by UPS, FedEx, EMS with tracking number, no receipt required.
No Prescription
Ant-anxiety
Chronic Pain
Seizures
depression
Migraines
Arthritis
Killing Cancer
Epilepsy
Post Traumatic Stress
Disorder(pstd)
Diabetes
Crohn’s Disease
Gout
Pain relief
Glaucoma
Opioid Dependence
Treating Alcohol Abuse
1-Shipping secure and discreet
2-tracking number provided for your shipment (Fast, safe and reliable delivery)
3-with or without scripts
4-packing is highly discreet sealed, wrapped with an aluminum foil, safe and secure
5-no signature required upon arrival of parcel
I am a legit supplier (vendor) of pharmaceuticals for both patients with or without scripts
I have varieties of pain and anxiety meds
I offer fast and discrete delivery to any location.
Fast and secured delivery guaranteed to any location
I have a 100% record in successful deliveries.
All Inquiries Below
General support contact
Email…([email protected])
Signal.. +(34)607218704)
Signal..(@Realjames.39)
Whatsapp..+(237)672564181)
whatsap/Signal.. +(34)607218704)
DMT powder, MIO5 DMT vape pen cartridge, GBL wheel cleaner in Sydney, Ballard, Brisbane. Auckland NZ, Perth, Darwin, Melbourne Australia New Zealand.
Auckland NZ 5mio dmt vape cartridge, Gbl wheel cleaner in Brisbane, psychedelic shrooms dealer in Sydney dmt powder perth
Experience the next level of vaping with our exclusive collection of THC vapes, Pharmaceutical products, Magic mushroom, Researched Chem. etc.
Chemicals DMT VAPE CARTRIDGES, PSILOCYBIN MUSHROOM CHOCOLATE BARS crafted to provide an unforgettable journey
through taste and sensation.
Buy Best Ghost Carts
Buy Big Chiefs Carts
Buy Delta 8 THC? Disposable Vape Carts
Buy Ace Ultra premium 2g disposable
Buy Muha Meds Disposable carts
Buy Big Chief – Disposable
Buy Push Vape carts
Buy Alien Labs Carts
Buy Mad Labs Cartridges
Buy pre rolls marijuana online
Buy PLUGPLAY weed online
Buy mushroom chocolate bars
Buy Mad Labs weed online
Buy kushy punch weed online
Order Kiva marijuana carts online
Buy Jeeter weed carts online
Buy Flave vape carts online
Buy disposable vape pens carts online
Buy Dime industries carts online
Buy Dabwoods vape cats online
Buy CBD Vape online
Buy Cake Disposable carts online
Buy Blinkers disposable vape carts online
Buy Polka Dot Chocolate
Buy Trippy flip chocolate bar Online
Buy Muha Meds Disposable carts
Buy Meth, coke, ketamine Adderall Diazepam, Tramadol, Xanax, GBL, GHB, Nembutal, Carfentanil, Suboxone and more.
Buy benzodiazepines, research chemicals ADHD and opiates online
Buy cannabinoids, buy synthetic cannabinoids, buy 5cladba online, 6cladba for sale. Delivery/Shipping
rohypnol 1 mg K2 paper/spray online at cheap price, Buy K2 Spice Sheets, Buy K2 Spray/liquid online,Buy 6cladba,Buy 5cladba,Buy
jwh-018, ZOPICLONE, TRAMADOL, LSD Vials, shrooms, LEXAUR, GABAPENTIN, XANAX, TEMAZEPAM, Metonitazene
psychedelic mushrooms price in the US.
psychedelic mushrooms price in the UK.
psychedelic mushrooms price in Australia.
psychedelic mushrooms price Canada.
psychedelic mushrooms supplier in Canada.
psychedelic mushrooms supplier in France
psychedelic mushrooms supplier in Germany
psychedelic mushrooms supplier in Belgium
psychedelic mushrooms supplier in Denmark
psychedelic mushrooms supplier in Scotland
psychedelic mushrooms supplier in Wales.
psychedelic mushrooms supplier in Austria
psychedelic mushrooms supplier in the US.
psychedelic mushrooms supplier in the UK.
psychedelic mushrooms supplier in Australia.
psychedelic mushrooms near me.
psychedelic mushrooms online shop.
psychedelic mushrooms for sale.
psychedelic mushrooms dealer.
psychedelic mushrooms europe supplier.
buy psychedelic mushrooms in europe.
All Inquiries Below
General support contact
Email…([email protected])
Signal.. +(34)607218704)
Signal..(@Realjames.39)
Whatsapp..+(237)672564181)
Signal..(@Realjames.39)
whatsap/Signal.. +(34)607218704)
Buy 100% undetectable counterfeit money grade AAA+ | SSD CHEM | ATM CONED CARDS,CASHAPP,ZELLE,PAYPAL,BITCION FLIPPS AND INVESTMENTS ONLINE FOR SALE Signal: +(34)607218704)
We are the best and Unique producer of HIGH QUALITY Undetectable Counterfeit Banknotes, with over a billion,
of our products circulating around the world. we produce genuine dollar, British pound and euro banknotes with different serial numbers on each account. We stock semi-finished banknote bases that have already been engraved and designed on the front and back of the various currencies of each denomination. We need a partner with whom we will work discreetly to complete the production of our semi-finished banknote substrates and make them legal tender that we will discuss in a personal meeting if you agree to work with us. We will schedule an appointment to show you everything and discuss all details and prepare samples so you can pass the test to confirm authenticity. All notes will pass important test such as ultraviolet light, pencil test,
All Inquiries Below
General support contact
Email…([email protected])
Signal.. +(34)607218704)
Signal..(@Realjames.39)
Whatsapp..+(237)672564181)
whatsap/Signal.. +(34)607218704)
Our counterfeit bank notes are produced taking into consideration all the security features to give them the top quality customers desire. They pass the pen test, UV light test, and possess hologram features, water points.
Our bills can be used in the following places.
-Self service machines
-Markets
-Festivals / other busy places
-Bars
-Shops
-Taxi
-Restaurant
-Snackbar
-Casinos and all other places of these types
BUY CONED CARDS AVAILABLE AT AFFORDABLE PRICES
Cloned Cards *********
***********CONED CARDS *********
***********CONED CARDS *********
***********CONED CARDS *********
clones card for sale with high balance instantly dispatched once order is confirmed stop being broken and start shopping everyday
Clone cards are spammed credit cards with clean funds. clone cards are available for cash out in ATMs,Gas stations,POS Our clone card comes with ATM pin for easy cash outs
HOW DOES IT WORK?
We use credit card filters to obtain magnetic stripe information of a credit or debit card. The information received is not limited to credit card password, numbers, CVV and expiration date. This information comes in the form of pin (101 or 201) dump. now we use the MSR printer to put received information on a blank card
A blank card that contains information received using credit card filters are called cloned cards. You can use them for in-store shopping (card) or cash payment from an ATM
Shipping is always smooth and safe because the card is always hidden in a book and wrapped neatly to look like a gift. it’s always safe buying your cloned cards from us.
Cloned Cards *********
LOW BALANCE
200= balance of £€$2k
300= balance of £€$3k
400= balance of £€$4k
500= balance of £€$5k
600= balance of £€$6k
800= balance of £€$8k
900= balance of £€$9k
HIGH BALANCE
1k= balance of £€$10k
2k= balance of £€$20k
3k= balance of £€$30k
4k= balance of £€$40k
5k= balance of £€$60k
7k= balance of £€$90k
All cards you have purchased are carefully checked by us to be 100% valid before shipping to you.
Come btc ready
How to use the Cloned Cards!
Step 1: Insert ATM Card.
Step 2: Select the Language.
Step 3: Enter 4 Digit ATM Pin.
Step 4: Select Your Transaction.
Step 5: Select Your Account.
Step 6: Enter the Withdrawal Money(withdraw $500 every after 2 hours)
Step 7: Collect the Cash.
Step 8: Take a Printed Receipt.
Clone Credit Card orders available
• Shipping
• Swift Delivery On USPS, FedEx, DHL express etc.
(USA)🇺🇸 >> Same day
(Canada) 🇨🇦 >> Same day
(UK) 🇬🇧 >> 48 hours
(Germany) 🇩🇪 >> 48 hours
(France) 🇫🇷 >> 48 hours
(Switzerland)🇨🇭>> 48 hours
(Russia) 🇷🇺 >> 48 hours
..and more
Buy Guns Online With No Papers, All Types Avaliable Dm Me for more details
BUY PISTOL ONLINE
BUY PISTOL GUNS 9MM ONLINE
Buy Rifles, Shotguns, and Handguns ONLINE
Buy American Long Rifle ONLINE
BUY HALL BREECHLOADING RIFLE ONLINE
Buy Colt Model 1851 Navy Revolver ONLINE
Buy Winchester Model 1873 Lever Action Rifle ONLINE
Buy Springfield Model 1903 Bolt Action Rifle ONLINE
Buy Colt Model 1911 Semi-automatic pistol ONLINE
Buy Thompson Submachine Gun ONLINE
Buy M1 Garand Semi-Automatic Rifle ONLINE
Buy AR-15 Rifle ONLINE
BUY Glock 19 ONLINE
BUY Glock 17 ONLINE
BUY Glock 19 Gen 5 ONLINE
BUY Glock 43 ONLINE
BUY Glock 9mm ONLINE
BUY Glock 45 ONLINE
BUY Glock 49 ONLINE
BUY Glock 42 ONLINE
BUY AR pistol ONLINE
BUY ar-556 pistol ONLINE
BUY ARP 556 ONLINE
BUY Palmetto State Armory ONLINE
BUY Best AR pistol ONLINE
BUY Best harp gun ONLINE
BUY 4 inch AR Pistol ONLINE
BUY ar-15 pistol with drum ONLINE
Our Delivery is Worldwide depending on your location contact us Bellow.
All Inquiries Below
Email…([email protected])
Signal.. +(34)607218704)
Signal..(@Realjames.39)
Whatsapp..+(237)672564181)
whatsap/Signal.. +(34)607218704)
Buy Grade A Pure CBD Isolate Powder,Medical Marijuana & Pain killer& MDMA,LSD (Ecstasy/Molly)Heroin,Cocaine
We sell Medical marijuana, Pure CBD Isolate Powder and Cannabis Oil for patients and smokers Remember Health is Wealth
1 Wholesale & Distributors of CBD Products for Sale | Wholesale & Bulk
We are the largest Bulk and Wholesale Suppliers of Pure CBD,Organic Hemp CBD, CBD Hemp
Our Pure CBD Isolate is a crystallized powder with CBD concentrations of over 99%. Never synthetic, and never
fortified, our naturally high CBD oil starts at 70% CBD and is then gently refined to remove the remaining 30% of plant
material all the way down to a single molecule of pure CBD crystalline isolate. Once in the crystallized form, we then
crush the CBD crystals into a pure CBD powder so that it may be used effectively and evenly distributed within product
formulations
Treatment of some of the following illness below
Ant-anxiety Chronic Pain Seizures Depression Migraines Arthritis Killing Cancer Epilepsy Post Traumatic stress Disorder(pstd) Diabetes Crohn’s Disease Gout Pain relief Glaucoma Opiod Dependence Treating Alcohol Abuse
We have the following pain killers available on stock
General support contact
Email…([email protected])
Signal.. +(34)607218704)
Signal..(@Realjames.39)
Whatsapp..+(237)672564181)
whatsap/Signal.. +(34)607218704)
Buy Nembutal online, Diazepam, Xanax, XTC, Methamphetamine, Valium, Oxynorm, Oxycodone, Oxycontin, Ritalin, Adderall without a prescription. (Safe and discreet medication purchase, 100% guaranteed). Email: ([email protected])
BUY GHB, GBL, BDO, MDMA, Methylone, LSD, Mephedrone, Cocaine, Ketamine, Amphetamine, Ephedrine for sale,
CBD hemp oil, marijuana buds, ephedrine, heroin, 4MMC, cocaine, MDMA, ketamine, crystal methamphetamine, LSD, oxy, Xanax
L.S.GHB, GBL, BDO. LSD-Ephedrine-HCl-Oxycontin-Hydrocodone-Cocaine-Ketamine-HCl-Methamphetamine-Heroin-4-mmc-Xanax-2mg-bar-
Mephedrone – MDMA – Alprazolam – JWH-020 – MDAI – 5-MeO-DALT – MDPV – Naphyrone – 2C-C – 2C-D – 2C-E – 2C-I – 2C-P – 2C-
MDMA, 4-mmc, Ketamine
Buy methamphetamine, GHB, mephedrone, MDMA, ephedrine, zolpidem, ketamine, CBD hemp oil, marijuana buds, EPHEDRINE, HEROIN, 4MMC, COCAINE, MDMA, KETAMINE, CRYSTAL METHAMPHETAMINE, LSD, OXY, XANAX, MDPV, MARIJUANA, DMT crystal, CODEINE, GHB and other related products for sale at very low prices. Delivery time is a maximum of 2 days and we offer secure shipping. Please contact me by email at hydromorph morphine Rohypnol Nonylphenol -methylmethcathinone (4-MMC) MDPV Ketamine 3-(p-fluorobenzoyloxy)tropane benzylpiperazine (BZP) 3-trifluoromethylphenylpiperazine (TFMPP) Nandrolone 4-Fluorotropococaine MDMA Rohypnol methylone Amphetamine morphine Heroin Amphetamine LSD LSD-Ephedrine-HCL-Oxycontin-Hydrocodone-Cocaine-Ketamine-HCL-Meth-Herion-4-mmc-Xanax-2mg-bar- Mephedrone-Mdma-Alprazolam-JWH-020-MDAI-5-MeO-DALT-MDPV-Nafyron-2C-C-2C-D-2C-E-2C-I-2C-P-2C-T- MDMA, 4-mmc, Ketamine and more
General support contact
Email…([email protected])
Signal.. +(34)607218704)
Signal..(@Realjames.39)
Whatsapp..+(237)672564181)
whatsap/Signal.. +(34)607218704)
BUY JWH018 CRYSTALS ONLINE, buy jwh018 online, buy jwj 250, buy jwh 018 pure online Signal: @Realjames.39 Buy 6cladba, 6cl-adb-a, 5cladba, 5cl-adb-a yellow and white powder, 5F-MDA-19,GHB,GBL,BDO,LSD,MDMA
We ship from china, netherlands and our warehouse USA..
BUY EUTYLONE AND OTHER RESEARCH CHEMICALS.
BUY eutylone ,COKE KU,NU, Alprazolam,Etizolam, protonitazene, metonitazene,etazene,bromazolam mdma crystals and other research chemicals at very good prices
BUY HERION
BUY COKE
Buy ECSTASY Pills
BUY FLAKKA
BUY FENTANYL
BUY Alprozolam
BUY XANAX pills
BUY PERCOCET
BUY ADDERALL
BUY SECONAL
BUY PERCOCET
BUY MORPHINE
BUY ADDERALL
BUY OXYCONTIN
BUY OXYCODONE
BUY SUBOXONE
BUY RITALIN
BUY 5cl
BUY 6fa
BUY 5cladba
BUY MDMA
BUY APVP
buy eutylone
Buy NU
Buy KU Buy
Isotodesnitazene Buy Protonitazene Buy Butonitazene Buy Fluonitazene Buy Etodesnitazene Buy Metodesnitazene Buy Metazene Buy Etodesnitazene Buy Etazene Buy Protodesnitazene Buy Bromazolam Buy MDMA Buy MAM-2201 Buy 4MMC Buy MDAI Buy MN-24 Buy PB-22 Buy 5F-PB-22 Buy 5F-UR Buy 2-FA Buy Pentetrone Buy Methylone Crystal Buy 5F-AKB-48 Buy Dimethocaine Buy 4-MEC Buy A-pvp Buy AB-Fubinaca Buy 5F-AB-Fubinaca Buy AB-Piñata Buy 5F-AB-Pinaca Buy 5-MEO-DALT Buy 5-MEO-MIPT Buy MPA Buy PB-8 Buy 5-APDB Buy MXE Buy Ethylphenidate Buy JWH-250 Buy MDPV Buy MDMA Buy KETAMINE BUY 5F AMB BUY COKE,
NEMBUTAL ( Pills, Liquid & Powder )
KLONOPIN
OPANA 10, 20, 30 and 40 mg
XANAX 1 mg Upjohn footbals
XANAX 1 mg ( blue Ksalol)
XANAX SR 2 mg ( brand Upjohn)
XANAX 2 mg ( Pfizer LongBars)
VALIUM 10 mg Bensedine
VALIUM 2mg, 5mg and 10mg
OXYCODONE-APAP ( Wattson labs) and ( Physicians tc.) 10/ 325mg
OXYCOTIN 20mg, 40mg and 80mg
NORCO YELLOW taps Watson
FENTANYL
DEMEROL ( Meperidine HCL) caps 8
ACTAVIS PROMETHAZINE
KETAMINE CRYSTAL
EPHEDRINE
MORPHINE30mg
WATSON 325 10MG
WATSON 853 10MG
VICODIN 5MG
VICODIN ES 7.5MG
EPHEDRINE 30MG
CELEBREX 100mg
CODEINE 15mg
OXYCOTIN 80MG
OXYCOTIN 20MG, 40MG.
HYDROCODONE 10MG/500MG
HYDROCODONE 5MG/500MG
METHADONE 10MG, 40MG WAFERS
LORCET – ( Hydrocodone Bitartrate/ Acetaminophen) 10 mg/ 650 mg
AMBIEN ( Zolpidem, Stilnox) 10 mg
LO LOESTRIN FE
ADIPEX-P 37.5MG
VIAGRA 100MG
LORAZEPAM 2.5 mg ( Ativan)
CLONAZEPAM 2 mg ( Rivotril)
CIALIS 20MG
PERCOCET 10/ 325
NORCO – ( Hydrocodone Bitartrate/ Acetaminophen ) 5 mg/ 325 mg
PERCOCET 5/ 325
ENDOCET 10/ 325
HYDROCODONE-IBUPROFEN (brand name:vicoprofen)
SUBOXONE
SUBUTEX
DILAUDID 8mg
SOMA 350mg
ADDERALL 30mg
RITALINE 10mg
TRAMADOL ( Ultram) 50mg
ATARAX 25mg
VIAGRA GOLD
FIORICET (BUTALBITOL 50MG) – MIKART
ROXICODONE 15mg, 30mg
1-Shipping secure and discreet 2-tracking number provided for your shipment (Fast,safe and reliable delivery) 3-with or without scripts 4-packing is highly discreet sealed, wrapped with an aluminum foil, safe and secure 5-no signature required upon arrival of parcel
So if you are interested contact for more details below
General support contact
Email…([email protected])
Signal.. +(34)607218704)
Whatsapp..+(237)672564181)
Signal..(@Realjames.39)
whatsap/Signal.. +(34)607218704)
Buy 5MEO DMT powder near New Orleans, LA 5MEO DMT vape pen cart domestics supplier in Honolulu, HI GBL wheel cleaner seller in Anaheim, CA. Global GHB powder Tampa, FL supplier GBL wheel cleaner Canadian and USA legit dealer. GBL wheel cleaner USA and Canadian legit supplier. Nembutal powder street dealer Nembutal powder online dealer Nembutal powder street price Nembutal powder online price Buy nembutal powder in Aurora, CO gbl wheel cleaner gbl wheel brite gbl cleaner for sale in Santa Ana, CA wheel cleaner gbl buy gbl wheel cleaner gbl wheel cleaner for sale in St. Louis, MO gbl wheel cleaner Pittsburgh, PA dealer 3m wheel cleaner 4 wheeler cleaning products 4 wheeler cleaner Buy Gbl wheel cleaner in Houston TX. GBL wheel cleaner Santa Fe TX Gbl wheel cleaner price in Dallas TX. GBL wheel polisher in San Antonio TX. GBL cleaner alloy wheel restored GBL wheel brite cleaner wheel cleaner gbl buy gbl wheel cleaner GBL wheel cleaner GBL Aluminum wheel cleaner, GBL alloy wheel cleaner, GBL rim cleaner, GBL cleaner & polish your car wheels. GBL alloy wheel cleaner. GBL wheel polisher, GBL alloy wheel restored. GBL alloy wheel cleaner, GBL rim cleaner, GBL wheel polisher. GBL alloy wheel, rim cleaner. Buy Gbl wheel cleaner in Columbus. GBL wheel cleaner Charlotte Gbl wheel cleaner price in Indianapolis. GBL wheel polisher in San Francisco. GBL cleaner alloy wheel restored GBL wheel brite cleaner wheel cleaner gbl buy gbl wheel cleaner GBL wheel cleaner GBL Aluminum wheel cleaner, GBL alloy wheel cleaner, GBL rim cleaner, GBL cleaner & polish your car wheels. GBL alloy wheel cleaner. GBL wheel polisher, GBL alloy wheel restored. GBL alloy wheel cleaner, GBL rim cleaner, GBL wheel
Email…([email protected])
Signal.. +(34)607218704)
Signal..(@Realjames.39)
Whatsapp..+(237)672564181)
whatsap/Signal.. +(34)607218704)
polisher. GBL alloy wheel, rim cleaner. Buy 5MEO DMT powder near Seattle 5MEO DMT vape pen cart domestics supplier in Denver GBL wheel cleaner street dealer Oklahoma City area. Global GHB powder supplier. GBL wheel cleaner Canadian and USA legit dealer. GBL wheel cleaner USA and Canadian legit supplier. Nembutal powder street dealer Nembutal powder online dealer Nembutal powder street price Nembutal powder online price Buy nembutal powder in Nashville gbl wheel cleaner gbl wheel brite gbl cleaner for sale wheel cleaner gbl buy gbl wheel cleaner gbl wheel cleaner Detroit, MI gbl wheel cleaner uk 3m wheel cleaner 4 wheeler cleaning products 4 wheeler cleaner 5MEO DMT vape pen cart supplier in El Paso 5MEO DMT powder supplier,5MEO DMT vape pen carts DMT vape powder dealer in Washington, D.C. 5MEO DMT vape pen carts supplier in Las Vegas 5MEO DMT powder supplier in Boston MA GBL wheel cleaner price in Memphis, TN GBL wheel cleaner home base dealer in Baltimore, MD Gbl wheel, rim cleaner dealer in Nashville-Davidson, TN Gbl wheel brite Portland, OR buy gbl wheel cleaner in Albuquerque, NM area. GBL wheel cleaner for sale Tucson, AZ gbl wheel cleaner price in Fresno, CA wheel cleaner gbl supplier near Long Beach, CA wheel cleaner 1 gallon wheel cleaner sale 3m wheel cleaner 5l wheel cleaner ultra clean wheel cleaner DMT vape pen cart for sale Kansas City, MO .DMT vape pen cart, DMT powder street supplier chain. 5MEO DMT powder supplier,5MEO DMT vape pen carts DMT vape powder street supplier in Mesa, AZ 5MEO DMT vape pen carts street supplier in Virginia Beach, VA 5MEO DMT powder street dealer in Atlanta, GA. GBL & GHB cleaner street value,GBL wheel rim cleaner street price, GHB powder street value GBL cleaner street value in Colorado Springs, CO. GBL wheel, rim cleaner street price in Omaha, NE , Buy GHB powder GBL cleaner supplier. DMT vape powder Raleigh, NC Gbl wheel cleaner for sale in Miami, FL DMT vape pen cart for sale in Cleveland, OH, legit dmt vape pen cart supplier in Tulsa, OK, gbl cleaner online supplier. buy domestic Oakland, CA gbl wheel cleaner seller. gbl cleaner for sale gbl wheel brite wheel cleaner gbl buy gbl wheel cleaner gbl wheel cleaner for sale wheel cleaner 1 gallon wheel cleaner sale 4 wheeler cleaner 4 wheeler cleaning products wheel cleaner gallon wheel cleaner Minneapolis, MN tire Gbl wheel cleaner for sale in Wichita, KS, DMT vape pen cart for sale in Arlington, TX WIRE- Gbl cleaner online supplier. gbl cleaner for sale gbl wheel brite wheel cleaner gbl buy gbl wheel cleaner gbl wheel cleaner for sale wheel cleaner 1 gallon wheel cleaner sale 4 wheeler cleaner 4 wheeler cleaning products wheel cleaner gallon wheel cleaner Bakersfield, CA tire cleaner products.
Email…([email protected])
Signal.. +(34)607218704)
Signal..(@Realjames.39)
Whatsapp..+(237)672564181)
whatsap/Signal.. +(34)607218704)
Buy Oxycodone Online No Prescription | buy Adderall 30mg Online | Order Subutex Online | buy Roxicodone 30mg | Buy Subutex 8mg Online | Buy suboxone online | Buy Oxycontin Online, Buy Amphetamine online, Codeine and Hydrocodone Buy Oxycontin 80mg online | buy Percocet online | Buy Dilaudid 8mg online
Buy Adderall Online
Buy Adipex Online Buy
Alprazolam Online
Buy Ambien Online
Buy Ativan Online
Buy Carisoprodol
Online Buy Clonazepam Online
Buy Codeine Online
Buy Darvocet Online
Buy Demerol Online
Buy Diazepam Online
Buy Dilaudid Online
Buy Fioricet Online
Buy Gabapentin Online
Buy Hydrocodone Online
Buy Hydromorphone Online
Buy Klonopin Online
Buy Lexapro Online
Buy Lorazepam Online
Buy Lorcet Online
Buy Lortab Online
Buy Meridia Online
Buy Methadone Online
Buy Modafinil Online
Buy Norco Online
Buy Opana ER Online
Buy Oxycodone Online
Buy Oxycontin Online
Buy Percocet Online
Buy Phentermine Online
Buy Roxicodone Online
Buy Soma Online
Buy Suboxone Online
Buy Subutex Online
Buy Tapentadol Online
Buy Tramadol Online
Buy Valium Online
Buy Viagra Online
Buy Vicodin Online
Buy Xanax Online
Buy Zolpidem Online
Buy Oxycodone 30mg Online UK – Your Trusted Online
Buy Oxycodone 30mg Online UK – UK Online Pharmacy & Over the Counter
Where to Buy Oxycodone 30mg Online UK with Instant Delivery
Buy Oxycodone 30mg Online UK Without Prescription Safely
Buy Oxycodone 30mg Online UK Dispatched Within 24 hours,
Buy Oxycodone 30mg Online UK Direct to Your Door Shop NOW
Buy Oxycodone 30mg Online Overnight UK Delivery – Pure Meds UK
Pure Meds UK provides an efficient way for customers to Buy Oxycodone 30mg Online in The UK when they need it for pain treatment. When patients purchase Oxycodone 30mg Online in the UK from Pure Meds UK, they can reach a secure, well-organized system to design the ordering process and fast delivery. Oxycodone 30mg Orders are treated and treated otherwise shipped overnight in the UK, well-being patients receive medication without their delay. Customers trust Pure Meds UK for its authenticity, privacy-focused service, and professional support team. Buy Oxycodone 30mg Online UK to UK Shipping at Best Price
Email…([email protected])
Signal.. +(34)607218704)
Signal..(@Realjames.39)
Whatsapp..+(237)672564181)
whatsap/Signal.. +(34)607218704)
Buy Morphine 30mg Online USA – Your Trusted Online USA Pharmacy
Buy Morphine 30mg Online USA – USA Online Pharmacy & Over the Counter
Where to Buy Morphine 30mg Online USA with Instant Delivery
Buy Morphine 30mg Online USA Without Prescription Safely
Buy Morphine 30mg Online USA Dispatched Within 24 hours,
Buy Morphine 30mg Online USA Direct to Your Door Shop NOW
Buy Morphine 30mg Online Overnight USA Delivery – Pure Meds USA
Eaz Meds USA provides an efficient way for customers to Buy Morphine 30mg Online in The USA when they need it for pain treatment. When patients purchase Morphine 30mg Online in the USA from Eaz Meds USA, they can reach on a secure, well-organized system to design the ordering process and fast delivery. Morphine 30mg Orders are treated and treated otherwise shipped overnight in the USA, well-being patients receive medication without their delay. Customers trust Eaz Meds USA for its authenticity, privacy-focused service, and professional support team. Buy Morphine 30mg Online USA to USA Shipping at Best Price.
Email…([email protected])
Signal.. +(34)607218704)
Signal..(@Realjames.39)
Whatsapp..+(237)672564181)
whatsap/Signal.. +(34)607218704)
Are you looking for how to buy a passport from any other country without citizenship? Or are you looking for to buy a registered driver’s license with DVLA, or DMV online without taking a test? authentic IELTS or TOEFL certificate, purchase quality passports online, Driver’s licenses, ID cards, Visas, Resident Permits, and Diplomas.
BUY FAKE DRIVING LICENSE,
BUY FAKE PASSPORT,
Buy fake Registered passports,
Purchase Legit fake Driver’s License,
buy real and fake ID cards,
buy fake Visas,
buy fake Resident Permits,
Purchase fake Diplomas,
buy fake TOEFL certificates,
buy fake Graduation certificates,
buy fake IELTS certificates,
buy fake Registered passport online,
Purchase fake Working Permit,
buy fake Social Security Number/Card,
buy fake Adoption Certificates,
Purchase fake Emancipation Document,
buy fake Birth Certificates,
buy fake Marriage Certificate,
Purchase fake College Degrees,
buy fake Schengen visa,
Email…([email protected])
Signal.. +(34)607218704)
Signal..(@Realjames.39)
Whatsapp..+(237)672564181)
whatsap/Signal.. +(34)607218704)
Buy database registered fake Passports Buy citizenship documents. Buy fake passport USA.
Buy fake Australian passport.
Purchase fake Belgian passports.
Buy fake.Brazilian passport.
Buy fake Canadian passport.
Buy fake passport Finlands.
Purchase fake French passport.
Buy fake German passport.
Buy fake Dutch passport.
Purchase fake Israeli passport.
Buy fake UK passport.
Buy fake Spanish passport.
Purchase fake Mexican passport.
Buy fake South African passport.
Buy fake Swiss passport.
Purchase fake Chinese passport.
Buy fake passport Austria.
Buy fake Japanese passport.
Buy fake Ukrainian passport.
Buy fake cambodiens passport.
Purchase fake passport USA.
Buy fake Romanian passport.
Buy fake passport Polish.
Buy fake Bulgarian passport.
Buy fake passport Moroccan.
Purchase fake passport Norwegian.
Buy fake passport Portuguese.
Buy fake Lithuanian passport.
Buy fake Russian passport.
Buy fake passport Hungary.
Purchase fake Australian passport.
Buy fake passport Brazilian.
Buy fake Italian passport.
Buy fake passport Jamaica.
Purchase fake South Korean passport.
Buy fake passport Croatian.
Buy fake passport Denmark.
Buy fake passport Malta.
Buy fake passport Polish.
Purchase fake Swedish passport.
Buy a valid passport, Buy fake CSCS card, buy Schengen visa, Buy ETIAS authorization, Proof of Accommodation, IDP, Proof of Financial Means, Return or Onward Ticket, Travel Insurance, high school diploma, Bachelor’s or Master’s, CFA in finance or a Fire Marshal Certification, HND diplomas.
Buy fake IDs USA.
Buy fake Australian identification cards.
Purchase fake Belgian identity cards.
Buy fake identification cards.
Buy Canadian false ID cards.
Buy fake Finland identity cards.
Buy false French identity cards.
Purchase fake German identification cards.
Buy fake Dutch identification cards.
Buy fake Israeli identity cards.
Buy fake UK IDs.
Buy fake Spanish identification cards.
Buy fake Mexican ID cards.
Buy fake cards of South African identity.
Purchase fake Swiss identity cards.
Buy fake German identity cards.
Buy fake Chinese ID cards.
buy undetectable counterfeit money buy real and fake passport online.
buy undetectable counterfeit money.
Purchase real and fake driver’s licenses.
Buy counterfeit banknotes.
where to buy fake dollar bills.
where to buy counterfeit bills.
where to buy fake bills,
buy counterfeit bank notes.
where to buy fake bank notes.
where can i buy fake dollar bills.
where to buy counterfeit bank notes.
Purchase counterfeit euro bills.
Purchase euro fake bills online.
Where to buy fake British pounds.
fake banknotes for sale.
uk fake bank notes for sale,
counterfeit euro banknotes for sale.
counterfeit bank notes for sale.
Where to buy fake euro bills.
Where to Buy British pounds.
Fake bank notes for sale.
Germany Counterfeit bank notes for sale.
China Buy currency bills.
Japan Where to buy euro bills online.
fake money for sale.
prop money for sale counterfeit money for sale,
Email…([email protected])
Signal.. +(34)607218704)
Signal..(@Realjames.39)
Whatsapp..+(237)672564181)
whatsap/Signal.. +(34)607218704)
Email…([email protected])
Signal.. +(34)607218704)
Signal..(@Realjames.39)
Whatsapp..+(237)672564181)
whatsap/Signal.. +(34)607218704)
High-quality Weed of various strains, affordable prices, discreet shipping, fast delivery/pickup/drop-off , and excellent customer service available.\” Coke, vape, Ritalin, Hash, ecstasy, Oxys, edibles, disposables, carts, mdma, shrooms
Buy Cocaine in Miami, Buy weed in Florence, buy vape in Tampa, buy coke in Vienna, buy weed in Miami, buy weed in Roma, buy weed in Kratovo, buy weed in Prilep, buy weed in Skopje, buy coke in Venice, buy pills in Paris, buy weed in Milan, buy mushrooms in Rome, buy weed in Venice, buy weed in Lisbon, buy weed in Strumica, buy coke in Amsterdam, buy mdma in Paris, buy crystal meth in Budapest, buy weed in Lisbon, buy coke in Amsterdam, buy weed in Istanbul, buy weed in Zagreb, buy coke in Cairo, buy weed in Puerto Plata, buy weed in Soufriére, buy weed in Karlovac, buy weed in Aruba, buy weed in Punta Cana, buy weed in Grand Cayman, buy weed in Nassau, buy weed in Trogir, buy coke in Rijeka. Buy weed in Colmar, buy weed in Lyon, buy weed in Cannes, buy weed in chartres, buy weed in Annecy, buy weed in Charleston, buy weed in Columbia SC, buy weed in San Juan, buy weed in Seneca, buy weed in Santo Domingo, buy weed in Santiago, buy weed in Lima, buy weed in Quito, buy weed online in Moscow, buy weed online in Paris, Weed for sale in Paris, weed online Paris, buy weed online in London, where to buy weed online in London, where to buy weed in London, buy weed in Madrid, where to buy weed in Madrid, buy weed online in Barcelona, buy weed in Saint Petersburg, buy weed in Milan, where to buy weed in Athens, buy weed in Athens, buy weed in Lisbon, where to buy weed in Lisbon, buy weed online in Manchester, weed online in kyiv, buy weed in Birmingham, where to buy weed in Kyiv, Where to buy weed in Birmingham, buy weed online in Naples, buy weed in Naples, buy weed in Brussels, where to buy weed in Brussels, buy weed online in Minsk, where to buy weed in Minsk, buy weed online in Vienna, where to buy weed in Vienna, weed for sale in Vienna, buy weed in Graz, buy weed in Innsbruck , buy weed online in Cartagena, buy weed in Cusco , buy weed in Rio de Janeiro, buy weed in Buenos Aires, Buy Weed Cocaine In New York, Buy Weed Cocaine In Los Angeles, buy weed cocaine mushroom in Chicago, buy weed cocaine in San Antonio, Buy Weed Cocaine In Austin, buy weed cocaine hash in Phoenix, buy weed cocaine molly in Houston, buy weed in San Diego, buy weed cocaine in Philadelphia, buy weed cocaine in Dallas, buy weed cocaine in Seattle, buy weed cocaine in San Francisco, buy weed cocaine in Denver, buy weed cocaine in Columbus, buy weed cocaine in Nashville, buy weed cocaine in Las Vegas, buy weed cocaine in Atlanta, buy weed cocaine in San Jose, buy weed cocaine in Charlotte, buy weed cocaine in Baltimore, buy weed cocaine in Boston, buy weed cocaine in Oklahoma City, buy weed cocaine in Milwaukee, buy weed cocaine in Raleigh, buy weed cocaine in Indianapolis, buy weed cocaine in Jacksonville, buy weed cocaine in Omaha, buy weed cocaine in Detroit, buy weed cocaine in Fort Worth, buy weed cocaine in Albuquerque, buy weed cocaine in Portland, buy weed cocaine in Memphis, buy weed cocaine in Miami, buy weed cocaine in Minneapolis, buy weed cocaine in Orlando,buy weed cocaine in Kansas City, buy weed cocaine in Salt Lake City, buy weed cocaine in St. Louis, buy weed cocaine in Colorado springs, buy weed cocaine in Kuwait, buy weed cocaine in Damascus, buy weed cocaine in Riyadh, buy weed cocaine in Beirut, buy weed cocaine in Madison, buy weed in Honolulu, buy weed in Fresno, buy weed in El Paso, buy weed in Tulsa, buy cocaine in Cappadocia, buy cocaine in Dahab, buy cocaine in Tel Aviv, buy cocaine in Muscat, Buycocaine in Cairo, buy cocaine in Jerusalem, buy cocaine in Manama, buy cocaine in Petra, buy cocaine in Doha, buy cocaine in Dubai, buy cocaine in Istanbul
Buy Bulk PSYCHEDELIC,MDMA,CRYSTAL METH,DMT Carts,Researched Chemica
Buy Bulk PSYCHEDELIC,MDMA,CRYSTAL METH,DMT Cart,LSD,METH,THC Vape,CBD, Marijuana/Cannabis,Xanax,Molly,Weed,OXY,Crystal Ketamine,Ecstasy, Researched Chemicals, Magic mushroom,Adderall,Hash,Wax,Edibles,Pre-rolls, online.
we are leading suppliers of the highest quality pharmaceuticals, research chemicals,Marijuana/Cannabis and painkillers pills and tablets etc. we ship worldwide. Please include your contact number when placing your order. We sell in small/bulk quantities, with guaranteed discreet delivery on time.
Email…([email protected])
Signal.. +(34)607218704)
Signal..(@Realjames.39)
Whatsapp..+(237)672564181)
whatsap/Signal.. +(34)607218704)
#GBL,GHB,BDO
#Ketamine(FOR DEPRESSION)
#Xanax.Pfizer Long Rods
#Fentalyn Patches
#Nembutal(tablets,liquid and powder)
#Klonopin
#LSD
#valium
#Hash
#Edibles
#Pre-rolls
#Nembutal
#Ativan
#Dilaudid
#AMBIEN
#Oxycontin
#Percocet
#CBD
#THC
#Wax
#THC vapes
#Dmt
#MDMA
#Weed
#Molly
#Adderall
#Researched Chemicals
#Crystal Ketamine
#Marijuana
#Cannabis
#TEMAZEPAM
#Ecstasy
#Cocaine
#ZOPICLONE
#TRAMADOL
#Roxycodone
#Mushrooms
#Quaaludes-Methaqualone Tablets
CONTACT ———————Email…([email protected])
Signal..(@Realjames.39)
Whatsapp..+(237)672564181)
whatsap/Signal.. +(34)607218704)
Understanding Pain Medications: Options, Uses & Safety
Pain is one of the most common reasons people seek medical care. Whether acute after surgery or injury, or chronic due to conditions like arthritis or neuropathy, effective pain management is essential for quality of life. Pain medications range from over-the-counter options to powerful prescription drugs — each with unique benefits and risks.
In this article, we’ll explore how pain medications work, when they’re used, and provide an overview of some of the strongest painkillers prescribed in the United States. Note: This is educational and not medical advice. Always consult a healthcare provider before using prescription pain medication.
DRUGS CONTROL BY DR JASON
How Pain Medications Work
Pain medications, or analgesics, target pain through different mechanisms:
Peripheral Pain Relievers
These reduce inflammation at the site of injury or irritation:
NSAIDs (e.g., ibuprofen, naproxen)
Central Pain Modulators
These act on the central nervous system (spinal cord/brain) to alter pain perception:
Opioids
Certain antidepressants and anticonvulsants (for neuropathic pain)
Adjuvant Medications
Used alongside primary painkillers:
Muscle relaxants
Steroids
Topical agents
RESEARCH Chemicals USED ONLY FOR RESEARCH PURPOSES
Categories of Pain Medications
Category
Typical Use
Example Medications
Over-the-Counter (OTC)
Mild pain
Acetaminophen, ibuprofen
NSAIDs (Prescription)
Moderate pain/inflammation
Celecoxib, diclofenac
Opioids (Prescription)
Moderate–severe pain
Morphine, oxycodone
Adjuvants
Neuropathic or muscle pain
Gabapentin, pregabalin
10 of the Strongest Painkillers Used in the USA
Below are powerful prescription pain medications typically reserved for severe pain, acute surgical pain, cancer pain, or end-of-life care. Their use must be medically supervised due to risk of side effects and dependence.
1. Fentanyl
One of the most potent opioids available; used in severe pain and anesthesia.
Forms: patches, lozenges, injectables.
2. Hydromorphone (Dilaudid)
Stronger than morphine; used in acute severe pain, including cancer pain.
3. Methadone
Long-acting opioid used for pain and addiction treatment; complex dosing requires specialist oversight.
4. Oxycodone (OxyContin, Percocet)
Commonly prescribed for moderate-to-severe pain; often combined with acetaminophen.
5. Morphine
A classic opioid for severe pain, especially in hospital and palliative care settings.
6. Oxymorphone
Stronger than oxycodone, used in severe pain management.
7. Hydrocodone (Vicodin, Norco)
Widely used for moderate to severe pain; typically combined with acetaminophen.
8. Tapentadol (Nucynta)
Opioid-like pain reliever with additional nerve-pain relief properties.
9. Buprenorphine
Partial opioid agonist; used for chronic pain and opioid dependence.
10. Ketamine (IV/IM)
Not a classic opioid; used in severe pain, anesthesia, and complex pain syndromes, often in controlled settings.
ENJOY IN BED
Important Safety Considerations
Even the strongest painkillers carry risks:
Respiratory depression
Dependence & addiction
Sedation & cognitive impairment
Constipation & nausea
Safe use tips:
Use exactly as prescribed.
Avoid combining with alcohol or sedatives.
Discuss history of substance use with your clinician.
Never share prescription painkillers.
Alternatives & Adjuncts to Strong Painkillers
Healthcare providers may recommend:
Physical therapy
Nerve blocks or injections
Non-opioid medications (antidepressants, anticonvulsants)
Cognitive-behavioral strategies
Topical analgesics
Conclusion
Pain medications — from OTC options to powerful prescription drugs — play a vital role in care. Strong opioids like fentanyl, hydromorphone, and morphine are invaluable for severe pain but require careful medical supervision due to their potency.
At JASON Pharmaceuticals, we emphasize safe, informed pain management and encourage ongoing dialogue between patients and healthcare providers to tailor treatment plans that balance relief with safety.
PAIN MEDICATIONS, PAIN KILLERS, PAIN RELIEF MEDICINE, BEST PAIN RELIEVER, STRONG PAIN KILLERS, PRESCRIPTION PAIN MEDS, OVER THE COUNTER PAIN RELIEF, CHRONIC PAIN TREATMENT, ACUTE PAIN RELIEF, FAST ACTING PAIN RELIEF, IBUPROFEN TABLETS, ACETAMINOPHEN DOSAGE, PARACETAMOL TABLETS, NAPROXEN SODIUM, ASPIRIN FOR PAIN, ANTI INFLAMMATORY DRUGS, NSAIDS FOR PAIN, HEADACHE RELIEF MEDICINE, FEVER AND PAIN MEDICINE, MUSCLE PAIN RELIEF PILLS, PRESCRIPTION PAINKILLERS, OPIOID PAIN MEDICATION, NARCOTIC PAIN RELIEVERS, STRONGEST PRESCRIPTION PAINKILLER, PAIN MANAGEMENT DRUGS, CONTROLLED PAIN MEDICATION, POST SURGERY PAIN MEDICINE, SEVERE PAIN TREATMENT DRUGS, CHRONIC PAIN PRESCRIPTIONS, DOCTOR PRESCRIBED PAIN MEDS, OXYCODONE TABLETS, HYDROCODONE PILLS, MORPHINE SULFATE, FENTANYL PATCHES, HYDROMORPHONE DILAUDID, METHADONE FOR PAIN, OXYMORPHONE TABLETS, TRAMADOL MEDICATION, TAPENTADOL NUCYNTA, BUPRENORPHINE PAIN PATCH, CODEINE TABLETS, PERCOCET DOSAGE, NORCO MEDICATION, VICODIN TABLETS, OPIOID PAIN RELIEF DRUGS, STRONG NARCOTICS FOR PAIN, CANCER PAIN MEDICATION, PALLIATIVE CARE PAIN DRUGS, HOSPITAL PAIN MANAGEMENT, EXTENDED RELEASE OPIOIDS, BACK PAIN MEDICATION, ARTHRITIS PAIN RELIEF, JOINT PAIN TREATMENT, NERVE PAIN MEDICATION, NEUROPATHY PAIN MEDICINE, MIGRAINE PAIN RELIEF, TOOTHACHE PAIN KILLERS, MENSTRUAL CRAMPS MEDICINE, MUSCLE RELAXERS FOR PAIN, FIBROMYALGIA PAIN RELIEF, SCIATIC NERVE PAIN MEDICATION, POST OPERATIVE PAIN CONTROL, SPORTS INJURY PAIN TREATMENT, INFLAMMATION PAIN MEDICINE, LOWER BACK PAIN PILLS, GABAPENTIN FOR NERVE PAIN, PREGABALIN LYRICA, DULOXETINE FOR PAIN, AMITRIPTYLINE PAIN RELIEF, TOPICAL PAIN CREAM, LIDOCAINE PATCHES, DICLOFENAC GEL, KETAMINE THERAPY PAIN, STEROID INJECTIONS PAIN, MUSCLE RELAXANT MEDICATION, BUY PAIN MEDICATION ONLINE, AFFORDABLE PAIN MEDS, PHARMACY PAIN RELIEF PRODUCTS, TRUSTED ONLINE PHARMACY, PAIN MEDICATION DELIVERY, SAME DAY PRESCRIPTION MEDS, DISCOUNT PAIN MEDICINE, REFILL PRESCRIPTION PAINKILLERS, BEST PHARMACY FOR PAIN MEDS, SAFE PAIN MEDICATION OPTIONS, HOW TO RELIEVE PAIN FAST, WHAT IS THE STRONGEST PAINKILLER, PAIN RELIEF NEAR ME, PAIN MANAGEMENT CLINIC, PAIN CONTROL TREATMENT, CHRONIC PAIN SOLUTIONS, SEVERE PAIN MEDICATION OPTIONS, FAST PAIN RELIEF TABLETS, MEDICAL PAIN THERAPY, BEST MEDICINE FOR BODY PAIN, PAIN TREATMENT FOR ADULTS, PRESCRIPTION DRUGS FOR PAIN RELIEF, ADVANCED PAIN MANAGEMENT, LONG LASTING PAIN RELIEF, PROFESSIONAL PAIN CARE PHARMACY
CONTACT ———————Email…([email protected])
Whatsapp..+(237)672564181)
Signal..(@Realjames.39)
whatsap/Signal.. +(34)607218704)
Buy GBL Gamma-Butyrolactone for sale . GBL Supplier Amongst Many Other Products; GHB, DMT, MOLLY, , ADDIES AND VARIOUS RESEARCH CHEM. Buy ADHD Medications for sale.
CONTACT ———————Email…([email protected])
Signal..(@Realjames.39)
Whatsapp..+(237)672564181)
whatsap/Signal.. +(34)607218704)
Buy Ketamine KLC , U-47700,opiates,Opium , Heroine , Cocaine, Potassium cyanide , Potassium Chloride, mdma , apvp , mdpv THC vapes, ADHD,Pharmaceutical products, Magic mushroom, weed,Researched Chem. etc
Chemicals DMT VAPE CARTRIDGES, PSILOCYBIN MUSHROOM CHOCOLATE BARS crafted to provide an unforgettable journey
through taste and sensation.
Buy Best Ghost Carts
Buy Big Chiefs Carts
Buy Delta 8 THC? Disposable Vape Carts
Buy Ace Ultra premium 2g disposable
Buy Muha Meds Disposable carts
Buy Big Chief – Disposable
Buy Push Vape carts
Buy Alien Labs Carts
Buy Mad Labs Cartridges
Buy pre rolls marijuana online
Buy PLUGPLAY weed online
Buy mushroom chocolate bars
Buy Mad Labs weed online
Buy kushy punch weed online
Order Kiva marijuana carts online
Buy Jeeter weed carts online
Buy Flave vape carts online
Buy disposable vape pens carts online
Buy Dime industries carts online
Buy Dabwoods vape cats online
Buy CBD Vape online
Buy Cake Disposable carts online
Buy Blinkers disposable vape carts online
Buy Polka Dot Chocolate
Buy Trippy flip chocolate bar Online
Buy Muha Meds Disposable carts
CONTACT ———————Email…([email protected])
Signal..(@Realjames.39)
Whatsapp..+(237)672564181)
whatsap/Signal.. +(34)607218704)
Buy Meth, coke, ketamine Adderall Diazepam, Tramadol, Xanax, GBL, GHB, Nembutal, Carfentanil, Suboxone and more.
Buy benzodiazepines, research chemicals ADHD and opiates online
Buy cannabinoids, buy synthetic cannabinoids, buy 5cladba online, 6cladba for sale. Delivery/Shipping
rohypnol 1 mg K2 paper/spray online at cheap price, Buy K2 Spice Sheets, Buy K2 Spray/liquid online,Buy 6cladba,Buy 5cladba,Buy
jwh-018, ZOPICLONE, TRAMADOL, LSD Vials, shrooms, LEXAUR, GABAPENTIN, XANAX, TEMAZEPAM, Metonitazene and more
Buy GHB,BDO,GBL Gamma-Butyrolactone for sale . GBL Supplier Amongst Many Other Products
Buy PSYCHEDELIC, MDMA, CRYSTAL METH, DMT Carts, LSD, METH, THC Vape, CBD, Marijuana/Cannabis, Xanax, Molly, Weed, OXY, Crystal Ketamine, Ecstasy, Researched
Buy pure cocaine online
Buy magic mushrooms
buy 2c-b online or purchase 2c-i online
Buy 2CB Powder Online
Buy 2C b Fly Online
Buy MDMA Crystals Online
How to buy MDMA Crystals online
Buy PCP Powder Online
Buy DMT Online
Buy PCP liquid Online
Buy LSD Gel Tabs Online
Buy Ketamine Powder Online
Buy 5 MEO DMT Online
Buy PCP liquid Online
Buy LSD VIAL (LIQUID LSD) Online
WHERE TO BUY LSD VIAL (LIQUID LSD)
Buy Ayahuasca Kit Online
Buy LSD Sheet Online
Buy 2CB pills Online
Magic Mushroom Edibles – Buy Shroom Edibles Online in USA
Salvinorin for sale
Buy LSD Gummies Online
buy iboga powder
Buy Amanita Muscaria Online
buy Ecstasy online
buy-mandrax-online/buy-strongtropin-online/buy-jintropin-online
Buy DMT Powder Online
Buy 3MCC online
Buy 4MMC Online – 3MMC for Sale, Buy Mephedrone Online
Buy Top quality GHB BDO GBL gamma Butyrolactone wheel cleaner
Buy K2 Spray, Buy K2 Spice, K2 paper sheet, K2 Liquid
Buy Peptides for Scientific Research and Development
Buy banknotes online
Buy clone cards online
Buy passports and license online
Abortion pills for sale
weed both indicative an sativa avaliable
Big Buddha Cheese
Fruity Pebbles OG
Northern Light’s
*Purple Space Cookies
* Sapphire Handle
•Moonrock
•cali kush
•LSD
•Shroom
•MDMA
•Pain and anxiety pills
•Crystals
•Heroine
•Vape pens
!!Both indica and sativa (free rolling papers)
!! vapes – carts – etc.
Dexies
Coke(top purity)
Shard
Pills
M.D.
LSD
Shrooms
MDMA
heroine
Ket
Oxycodone
Xanax
Heroine
Codeine
Ozempic, Mounjaro Wegovy, Sexenda, peptides all weight lose and gain products available.PM Now 🤝
Adderall,Oxycodone,LSD,MDMA,XTC,METH,Codeine,Xanax,MSJS,Tamazepam Gel,Pregablin,Diazepam,Zopiclone,Tramadol,Viagra,Nitrazepam,percocet,Speed,Ketamine,Heroin,Mephedrone,Vape
DMT vapes
THC Oil
Counterfeit banknote and
Clone cards
Fast and discrete delivery
HOME CIGAR FIR SALE WORLDWIDE DELIVERY
ABOUT CUBAN CIGARS
SHOP
BOLIVAR
COHIBA
CUABA
H. UPMANN
MONTECRISTO
PARTAGAS
ROMEO Y JULIETA
CART
SERVICES
BLOG
CONTACT ———————Email…([email protected])
Whatsapp..+(237)672564181)
Signal..(@Realjames.39)
whatsap/Signal.. +(34)607218704)
Buy Peptides and Retatrutide Online
Buy Oxycodone
Buy Ritalin 20 mg
Buy Adderall 20 mg
Buy Oxycodone 40-80 mg
Buy Diazepam (Valium) 10 mg
Buy Xanax 2 mg
Buy Dilaudid 8 mg
Buy Hydrocodone 500 mg
Buy Percocet 10 mg
Buy MDMA 50 mg
Buy Tramadol 100 mg
Buy Suboxone in 8 mg strips or pills.
Buy Rohypnol 20 mg
Buy Tilidin 100/8 mg
Buy Concerta XL 18-36 mg
Buy Morphine 15 mg
Buy Opana 10 mg
Buy Oxynorm 20 mg
Buy Mandrax (Quaalude) 300 mg
Buy Codeine Syrup… in a 43 g bottle!!! Buy Lortab Watson 7.5 mg
Buy Dilaudid 8 mg
Buy Viagra 300 mg
Buy high-quality marijuana
General Support Contact
CONTACT ———————Email…([email protected])
Signal..(@Realjames.39)
Whatsapp..+(237)672564181)
whatsap/Signal.. +(34)607218704)
100 mg Fentanyl Patches… 4 Packs!!! Stilnox 10 mg
Viagra 1000 mg
Subutex 8 mg
Lyrica 300 mg
Vicodine 5-10 mg
Seconal 15 mg
Dexedrine 15 mg
Morphine
Xanax
Diazepam
Methadone
Oxycodone
Heroin
Percocet
Subutex
Hydrocodone
Methadone
Lyrica
Adderall
Diazepam
Roxycodone
Rohypnol
Vicodin
Coca-Cola
Heroin
Get all your orders delivered right away. Contact our support team.
CONTACT ———————Email…([email protected])
Signal..(@Realjames.39)
whatsap/Signal.. +(34)607218704)
Whatsapp..+(237)672564181)
BUY PEPTIDES,RETATRUIDE,OZEMPIC,SEXANDA,WEGOVEY BOTOX,GHB,CIALIS AND ALL TYPES OF WEIGHT LOSE SUPPLEMENTS ONLINE IN USA,UK,GERMANY,AUSTRALIA,SAUDI ARABIA EUROPE.
Contact General support
Email:::([email protected])
Signal:::(@Realjames.39)
whatsap/Signal::+(34)607218704)
Whatsapp:::::+(237)672564181)
Retatrutide available in bulk
High Quality weight loss products at affordable prices
#Retatrutide #mounjaro #weightlossgoals #mounjaroweightloss #ozempicaustralia #Retatrutide #weightlosstransformation #saxendaweightloss #saxendauk #weightlosstips #weightloss #weightlossjourney #saxendajourney #saxendaforweightloss #ozempic #ozempicbrasil #weightlossmotivation #ozempicweightloss #saxenda #saxendainjections #ozempicjourney #mounjarojourney #weight #wegovy #wegovyweightloss #obesitytreatment #obesitymedicine #obesityawareness #obesity #obesitykills #lossweightsafely #Zepbound #zepbound
Buy Injectable Steroids
Buy Boldeplex 200mg Online
Buy Blend 2 Mutant Pharma Online
Buy Steroids Online
Buy Xt Labs Steroids Online
Buy Cardarine Cooper Pharma Online
Anavar Fem For Sale
Cheap Injectable Steroids For Sale
Anavar Wescott For Sale Online
High Quality Ligandrol For Sale
Buy Testosterone Enanthate online
Buy Testosterone Cypionate Online
Buy Anabolic Steroid Cycles
Buy Anabolic Steroids Online
Buy Propandrol Testosterone P 100 Mg Balk
Buy Dianabol Wescott Online
Ostarine Mk-2866 For Sale
Buy Sustanon Wescott On-line
ORAL:
#aromasin
#anadrol
#anavar
#clomid
#cialis
#dianabol
#danabol
#provided
#metribolone
#novaldex
#superdrol
#turinabol
#winstrol
#arimidex
#clenbuterol
INJECTABLES:
#testosterone
#trenbolone
#sustanon
#decanoate
#boldenone
#team
#masterone
#primobolan
SARMS:
#AICAR
#ANADRONE
#LGD4033
#MK677
#MK-2866
#RAD-140
HGH:
#GENOTROPIN
#SOMATROPIN
#HUMATROP
#KEIFEI
For weight loss
Ozempic
Saxenda
Mounjaro
Rybelsus
Botox
action
Contact General support
Email:::([email protected])
Signal:::(@Realjames.39)
whatsap/Signal::+(34)607218704)
Whatsapp:::::+(237)672564181)
Are online peptides legal to purchase
What peptides are in retatrutide
What peptide works like Ozempic
Is retatrutide available in the USA
Buy peptides and retatrutide online usa
Best place to buy peptides and retatrutide online
Best place to buy Retatrutide online
Best place to buy Retatrutide peptides
Best place to buy peptides online
Where to buy peptides on-line
Retatrutide research peptide for sale
Retatrutide peptide 20 mg price
Can you legally buy peptides online IN USA
What are the top 5 peptides IN UK
Are peptides easy to buy IN GERMANY
Are peptides worth buying IN EUROPE
Best place to buy peptides online
Best place to buy peptides online in USA
Buy peptides online in usa
Bachem peptides
Buy peptides online for weight loss
MJ peptides
Buy peptides online Tirzepatide
Best place to buy peptides online for weight loss
Where is the best place to buy peptides in the UK?
Is it legal to buy peptides in the UK?
Are peptides safe to take in the UK?
Can you get peptide injections in the UK?
Pure peptides UK
Peptide Sciences UK
Peptides Lab UK
UK peptides Direct
UK Peptides review
Best peptides UK
Oral peptides UK
Oxford Peptides UK
Can you get tirzepatide in the UK
How effective is retatrutide for weight loss
Can I buy orlistat over the counter in the UK
Is retatrutide approved by the FDA
Where can i buy retatrutide online in uk
Buy retatrutide online in uk nhs
Where can I buy Retatrutide online
Buy retatrutide online in uk cheap
Best place to buy retatrutide online in uk
Retatrutide pen where to buy
Retatrutide price UK
Retatrutide weight loss buy
Contact General support
Email:::([email protected])
Signal:::(@Realjames.39)
whatsap/Signal::+(34)607218704)
Whatsapp:::::+(237)672564181)
CONTACT ———————Email…([email protected])
Signal..(@Realjames.39)
Whatsapp..+(237)672564181)
whatsap/Signal.. +(34)607218704)
Best place to buy GHB/BDO/Gbl online in Telscombe UK #texas #homosexuality #lgbtqcommunity #lgbtqpride #party #dallas #pride #dallasrapper #puppylife #incognito #terapiaonline #incognitomode #dallastexas #GayBar #lgbt #UK #unitedkingdom #Liverpool #gaylondon #gayliquid #gblgammabutyrolactone #ukpride #besexualbehealthy #prep #chemsex #gay #drogas #n #instagay #sexodrogasyt #lgbtqia #queer #vih #harmreduction #saludsexual #educacionsexual #sexoquimico #harmreductionsaveslives
buy gbl (gamma-butyrolactone) online
buy gamma butyrolactone uk
gamma-butyrolactone buy usa
gamma butyrolactone buy canada
gamma-butyrolactone buy australia
gamma-butyrolactone buy
gamma butyrolactone buy online
gamma-butyrolactone in bacteria
gamma-butyrolactone in wine
gamma-butyrolactone for sale
gamma butyrolactone products
gamma butyrolactone cleaner
gamma butyrolactone suppliers uk
gamma butyrolactone buy
gamma butyrolactone uk
gamma butyrolactone products uk
gamma butyrolactone sds
gamma butyrolactone amazon
gamma butyrolactone australia
gamma butyrolactone alibaba
gamma-butyrolactone and 1 4 butanediol
gamma butyrolactone anhydrous
gamma butyrolactone aldrich
gamma butyrolactone abuse
gamma-butyrolactone ar
gamma butyrolactone bunnings
gamma butyrolactone boiling point
gamma butyrolactone buy online
gamma-butyrolactone buy australia
gamma butyrolactone basf
Gbl Gamma-Butyrolactone wheel cleaner for sale in Townsvill,Australia
Gbl Gamma-Butyrolactone wheel cleaner for sale inNewcastle,Australia
Gbl Gamma-Butyrolactone wheel cleaner for sale in Launceston,Australia
Gbl Gamma-Butyrolactone wheel cleaner for sale in Queanbeyan,Australia
Gbl Gamma-Butyrolactone wheel cleaner for sale in Bendigo,Australia
Gbl Gamma-Butyrolactone wheel cleaner for sale in Ballarat,Australia
Gbl Gamma-Butyrolactone wheel cleaner for sale in Mackay,Australia
Gbl Gamma-Butyrolactone wheel cleaner for sale in Bunbury,Australia
Gbl Gamma-Butyrolactone wheel cleaner for sale in Cyprus
Gbl gamma butyrolactone wheel cleaner for sale in Queensland Australia
Gbl gamma butyrolactone wheel cleaner for sale in Hervey bay Australia
Gbl gamma butyrolactone wheel cleaner for sale in Burliegh head Australia
Gbl gamma butyrolactone wheel cleaner for sale in Hamilton island Australia
Is butanediol illegal?
Can you buy GBL in Australia?
gbl drug for sale
what is gbl trafficking
gbl overdose
gbl bodybuilding
gbl uk
how to extract gbl
gbl legality
gamma-butyrolactone buy australia
gbl cleaner bunnings
what is gbl drug used for
blue nitro drug
gamma butyrolactone bunnings
fantasy drug effects
g drug urban dictionary
Is it legal to buy GBL?
What products contain GBL?
What is GBL cleaner used for?
1,4-butanediol to gbl
1,4-butanediol buy
1,4-butanediol price
1,4-butanediol dosage
1,4-butanediol suppliers
1,4 butanediol cleaner
how to make 1 4-butanediol
1,4-butanediol uses
Is BDO illegal?
What is the difference between BDO and GHB?
Is possessing GBL illegal?
1,4 butanediol 500ml
buy 1,4-butanediol online usa
1,4 bdo ink cleaner
1,4 butanediol buy uk
1,4 butanediol buy amazon
1,4-butanediol price
buy 1 4 butanediol ebay
1,4-butanediol suppliers
buy 1,4-butanediol online reddit
1,4 butanediol 500ml
buy 1,4-butanediol (bdo)
1,4 butanediol cleaner
1,4 butanediol buy amazon
1,4-butanediol suppliers
1,4 butanediol ebay
1,4-butanediol price
buy 1,4-butanediol online reddit
buy 1,4-butanediol (bdo)
1,4 butanediol ebay
1,4 butanediol 500ml
1,4 butanediol cleaner
1,4-butanediol suppliers
1,4 butanediol buy amazon
how to make 1 4-butanediol
buy 1,4 butanediol cleaner
buy 1,4-butanediol online
1,4 butanediol 500ml
1,4-butanediol price
1,4 butanediol buy amazon
1 4 butanediol ebay
buy 1,4-butanediol online usa
indiana chemical 1,4 butanediol
1,4 butanediol cleaner
gbl cleaner usa
buy gbl online ship to usa
gbl online shop
gbl china
buy 1 4 butanediol ebay
buy gbl in uk
Can you buy GBL in UK?
Can you buy GBL online?
What brands contain GBL?
Is GBL legal in the US?
Can you buy GBL online?
What brands contain GBL?
What cleaning products contain GBL?
buy gbl usa reddit
buy gbl usa
Can you buy GBL in the US?
best place to buy gbl
pure gbl for sale
gbl next day delivery
buy gbl usa
buy gbl online europe
buy gbl with credit card
buy gbl online india
gamma-butyrolactone price
How do you get gamma butyrolactone?
Can I buy GBL in UK?
Is GBL legal?
buy gbl online ship to usa
pure gbl for sale
gamma-butyrolactone products
gamma butyrolactone ebay
how to extract gbl
gamma-butyrolactone synthesis
Is possessing GBL illegal?
gbl next day delivery uk
gamma-butyrolactone for sale uk
where to buy gbl
best place to buy gbl
buy gbl online europe
gamma-butyrolactone suppliers uk
gbl buy online
gamma-butyrolactone uk
best place to buy gbl uk
buy gbl online uk
buy gbl online ship to usa
gbl online shop
gbl suppliers usa
buy gbl cleaner
buy gbl with credit card
where to buy gbl uk
gamma-butyrolactone buy online
gamma-butyrolactone paint remover
buy gbl online europe
best place to buy gbl uk
gamma-butyrolactone price
best place to buy gbl
buy gbl discreetly in usa
buy gbl online india
buy gbl with credit card
gamma-butyrolactone price
how to extract gbl from wheel cleaner
gamma-butyrolactone products uk
buy gbl paypal
buy gbl online usa
best place to buy gbl uk
gbl next day delivery
buy gbl online uk
where to buy gbl uk
buy gbl discreetly in usa
buy gbl eu
buy gbl paypal
cas 7331-52-4
gbl shop china review
gbl cleaner usa
gbl wheel brite review
pure gbl for sale
buy gbl online usa
best place to buy gbl
buy gbl with credit card
gamma-butyrolactone home depot
gamma-butyrolactone products
how to extract gbl
best place to buy GBL Gamma-Butyrolactone Cleaning chemical Online
GBL for sale in Netherland
GBL for sale in Australia
GBL Gamma-Butyrolactone online
GBL for sale in Melbourne
GBL for sale in Lake Conjola
GBL for sale in Northern Ireland
GBL for sale near me
GBL for sale online
GBL for sale in Sydney
GBL for in Perth
GBL for sale in Sydney
GBL for sale in New South Wales
GBL for sale in Queenstown
GBL for sale in Queensland
GBL for sale in Victoria
GBL for sale in western Australia
GBL for sale in Tasmania
GBL for sale in Swan River
GBL for sale in Eastern States of Australia
GBL for sale in Brisbane
GBL for sale in Perth
GBL for sale in Adelaide
GBL for sale in Canberra
GBL for sale in Gold Coast
GBL for sale in Hobart
GBL for sale in Darwin
GBL for sale in Cairns
GBL for sale in Wollongong
GBL for sale in Newcastle
GBL for sale in Geelong
GBL for sale in Townsville
GBL for sale in Launceston
GBL for sale in Ballarat
GBL for sale in Bendigo
Best place to buy GBL Gamma-Butyrolactone online
GBL for sale near me
GBL for sale online
GBL for sale in Bundaberg centra
GBL for sale in Toowoomba
GBL for sale in Rockhampton
GBL for sale in Wagga Wagga
GBL for sale in Kalgorlie Boulder
GBL for sale in Alice Springs
GBL for sale in Mackay
GBL for sale in Queenbeyan
GBL for sale in orange
GBL for sale in Geraldton
GBL for sale in Mildura
GBL for sale in Dubbo
GBL for sale in Coffs Habbour
GBL for sale in Tamworth
GBL for sale in Denvonport
GBL for sale in Hervey Bay
Trusted GBL vendor
Buy GBL Gamma-Butyrolactone online from secured source
GBL Gamma-Butyrolactone for sale online
GBL for sale in Traralgon
GBL for sale in Bathurst
GBL for sale in Logan city
Buy GBL Gamma-Butyrolactone Alloy wheel cleaner online
Discrete delivery to all locations
gbl supplier in West Melbourne Australia
gbl for sale near Carlton, Australia
1,4 Butanedoil in South Wharf Australia
buy GBL in North Melbourne Australia
southbank Australia
buy GBL online in Fitzroy Australia
Buy GBL online in Parksville Australia
Buy GBL online in South Melbourne
Buy GBL online in Collingwood Australia
Buy GBL online in Carlton North Australia
GBL for sale in Prince hill Australia
gbl Gamma-Butyrolactone
1,4 Butanedoil online in Richmond Australia
buy 1,4 Butanedoil online in Alberrt park
GBL for sale near Cariton
Buy gbl wheel cleaner online in Sydney Australia
Buy gbl wheel cleaner online in Melbourne Australia
Buy gbl wheel cleaner online in carlton Australia
Buy gbl wheel cleaner online in port Melbourne Australia
Buy gbl wheel cleaner online in East Melbourne Australia
Buy gbl wheel cleaner online in Docklandsb Australia
Buy gbl wheel cleaner online in south Yarra Australia
Buy gbl wheel cleaner online in west Melbourne Australia
Buy gbl wheel cleaner online in North Melbourne Australia
Buy gbl wheel cleaner online in Fitzroy Australia
Buy gbl wheel cleaner online in Collingwood Australia
Buy gbl wheel cleaner online in parkville Australia
Buy gbl wheel cleaner online in Brighton Australia
Buy gbl wheel cleaner online in carton north Australia
Buy gbl wheel cleaner online in frankston Australia
Buy gbl wheel cleaner online in Sunbury Australia
Buy gbl wheel cleaner online in Camberwell Australia
Buy gbl wheel cleaner online in moonee valley city Australia
Buy gbl wheel cleaner online in northcote Australia
Buy gbl wheel cleaner online in Alexandria Australia
Buy gbl wheel cleaner online in Annandale Australia
Buy gbl wheel cleaner online in barangaroo Australia
Buy gbl wheel cleaner online in Beaconsfield
Buy gbl wheel cleaner online in camperdown Australia
Buy gbl wheel cleaner online in centennial park Australia
Buy gbl wheel cleaner online in Chippendale
Buy gbl wheel cleaner online in darlinghurst
Buy gbl wheel cleaner online in Darlington
Buy gbl wheel cleaner online in Dawes point
Buy gbl wheel cleaner online in Elizabeth bay
GBL for sale near Docklands
GHB for sale in East Melbourne
GBL/GHB for sale near north Melbourne
1,4 Butanedoil for sale near Parksville
Buy GBL with Bitcoins online
gbl supplier in Kensington and Flemington
gbl for sale near Port Melbourne
1,4 Butanedoil in Melbourne
buy GBL in South Yarrra west
buy GBL online in Australia
#Australia
GBL for sale in Albany
GBL for sale in Warrnambool
GBL for sale in Busselton
GBL for sale in Gladstone Central
GBL for sale in Albury Wodonga
GBL for sale in Nowra
GBL for sale in Lismore
GBL for sale in Broken Hill
GBL for sale in Whyalla
GBL for sale in Port Macq
3-hydroxy-gamma-butyrolactone
Can you buy GBL in the US?
Is it legal to buy GBL?
Where is GBL found?
Is gamma butyrolactone illegal?Can you still buy GBL?Is GBL legal?
What is GBL cleaner?
Where can I buy gbl wheel cleaner online
Where can I buy gbl wheel cleaner in usa
Where can I buy gbl wheel cleaner in Canada
Where can I buy gbl wheel cleaner in Australia
Where can I buy gbl in New Zealand
Cleaning products
Wheel cleaner chemicals
Gbl online shop
Legit gbl wheel cleaner shop online
Where can I buy gbl in california
Where can I buy gbl wheel cleaner in Texas
Where can I buy gbl wheel cleaner in New York
Where can I buy gbl wheel cleaner in Alabama
Where can I buy gbl wheel cleaner in Florida
Where can I buy gbl wheel cleaner in Washington
Where can I buy gbl wheel cleaner in Michigan
Where can I buy gbl wheel cleaner in NJ
Where can I buy gbl wheel cleaner in SC
Where can I buy gbl wheel cleaner In NC
Where can I buy gbl wheel cleaner in Canada
Where can I buy gbl wheel cleaner In UNITED STATE
Where can I buy gbl wheel cleaner DENMARK
GBL WHEEL CLEANER
CONTACT ———————Email…([email protected])
Signal..(@Realjames.39)
Whatsapp..+(237)672564181)
whatsap/Signal.. +(34)607218704)
GBLBDO GHB Wheel cleaner 2L GBL Wheel cleaner 3L GBL Wheel cleaner BUY GBL ONLINE
Buy gbl online usa,
Buy GBL Payment via Paypal
buy gbl use Paypal
buy gbl online pay via Paypal.
Buy GBL online ship to usa
Pure GBL for sale
Best place to buy GBL
Top car cleaners gbl
Best cleaner for inside car
Best car carpet cleaner
Best car fabric cleaner
Best car glass cleaner
Best car leather cleaner
Best cleaner for car interiors
Best car wheel cleaner
Best car mat cleaner
Best car cleaning products 2022
Best car cleaning products 2022
Professional car cleaning products
Car cleaner interior
Best home car wash System
Car Cleaner Spray
Gbl car
Best car cleaning products UK 2022
GBL cleaner
Griot’s Garage Wheel Cleaner GBL
Gold car cleaner GBL
How to extract GBL from wheel cleaner
Gbl car
Buy GBL online
Magic cleaner gbl reddit
GBL magic cleaner
GBL Europe
GBL wheel cleaner reviews
GBL graffiti remover
Gamma-butyrolactone buy
GBL next day delivery
CONTACT ———————Email…([email protected])
Signal..(@Realjames.39)
Whatsapp..+(237)672564181)
whatsap/Signal.. +(34)607218704)
GBL,GHB,Cocaine,mdma,Crystal Meth,DMT,LSD,METH,ketamineGBL,GHB,Cocaine,mdma,Crystal Meth,DMT,LSD,METH,ketamineGBL,GHB,Cocaine,mdma,Crystal Meth,DMT,LSD,METH,ketamineMephedrone for sale online,
Mephedrone for sale online ARGENTINA,
Mephedrone for sale online AUSTRALIA,
Mephedrone for sale online CANADA,
Mephedrone for sale online EUROPE,
Mephedrone for sale online FRANCE,
Mephedrone for sale online GERMANY,
Mephedrone for sale online ITALY,
Mephedrone for sale online NEWZEALAND,
Mephedrone for sale online PORTUGAL,
Mephedrone for sale online RUSSIA,
Mephedrone for sale online SPAIN,
Mephedrone for sale online UAE,
Mephedrone for sale online UK,
Mephedrone for sale online USA,
Mephedrone online,
buy Mephedrone online ARGENTINA,
buy Mephedrone online AUSTRALIA,
buy Mephedrone online CANADA,
buy Mephedrone online EUROPE,
buy Mephedrone online FRANCE,
buy Mephedrone online GERMANY,
buy Mephedrone online ITALY,
buy Mephedrone online NEWZEALAND,
buy Mephedrone online PORTUGAL,
buy Mephedrone online RUSSIA,
buy Mephedrone online SPAIN,
buy Mephedrone online UAE,
buy Mephedrone online UK,
buy Mephedrone online USA,
order Mephedrone online,
order Mephedrone online ARGENTINA,
order Mephedrone online AUSTRALIA,
order Mephedrone online CANADA,
order Mephedrone online EUROPE,
order Mephedrone online FRANCE,
order Mephedrone online GERMANY,
order Mephedrone online ITALY,
order Mephedrone online NEWZEALAND,
order Mephedrone online PORTUGAL,
order Mephedrone online RUSSIA,
order Mephedrone online SPAIN,
order Mephedrone online UAE,
order Mephedrone online UK,
order Mephedrone online USA,
purchase Mephedrone online,
purchase Mephedrone online ARGENTINA,
purchase Mephedrone online AUSTRALIA,
purchase Mephedrone online CANADA,
purchase Mephedrone online EUROPE,
purchase Mephedrone online FRANCE,
purchase Mephedrone online GERMANY,
purchase Mephedrone online ITALY,
purchase Mephedrone online NEWZEALAND,
purchase Mephedrone online PORTUGAL,
purchase Mephedrone online RUSSIA,
purchase Mephedrone online SPAIN,
purchase Mephedrone online UAE,
purchase Mephedrone online UK,
purchase Mephedrone online USA
CONTACT ———————Email…([email protected])
Signal..(@Realjames.39)
Whatsapp..+(237)672564181)
whatsap/Signal.. +(34)607218704)
Buy K2 Sheets, KETAMINE hcl 99.99% pure and Ketamine powder Online. KETAMINE belongs to the class of barbiturates and acts as a depressant.
buy ketamine, #OZEMPIC, #rubifen, #ritalin, #concerta, #adderall, #sibutramine, #dysport, #botox, #restylane, #surgiderm, etc.
We offer all types of diet pills with the
active ingredient of sibutramine that reduces calorie intake by inhibiting appetite, increases satiety and increases metabolism, increasing the body’s caloric intake. list of products;
Contact us if you are interested.
tramadol
gbl
ghb
obeclox
botox
bath salt
sibutramine
slimex 15mg
sibutril 15 mg
reductil 15mg
fenproporex
pentermine
ritalin
risperin
rubifen 20mg
duromine
mazindol 3mg
obstacles – 10
subutex
redotex
concert 54
obeclox
tina farm ax
pharmapram
precar
serotramine
feprorex
codeine
adderall
percocet
concert
mdma
hydrocodone
ephedrine
30 mg morphine
mephedrone
mdpv
methylone
phenazepam
butylone
CONTACT ———————Email…([email protected])
Signal..(@Realjames.39)
Whatsapp..+(237)672564181)
whatsap/Signal.. +(34)607218704)
CONTACT ———————Email…([email protected])
Signal..(@Realjames.39)
Whatsapp..+(237)672564181)
whatsap/Signal.. +(34)607218704)
WHERE TO BUY GUNS ONLINE, ORDER FOR GUNS ONLINE. Are you in America, Europe etc and having problems Buying a gun online? Are you searching for a rifle, Shotgun or Longgun to buy online? Are you new to guns or buying guns online? Where to buy guns online is a gun store platform created to sell guns online. Where to buy guns online or our “gun store is a gun shop near me” kind of gun store where we make it easy for everyone or people based in Europe, America and other parts of the world to buy guns online without any hassle. Being one of the best gun dealers with the possibility of shipping anywhere, We specialize in the sales or firearms like the 9mm Firearms, Taurus Handguns, Panzer Arms, Glock pistols, 7mm Remington guns, Diamondback Rifles, ATI Firearms, and Much more. The Panzer Arms or Panzer arms Ar12 shotguns have been flooding the market with the new AR12 shotguns, hat is the bp-12. The panzer arms Bp-12 PRO is the latest Panzer arms shot gun in the Market. Just like the Taurus and Diamondback Rifles, the 9mm Pistols on Where to buy guns online is taking over the market. Guns for sale such as the glocks for sale, Diamondback rifles for sale or Taurus Handguns for sale or 9mm handguns for sale are all specials of the Where to buy guns online. ORDER FOR GUNS ONLINE
Where to buy guns online-BUY GUNS FROM ANYWHERE AROUND THE GLOBE
Best Places to Buy Guns Online: Top Gun Websites and Shops in USA AND EUROPE
Order guns in the USA
Order guns in Europe
Buy Guns in the USA Buy
guns in Europe Buy
Rifles Buy
shotguns Buy
Carbines
Buy Machine guns
Buy Sniper rifles Buy
submachine guns
Buy Automatic rifles
Buy Assault rifles
Buy Ammo and bullets
Buy Personal defense weapons
we Sell CVV,Dumps,Dumps + Pin Clone Cards,buy counterfeit money
Buy clone cards online
Buy cloned credit cards
Free delivery
Best CVV Shop Buy CCV Online + Dumps Shop swipe Card
Buy Dumps With Pin Online Recommended Underground Dumps & Cvv Vendor Shop Online
Carding Website 2024 Sell CVV, Dumps, Dumps + Pin Online
Sell Bank Login In Account With Hight Balance – Clone Cards Worldwide
Specializes In Buying And Selling Bank Cards and Good Price Clone Card
CONTACT ———————Email…([email protected])
Signal..(@Realjames.39)
Whatsapp..+(237)672564181)
whatsap/Signal.. +(34)607218704)
CONTACT ———————Email…([email protected])
Signal..(@Realjames.39)
Whatsapp..+(237)672564181)
whatsap/Signal.. +(34)607218704)
WHERE TO BUY GUNS ONLINE, ORDER FOR GUNS ONLINE. Are you in America, Europe etc and having problems Buying a gun online? Are you searching for a rifle, Shotgun or Longgun to buy online? Are you new to guns or buying guns online? Where to buy guns online is a gun store platform created to sell guns online. Where to buy guns online or our “gun store is a gun shop near me” kind of gun store where we make it easy for everyone or people based in Europe, America and other parts of the world to buy guns online without any hassle. Being one of the best gun dealers with the possibility of shipping anywhere, We specialize in the sales or firearms like the 9mm Firearms, Taurus Handguns, Panzer Arms, Glock pistols, 7mm Remington guns, Diamondback Rifles, ATI Firearms, and Much more. The Panzer Arms or Panzer arms Ar12 shotguns have been flooding the market with the new AR12 shotguns, hat is the bp-12. The panzer arms Bp-12 PRO is the latest Panzer arms shot gun in the Market. Just like the Taurus and Diamondback Rifles, the 9mm Pistols on Where to buy guns online is taking over the market. Guns for sale such as the glocks for sale, Diamondback rifles for sale or Taurus Handguns for sale or 9mm handguns for sale are all specials of the Where to buy guns online. ORDER FOR GUNS ONLINE
Where to buy guns online-BUY GUNS FROM ANYWHERE AROUND THE GLOBE
Best Places to Buy Guns Online: Top Gun Websites and Shops in USA AND EUROPE
Order guns in the USA
Order guns in Europe
Buy Guns in the USA Buy
guns in Europe Buy
Rifles Buy
shotguns Buy
Carbines
Buy Machine guns
Buy Sniper rifles Buy
submachine guns
Buy Automatic rifles
Buy Assault rifles
Buy Ammo and bullets
Buy Personal defense weapons
we Sell CVV,Dumps,Dumps + Pin Clone Cards,buy counterfeit money
Buy clone cards online
Buy cloned credit cards
Free delivery
Best CVV Shop Buy CCV Online + Dumps Shop swipe Card
Buy Dumps With Pin Online Recommended Underground Dumps & Cvv Vendor Shop Online
Carding Website 2024 Sell CVV, Dumps, Dumps + Pin Online
Sell Bank Login In Account With Hight Balance – Clone Cards Worldwide
Specializes In Buying And Selling Bank Cards and Good Price Clone Card
CONTACT ———————Email…([email protected])
Signal..(@Realjames.39)
Whatsapp..+(237)672564181)
whatsap/Signal.. +(34)607218704)
Contact General support
Email…([email protected])
Signal:::(@Realjames.39)
whatsap/Signal::+(34)607218704)
Whatsapp:::::+(237)672564181)
XANAX 1 mg (blue Ksalol)
Nembutal (pentobarbital)
Xanax 2 mg (brand Upjohn)
Xanax 2 mg (Pfizer LongBars)
Valium 10 mg Bensedine
AMBIEN (Zolpidem, Stilnox)
Lorazepam 2.5 mg (Ativan)
Clonazepam 2 mg (Rivotril)
Nitrazeoam 5 mg (Nipam)
Bromazepam 6 mg (Lexotan)
Apaurine 10 mg (blue valium)
aderall generic: amphetamine salt combo
arimidex chemical name: anastrozole
adderall xr
codeine 30/500mg
demerol (meperidine hcl) caps
diazepam
dilaudid
soma -generic-
ketalar injection
ritalin
flexeril (cyclobenzaprine) – merck tabs
hydrocodone 10mg/500mg 60tabs
roxicodone 30mg (physicians tc)
clonazepam (klonopin)
fentanyl brand name: duragesic 5-12 12.5 mcg/hr patches
oxycontin
methadone
Seconal (chemical name-secobarbital)
> oxycodone-apap (wattson labs)
> vailum
> cialis
> vicoprofen (generic:hydrocodone-ibuprofen)
> hydrocodone-ibuprofen (brand name:vicoprofen)
> suboxone
> subutex
> nembutal
> -100% Discreet and Confidential,
> -Your personal details are 100% SECURE.,
> -Your orders are 100% Secure and Anonymous.,
> -Fast Worldwide Delivery (You can track and trace with your tracking number provided)
Premium Quality GBL for Wholesale Supply. GBL for Sale Online USA,99.99% GBL Liquids. Buy Gbl Cleaner
Online USA Buy GHB Powder online Where to Buy GBL Canada Wholesale GBL USA Buy Caluanie Muelear Oxidize
Parteurize USA MADE Buy Caluanie (Heavy water) USA made Caluanie Muelar Oxidize (Heavy water) for sale
gamma-Butyrolactone Drug gamma-Butyrolactone, ?-Butyrolactone is a hygroscopic colorless, water-miscible
liquid with a weak characteristic odor. It is the simplest 4-carbon lactone. It is mainly used as an
intermediate in the production of other chemicals,
gbl careers gbl drug price gbl software gbl investment gbl bodybuilding what products contain gbl
buy gbl online australia buy gbl online uk buy gbl online usa
buy gbl usa buy gbl cleaner buy gbl amazon buy gbl alibaba
buy gbl alloy cleaner where to buy a gbl buy gbl bitcoin buy gbl brazil
buy gbl basf buy gbl (gamma-butyrolactone) online best buy gbl
buy gbl cleaner uk buy gbl canada buy gbl china buy gbl cleaner onlineorder gbl canada buy gbl with credit card buy gbl discreetly in usabuy gbl next day delivery buy gbl europe buy gbl ebay buy
gbl europe reddit buy gbl eu buy gbl from china buy gbl france
gbl order finland buy gbl germany gbl for sale australia
gbl products australia buy gbl in uk buy gbl ireland
buy gbl india buy gbl in us buy gbl online india
where to buy gbl in australia can you buy gbl in australia can i buy gbl
where can i buy gbl in the uk where can i buy gbl wheel cleaner i want to buy gbl buy gbl
uk online gbl cleaner australia buy gbl liquid buy gbl london buy gbl lithuania buy gbl mexico
buy gbl netherlands buy gbl nz buy gbl nl buy gbl online netherlands
gbl buy australia buy gbl online ship to usa buy gbl online canada buy gbl online
reddit buy gbl poland buy gbl paint remover buy gbl paypal buy
WE HAVE THE FOLLOWING HIGH QUALITY PRODUCTS IN STOCK IN OUR STORE
Contact General support
Email…([email protected])
Signal:::(@Realjames.39)
whatsap/Signal::+(34)607218704)
Whatsapp:::::+(237)672564181)
Nembutal powder
MDPHP Freebase and HCl
MEPHDRONE (4-MMC)
Clephedrone (4-CMC)
Metaphedrone (3-MMC)
Clophedrone (3-CMC)
Heroin (white and brown)
crack cocaine
Amphetamine powder
Crystal Meth
Nembutal pentobarbital sodium 100 ml
Fentanyl patches (12-150 mcg/h)
Methamphetamine crystals
Ketamine powder
Fentanyl powder
MDMA crystals
Oxycodone powder
GHB powder
Colombian cocaine
Peruvian cocaine
Bolivian cocaine
-Pure Cocaine powder
– Fish scale cocaine
– Durogesic (12-100 mcg/h)
– Alpha-PVP (Flakka) crystals
– Alpha-PHiP
– Alpha-PIHP
– Alpha-PHP
– 4-MEC
– MDPV
-Ethylone
– Methylone (MDMC)
– GHB liquid
– 4F-MPH
– Acetylfentanyl powder
– LSD rolling papers and tablets
– Bromazolam powder
– Clonazolam powder
– Flubromazolam powder
– Ephedrine HCl powder
– Alprazolam powder
– GBL (Gamma-Butyrolactone)
– Etizolam powder
– Diclazepam powder
– MDMA (ecstasy)
-AB-CHMINACA
-5cl-adba
-6cl-adba
-AB-PINACA
-ADB-BUTINACA
-AB-FUBINACA
-5F-MDMB-PICA
-JWH-018.210 liquid and powder
-MDMB-4in-PINACA
-ADB-BINACA
-5F-mdmb-2201
-5F-MDMB-PICA
-AMB-FUBINACA
-4F-MDMB-BINACA
-4F-ABINACA
-5F-ADB (5F-MDMB-PINACA)
-ADB-4in-PINACA
-5F-EDMB-PICA
-SGT-263.63 at 78
-NM2201
-Etonitazepyne
-Protonitazene
-Metonitazene
-Etonitazene
-Desmetramadol (O-DSMT)
-Nitazene
-Etazene
-Clonitazene
-U-48800
-U-47700
-K2 papers
-K2 sheets
-K2 prison papers
-K2 herbs
-K2 sheets
-K2 liquid
-K2 spray
-K2 sheets
-K2 chemicals
-K2 herbal papers
-K2 powder
-K2 pages
And many more productsContact General support
Contact General support
Email…([email protected])
Signal:::(@Realjames.39)
whatsap/Signal::+(34)607218704)
Whatsapp:::::+(237)672564181)
Contact General support
Email…([email protected])
Signal:::(@Realjames.39)
whatsap/Signal::+(34)607218704)
Whatsapp:::+(237)672564181)
Buy Top quality 3mmc 3MMC 3CMC 99% Purity Research Buy Top quality 3mmc 3MMC 3CMC 99% Purity Research Buy Top quality 3mmc 3MMC 3CMC 99% Purity Research Buy Top quality 3mmc 3MMC 3CMC 99% Purity Research Buy Top quality 3mmc 3MMC 3CMC 99% Purity Research,1L GBL Wheel cleaner 2L GBL Wheel cleaner 3L GBL Wheel cleaner BUY GBL ONLINE
Gbl wheel cleaner – Buy GBL Gamma Butyrolactone Buy 99% pure GBL,GHB,Cocaine,mdma,Crystal Meth,DMT,LSD,METH,.Buy 99% pure GBL,GHB,Cocaine,mdma,Crystal Meth,DMT,LSD,METH,..Buy 99% pure GBL,GHB,Cocaine,mdma,Crystal Meth,DMT,LSD,METH,buy gbl in australia,Buy best Gbl wheel cleaner in Australia buy 99% pure GBLwe are leading premium suppliers of top-quality drugs, research chemicals, and pain medication pills and tablets. We ship worldwide. Please Do Include Your Whatsapp Contact Number. we sell in small/large quantities with guaranteed discreet delivery in good time Buy GBL, BD, GHV,GVL GHB, DBO,KCN liquid,SSD Chemical solution,GBLBdo Butyrolactone2 liter GBL Gamma-Butyrolactone5 liter GBL 80 5l 4l 6l 7l 8l 9l 10l 20l 15l 50l 30l 100ml 500ml 500l Buy GBL (Gamma butyrolactone) Wheel Cleaner and other related chemicals Buy 99.9% Pure GBL GHB GBL Gamma Butyrolactone, buy GBL Cleaners GBL Car Wheel Cleaners Gamma Butyrolactone Other Name:Butyrolactone;1,4 Bu Premium Quality GBL for Wholesale Supply. GBL for Sale Online USA,99.99% GBL Liquids. Buy Gbl Cleaner Online USA Buy GHB Powder online Where to Buy GBL Canada Wholesale GBL USA Buy Caluanie Muelar Oxidize Parteurize USA MADE Buy Caluanie (Heavy water) USA made Caluanie Muelar Oxidize (Heavy water) for sale Caluanie Muelar Oxidize Made in the USA Available Buy Crude Caluanie 99% is generated from Muelear oxidize GBL Suppliers USA Gbl Suppliers Canada Buy GHB Powder online Wholesale GBL USA, UK, Australi GBL Suppliers USA , Canada , Australia Buy Gbl with Bitcoins gbl magic cleaner gbl wheel cleaner canada gbl wheel cleaner gbl brake cleaner gbl industrial cleaner gamma-butyrolactone products in australia buy gamma butyrolactone australiaOrder your Pro Wheel CleanerBuy Caluanie Muelar Oxidize Parteurize USA MADEBuy Caluanie (Heavy water) USA madeCaluanie Muelear Oxidize (Heavy water) for saleCaluanie Muelear Oxidize Made in the USA AvailableBuy Crude Caluanie 99% is generated from Muelear oxidizbuy Gamma-butyrolactone(GBL) with bitcoin in Perth, Australianbuy Gamma-butyrolactone(GBL) with bitcoin in Victoria, Australianbuy Gamma-butyrolactone(GBL) with bitcoin in Brisbane, Australianbuy Gamma-butyrolactone(GBL) with bitcoin in Hobart, Australianbuy Gamma-butyrolactone(GBL) with bitcoin in Adelaide, Queenslandnbuy Gamma-butyrolactone(GBL) with bitcoin innBrisbane, Australianbuy Gamma-butyrolactone(GBL) with bitcoin Darwin, Australianbuy Gamma-butyrolactone(GBL) with bitcoin in Sydney, Australianbuy Gamma-butyrolactone(GBL) with bitcoin in Bendigo, Australianbuy Gamma-butyrolactone(GBL) with bitcoin in East Gippsland, Australianbuy Gamma-butyrolactone(GBL) with bitcoin in Echuca, Australianbuy Gamma-butyrolactone(GBL) with bitcoin in Geelong, Australian Gamma-butyrolactone(GBL) with bitcoin in Echuca, Australianbuy Gamma-butyrolactone(GBL) with bitcoin in Geelong, Australianbuy Gamma-butyrolactone(GBL) with bitcoin in Gippsland – Sale, Queenslandnbuy Gamma-butyrolactone(GBL) with bitcoin in Horsham, Australianbuy Gamma-butyrolactone(GBL) with bitcoin Latrobe Valley, Australianbuy Gamma-butyrolactone(GBL) with bitcoin in Melbourne – East , Australianbuy Gamma-butyrolactone(GBL) with bitcoin in Melbourne – North, Australianbuy Gamma-butyrolactone(GBL) with bitcoin in Melbourne – South, Australianbuy Gamma-butyrolactone(GBL) with bitcoin in Melbourne – West, AustraliannWickR buy Gamma-butyrolactone(GBL) with bitcoin in Mildura , Australianbuy Gamma-butyrolactone(GBL) with bitcoin in Mornington Peninsula , Queenslandnbuy Gamma-butyrolactone(GBL) with bitcoin in Horsham, Australianbuy Gamma-butyrolactone(GBL) with bitcoin Shepparton, Australianbuy Gamma-butyrolactone(GBL) with bitcoin in Swan Hill , Australianbuy Gamma-butyrolactone(GBL) with bitcoin in Warnambool, Australianbuy Gamma-butyrolactone(GBL) with bitcoin Wodonga – Victoria, Australianbuy Gamma-butyrolactone(GBL) with bitcoin in Latrobe Valley,Best place to buy Gbl wheel cleaner online in Liverpool UKBest place to buy Gbl wheel cleaner online in Badgerys Creek UKBest place to buy Gbl wheel cleaner online in Bringelly UKBest place to buy Gbl wheel cleaner online in Busby UKBest place to buy Gbl wheel cleaner online in Carnes Hill UKBuy Gbl wheel cleaner online in Elizabeth Hills UK
Buy Gbl wheel cleaner online in Greedale UK
Buy Gbl wheel cleaner online in Green Valley UK
Buy Gbl wheel cleaner online in Hammondville UK
Buy Gbl wheel cleaner online in Heckenburg UK
Buy Gbl wheel cleaner online in Hinchinbrook UK
Buy Gbl wheel cleaner online in Holsworthy UK
Buy Gbl wheel cleaner online in Horningsea UK
Buy Gbl wheel cleaner online in Hoxton Park UK
Buy Gbl wheel cleaner online in Kemps Creek UK
Buy Gbl wheel cleaner online in Len Waters Estate UK
Buy Gbl wheel cleaner online in Leppington UK
Buy Gbl wheel cleaner online in Liverpool UK
Buy Gbl wheel cleaner online in Luddenham UK
Buy Gbl wheel cleaner online in Lurnea UK
Buy Gbl wheel cleaner online in Middleton Grange.
Buy Gbl wheel cleaner online in Miller UK
Buy Gbl wheel cleaner online in Moorebank UK
Buy Gbl wheel cleaner online in Mount Pitchard UK
Buy Gbl wheel cleaner online in Pleasure Point UK
Buy Gbl wheel cleaner online in Prestons UK
Best place to buy Gbl wheel cleaner online in Rossmore UK
Best place to buy Gbl wheel cleaner online in Sadlier UK
Best place to buy Gbl wheel cleaner online in Silverdale Uk
Best place to buy Gbl wheel cleaner online in Voyager Point UK
Best place to buy Gbl wheel cleaner online in Wallacia UK
Best place to buy Gbl wheel cleaner online in Warwick Farm UK
Best place to buy Gbl wheel cleaner online in wattle Groove UK
Best place to buy Gbl wheel cleaner online in West Hoxton UK
Best place to buy Gbl alloy wheel cleaner online in china
Best place to buy Gbl online in Aberdeen
Best place to buy Gbl wheel cleaner online in Alford Uk
Best place to buy Gbl wheel cleaner online in Ballater UK
Best place to buy Gbl wheel cleaner online in Banchony UK
Best place to buy Gbl wheel cleaner online in Banff UK
Best place to buy Gbl wheel cleaner online in Buckie UK
Best place to buy Gbl wheel cleaner online in Alford
Best place to buy Gbl wheel cleaner online in Buckie.
Best place to buy Gbl wheel cleaner online in peterculter.
Best place to buy Gbl wheel cleaner online in Strathdon
Best place to buy Gbl wheel cleaner online in Inverurie
Best place to buy Gbl wheel cleaner online in Turriff
Best place to buy Gbl wheel cleaner online in westhill
Best place to buy Gbl wheel cleaner online in Fraserburgh
Best place to buy Gbl online in Harpenden UK
Best place to buy Gbl online in Hatfield UK
Best place to buy Gbl online in St. Albans UK
Best place to buy Gbl online in Welwln UK
Best place to buy Gbl online in Alcester UK
Best place to buy Gbl online in Birmingham UK
Best place to buy Gbl online in Bromsgrove UK
Best place to buy Gbl online in Cradley Heath UK
Best place to buy Gbl online in Halesowen UK
Best place to buy Gbl online in Henley-in-Arden UK
Best place to buy Gbl online in Oldbury UK
Best place to buy Gbl online in Redditch UK
Best place to buy Gbl online in Rowley Regis UK
Best place to buy Gbl online in Smethwick UK
Best place to buy Gbl online in Solihull UK
Best place to buy Gbl online in Studley UK
Best place to buy Gbl online in Sutton Coldfield Uk
Best place to buy Gbl online in Tamworth UK
Best place to buy Gbl online in West Bromwich
Best place to buy Gbl online in Bath UK
Best place to buy Gbl online in Bruton UK
Best place to buy Gbl online in Castle Cary UK
Best place to buy Gbl online in Glastonbury UK
Best place to buy Gbl online in Radstock UK
Best place to buy Gbl online in Westbury UK
Best place to buy Gbl online in Barnoldswick UK
Best place to buy Gbl online in Albourne UK
Best place to buy Gbl online in Barcombe UK
Best place to buy Gbl online in Buxted UK
Best place to buy Gbl online in Chailey UK
Best place to buy Gbl online in Clayton UK
Best place to buy Gbl online in cooksbridge UK
Best place to buy Gbl online in Cuckfield UK
Best place to buy Gbl online in Denton UK
Best place to buy Gbl online in Ditchling UK
Best place to buy Gbl online in East Chilington UK
Best place to buy Gbl online in Falmer UK
Best place to buy Gbl online in Firle UK
Best place to buy Gbl online in Fletching UK
Best place to buy Gbl online in Fulking UK
Best place to buy Gbl online in Glynde UK
Best place to buy Gbl online in Hamsey UK
Best place to buy Gbl online in Hurstpierpoint UK
Best place to buy Gbl online in Iford UK
Best place to buy Gbl online in Keymer UK
Best place to buy Gbl online in Kingston by Sea UK
Best place to buy Gbl online in Little Horsted
Best place to buy Gbl online in Maresfield UK
Best place to buy Gbl online in Newick UK
Best place to buy Gbl online in Offham UK
Best place to buy Gbl online in Ovingdean UK
Best place to buy Gbl online in piddinghoe UK
Best place to buy Gbl online in piltdown UK
Best place to buy Gbl online in plumpton UK
Best place to buy Gbl online in plumpton Green UK
Best place to buy Gbl online in poynings UK
Best place to buy Gbl online in pycombe UK
Best place to buy Gbl online in Ringmer UK
Best place to buy Gbl online in Rodmell UK
Best place to buy Gbl online in Rottingdean UK
Best place to buy Gbl online in Sheffield Park UK
Best place to buy Gbl online in shermanbury
Best place to buy Gbl online in small Dole
Best place to buy Gbl online in south Heighton
Best place to buy Gbl online in southease UK
Best place to buy Gbl online in Spithurst UK
Best place to buy Gbl online in Stanmer UK
Best place to buy Gbl online in Streat UK
Best place to buy Gbl online in Tarring Neville UK
Contact General support
Email…([email protected])
Signal:::(@Realjames.39)
whatsap/Signal::+(34)607218704)
Whatsapp:::::+(237)672564181)
Best place to buy Gbl online in Telscombe UK #texas #homosexuality #lgbtqcommunity #lgbtqpride #party #dallas #pride #dallasrapper #puppylife #incognito #terapiaonline #incognitomode #dallastexas #GayBar #lgbt #UK #unitedkingdom #Liverpool #gaylondon #gayliquid #gblgammabutyrolactone #ukpride #besexualbehealthy #prep #chemsex #gay #drogas #n #instagay #sexodrogasyt #lgbtqia #queer #vih #harmreduction #saludsexual #educacionsexual #sexoquimico #harmreductionsaveslives
buy gbl (gamma-butyrolactone) online
buy gamma butyrolactone uk
gamma-butyrolactone buy usa
gamma butyrolactone buy canada
gamma-butyrolactone buy australia
gamma-butyrolactone buy
gamma butyrolactone buy online
gamma-butyrolactone in bacteria
gamma-butyrolactone in wine
gamma-butyrolactone for sale
gamma butyrolactone products
gamma butyrolactone cleaner
gamma butyrolactone suppliers uk
gamma butyrolactone buy
gamma butyrolactone uk
gamma butyrolactone products uk
gamma butyrolactone sds
gamma butyrolactone amazon
gamma butyrolactone australia
gamma butyrolactone alibaba
gamma-butyrolactone and 1 4 butanediol
gamma butyrolactone anhydrous
gamma butyrolactone aldrich
gamma butyrolactone abuse
gamma-butyrolactone ar
gamma butyrolactone bunnings
gamma butyrolactone boiling point
gamma butyrolactone buy online
gamma-butyrolactone buy australia
gamma butyrolactone basf
Gbl Gamma-Butyrolactone wheel cleaner for sale in Townsvill,Australia
Gbl Gamma-Butyrolactone wheel cleaner for sale inNewcastle,Australia
Gbl Gamma-Butyrolactone wheel cleaner for sale in Launceston,Australia
Gbl Gamma-Butyrolactone wheel cleaner for sale in Queanbeyan,Australia
Gbl Gamma-Butyrolactone wheel cleaner for sale in Bendigo,Australia
Gbl Gamma-Butyrolactone wheel cleaner for sale in Ballarat,Australia
Gbl Gamma-Butyrolactone wheel cleaner for sale in Mackay,Australia
Gbl Gamma-Butyrolactone wheel cleaner for sale in Bunbury,Australia
Gbl Gamma-Butyrolactone wheel cleaner for sale in Cyprus
Gbl gamma butyrolactone wheel cleaner for sale in Queensland Australia
Gbl gamma butyrolactone wheel cleaner for sale in Hervey bay Australia
Gbl gamma butyrolactone wheel cleaner for sale in Burliegh head Australia
Gbl gamma butyrolactone wheel cleaner for sale in Hamilton island Australia
Contact General support
Email…([email protected])
Signal:::(@Realjames.39)
whatsap/Signal::+(34)607218704)
Whatsapp:::::+(237)672564181)
Is butanediol illegal?
Can you buy GBL in Australia?
gbl drug for sale
what is gbl trafficking
gbl overdose
gbl bodybuilding
gbl uk
how to extract gbl
gbl legality
gamma-butyrolactone buy australia
gbl cleaner bunnings
what is gbl drug used for
blue nitro drug
gamma butyrolactone bunnings
fantasy drug effects
g drug urban dictionary
Is it legal to buy GBL?
What products contain GBL?
What is GBL cleaner used for?
1,4-butanediol to gbl
1,4-butanediol buy
1,4-butanediol price
1,4-butanediol dosage
1,4-butanediol suppliers
1,4 butanediol cleaner
how to make 1 4-butanediol
1,4-butanediol uses
Is BDO illegal?
What is the difference between BDO and GHB?
Is possessing GBL illegal?
1,4 butanediol 500ml
buy 1,4-butanediol online usa
1,4 bdo ink cleaner
1,4 butanediol buy uk
1,4 butanediol buy amazon
1,4-butanediol price
buy 1 4 butanediol ebay
1,4-butanediol suppliers
buy 1,4-butanediol online reddit
1,4 butanediol 500ml
buy 1,4-butanediol (bdo)
1,4 butanediol cleaner
1,4 butanediol buy amazon
1,4-butanediol suppliers
1,4 butanediol ebay
1,4-butanediol price
buy 1,4-butanediol online reddit
buy 1,4-butanediol (bdo)
1,4 butanediol ebay
1,4 butanediol 500ml
1,4 butanediol cleaner
1,4-butanediol suppliers
1,4 butanediol buy amazon
how to make 1 4-butanediol
buy 1,4 butanediol cleaner
buy 1,4-butanediol online
1,4 butanediol 500ml
1,4-butanediol price
1,4 butanediol buy amazon
1 4 butanediol ebay
buy 1,4-butanediol online usa
indiana chemical 1,4 butanediol
1,4 butanediol cleaner
gbl cleaner usa
buy gbl online ship to usa
gbl online shop
gbl china
buy 1 4 butanediol ebay
buy gbl in uk
Can you buy GBL in UK?
Can you buy GBL online?
What brands contain GBL?
Is GBL legal in the US?
Can you buy GBL online?
What brands contain GBL?
What cleaning products contain GBL?
buy gbl usa reddit
buy gbl usa
Can you buy GBL in the US?
best place to buy gbl
pure gbl for sale
gbl next day delivery
buy gbl usa
buy gbl online europe
buy gbl with credit card
buy gbl online india
gamma-butyrolactone price
How do you get gamma butyrolactone?
Can I buy GBL in UK?
Is GBL legal?
buy gbl online ship to usa
pure gbl for sale
gamma-butyrolactone products
gamma butyrolactone ebay
how to extract gbl
gamma-butyrolactone synthesis
Is possessing GBL illegal?
gbl next day delivery uk
gamma-butyrolactone for sale uk
where to buy gbl
best place to buy gbl
buy gbl online europe
gamma-butyrolactone suppliers uk
gbl buy online
gamma-butyrolactone uk
best place to buy gbl uk
buy gbl online uk
buy gbl online ship to usa
gbl online shop
gbl suppliers usa
buy gbl cleaner
buy gbl with credit card
where to buy gbl uk
gamma-butyrolactone buy online
gamma-butyrolactone paint remover
buy gbl online europe
best place to buy gbl uk
gamma-butyrolactone price
best place to buy gbl
buy gbl discreetly in usa
buy gbl online india
buy gbl with credit card
gamma-butyrolactone price
how to extract gbl from wheel cleaner
gamma-butyrolactone products uk
buy gbl paypal
buy gbl online usa
best place to buy gbl uk
gbl next day delivery
buy gbl online uk
where to buy gbl uk
buy gbl discreetly in usa
buy gbl eu
buy gbl paypal
cas 7331-52-4
gbl shop china review
gbl cleaner usa
gbl wheel brite review
pure gbl for sale
buy gbl online usa
best place to buy gbl
buy gbl with credit card
gamma-butyrolactone home depot
gamma-butyrolactone products
how to extract gbl
best place to buy GBL Gamma-Butyrolactone Cleaning chemical Online
GBL for sale in Netherland
GBL for sale in Australia
GBL Gamma-Butyrolactone online
GBL for sale in Melbourne
GBL for sale in Lake Conjola
GBL for sale in Northern Ireland
GBL for sale near me
GBL for sale online
GBL for sale in Sydney
GBL for in Perth
GBL for sale in Sydney
GBL for sale in New South Wales
GBL for sale in Queenstown
GBL for sale in Queensland
GBL for sale in Victoria
GBL for sale in western Australia
GBL for sale in Tasmania
GBL for sale in Swan River
GBL for sale in Eastern States of Australia
GBL for sale in Brisbane
GBL for sale in Perth
GBL for sale in Adelaide
GBL for sale in Canberra
GBL for sale in Gold Coast
GBL for sale in Hobart
GBL for sale in Darwin
GBL for sale in Cairns
GBL for sale in Wollongong
GBL for sale in Newcastle
GBL for sale in Geelong
GBL for sale in Townsville
GBL for sale in Launceston
GBL for sale in Ballarat
GBL for sale in Bendigo
Best place to buy GBL Gamma-Butyrolactone online
GBL for sale near me
GBL for sale online
GBL for sale in Bundaberg centra
GBL for sale in Toowoomba
GBL for sale in Rockhampton
GBL for sale in Wagga Wagga
GBL for sale in Kalgorlie Boulder
GBL for sale in Alice Springs
GBL for sale in Mackay
GBL for sale in Queenbeyan
GBL for sale in orange
GBL for sale in Geraldton
GBL for sale in Mildura
GBL for sale in Dubbo
GBL for sale in Coffs Habbour
GBL for sale in Tamworth
GBL for sale in Denvonport
GBL for sale in Hervey Bay
Trusted GBL vendor
Buy GBL Gamma-Butyrolactone online from secured source
GBL Gamma-Butyrolactone for sale online
GBL for sale in Traralgon
GBL for sale in Bathurst
GBL for sale in Logan city
Buy GBL Gamma-Butyrolactone Alloy wheel cleaner online
Discrete delivery to all locations
gbl supplier in West Melbourne Australia
gbl for sale near Carlton, Australia
1,4 Butanedoil in South Wharf Australia
buy GBL in North Melbourne Australia
southbank Australia
buy GBL online in Fitzroy Australia
Buy GBL online in Parksville Australia
Buy GBL online in South Melbourne
Buy GBL online in Collingwood Australia
Buy GBL online in Carlton North Australia
GBL for sale in Prince hill Australia
gbl Gamma-Butyrolactone
1,4 Butanedoil online in Richmond Australia
buy 1,4 Butanedoil online in Alberrt park
GBL for sale near Cariton
Buy gbl wheel cleaner online in Sydney Australia
Buy gbl wheel cleaner online in Melbourne Australia
Buy gbl wheel cleaner online in carlton Australia
Buy gbl wheel cleaner online in port Melbourne Australia
Buy gbl wheel cleaner online in East Melbourne Australia
Buy gbl wheel cleaner online in Docklandsb Australia
Buy gbl wheel cleaner online in south Yarra Australia
Buy gbl wheel cleaner online in west Melbourne Australia
Buy gbl wheel cleaner online in North Melbourne Australia
Buy gbl wheel cleaner online in Fitzroy Australia
Buy gbl wheel cleaner online in Collingwood Australia
Buy gbl wheel cleaner online in parkville Australia
Buy gbl wheel cleaner online in Brighton Australia
Buy gbl wheel cleaner online in carton north Australia
Buy gbl wheel cleaner online in frankston Australia
Buy gbl wheel cleaner online in Sunbury Australia
Buy gbl wheel cleaner online in Camberwell Australia
Buy gbl wheel cleaner online in moonee valley city Australia
Buy gbl wheel cleaner online in northcote Australia
Buy gbl wheel cleaner online in Alexandria Australia
Buy gbl wheel cleaner online in Annandale Australia
Buy gbl wheel cleaner online in barangaroo Australia
Buy gbl wheel cleaner online in Beaconsfield
Buy gbl wheel cleaner online in camperdown Australia
Buy gbl wheel cleaner online in centennial park Australia
Buy gbl wheel cleaner online in Chippendale
Buy gbl wheel cleaner online in darlinghurst
Buy gbl wheel cleaner online in Darlington
Buy gbl wheel cleaner online in Dawes point
Buy gbl wheel cleaner online in Elizabeth bay
GBL for sale near Docklands
GHB for sale in East Melbourne
GBL/GHB for sale near north Melbourne
1,4 Butanedoil for sale near Parksville
Buy GBL with Bitcoins online
gbl supplier in Kensington and Flemington
gbl for sale near Port Melbourne
1,4 Butanedoil in Melbourne
buy GBL in South Yarrra west
buy GBL online in Australia
#Australia
GBL for sale in Albany
GBL for sale in Warrnambool
GBL for sale in Busselton
GBL for sale in Gladstone Central
GBL for sale in Albury Wodonga
GBL for sale in Nowra
GBL for sale in Lismore
GBL for sale in Broken Hill
GBL for sale in Whyalla
GBL for sale in Port Macq
3-hydroxy-gamma-butyrolactone
Can you buy GBL in the US?
Is it legal to buy GBL?
Where is GBL found?
Is gamma butyrolactone illegal?Can you still buy GBL?Is GBL legal?
What is GBL cleaner?
Where can I buy gbl wheel cleaner online
Where can I buy gbl wheel cleaner in usa
Where can I buy gbl wheel cleaner in Canada
Where can I buy gbl wheel cleaner in Australia
Where can I buy gbl in New Zealand
Cleaning products
Wheel cleaner chemicals
Gbl online shop
Legit gbl wheel cleaner shop online
Where can I buy gbl in california
Where can I buy gbl wheel cleaner in Texas
Where can I buy gbl wheel cleaner in New York
Where can I buy gbl wheel cleaner in Alabama
Where can I buy gbl wheel cleaner in Florida
Where can I buy gbl wheel cleaner in Washington
Where can I buy gbl wheel cleaner in Michigan
Where can I buy gbl wheel cleaner in NJ
Where can I buy gbl wheel cleaner in SC
Where can I buy gbl wheel cleaner In NC
Where can I buy gbl wheel cleaner in Canada
Where can I buy gbl wheel cleaner In UNITED STATE
Where can I buy gbl wheel cleaner DENMARK
GBL WHEEL CLEANER
GBL Wheel cleaner 2L GBL Wheel cleaner 3L GBL Wheel cleaner BUY GBL ONLINE
Buy gbl online usa,
Buy GBL Payment via Paypal
buy gbl use Paypal
buy gbl online pay via Paypal.
Buy GBL online ship to usa
Pure GBL for sale
Best place to buy GBL
Top car cleaners gbl
Best cleaner for inside car
Best car carpet cleaner
Best car fabric cleaner
Best car glass cleaner
Best car leather cleaner
Best cleaner for car interiors
Best car wheel cleaner
Best car mat cleaner
Best car cleaning products 2022
Best car cleaning products 2022
Professional car cleaning products
Car cleaner interior
Best home car wash System
Car Cleaner Spray
Gbl car
Best car cleaning products UK 2022
GBL cleaner
Griot’s Garage Wheel Cleaner GBL
Gold car cleaner GBL
How to extract GBL from wheel cleaner
Gbl car
Buy GBL online
Magic cleaner gbl reddit
GBL magic cleaner
GBL Europe
GBL wheel cleaner reviews
GBL graffiti remover
Gamma-butyrolactone buy
GBL next day delivery
GBL,GHB,Cocaine,mdma,Crystal Meth,DMT,LSD,METH,ketamineGBL,GHB,Cocaine,mdma,Crystal Meth,DMT,LSD,METH,ketamineGBL,GHB,Cocaine,mdma,Crystal Meth,DMT,LSD,METH,ketamineMephedrone for sale online,
Mephedrone for sale online ARGENTINA,
Mephedrone for sale online AUSTRALIA,
Mephedrone for sale online CANADA,
Mephedrone for sale online EUROPE,
Mephedrone for sale online FRANCE,
Mephedrone for sale online GERMANY,
Mephedrone for sale online ITALY,
Mephedrone for sale online NEWZEALAND,
Mephedrone for sale online PORTUGAL,
Mephedrone for sale online RUSSIA,
Mephedrone for sale online SPAIN,
Mephedrone for sale online UAE,
Mephedrone for sale online UK,
Mephedrone for sale online USA,
Mephedrone online,
buy Mephedrone online ARGENTINA,
buy Mephedrone online AUSTRALIA,
buy Mephedrone online CANADA,
buy Mephedrone online EUROPE,
buy Mephedrone online FRANCE,
buy Mephedrone online GERMANY,
buy Mephedrone online ITALY,
buy Mephedrone online NEWZEALAND,
buy Mephedrone online PORTUGAL,
buy Mephedrone online RUSSIA,
buy Mephedrone online SPAIN,
buy Mephedrone online UAE,
buy Mephedrone online UK,
buy Mephedrone online USA,
order Mephedrone online,
order Mephedrone online ARGENTINA,
order Mephedrone online AUSTRALIA,
order Mephedrone online CANADA,
order Mephedrone online EUROPE,
order Mephedrone online FRANCE,
order Mephedrone online GERMANY,
order Mephedrone online ITALY,
order Mephedrone online NEWZEALAND,
order Mephedrone online PORTUGAL,
order Mephedrone online RUSSIA,
order Mephedrone online SPAIN,
order Mephedrone online UAE,
order Mephedrone online UK,
order Mephedrone online USA,
purchase Mephedrone online,
purchase Mephedrone online ARGENTINA,
purchase Mephedrone online AUSTRALIA,
purchase Mephedrone online CANADA,
purchase Mephedrone online EUROPE,
purchase Mephedrone online FRANCE,
purchase Mephedrone online GERMANY,
purchase Mephedrone online ITALY,
purchase Mephedrone online NEWZEALAND,
purchase Mephedrone online PORTUGAL,
purchase Mephedrone online RUSSIA,
purchase Mephedrone online SPAIN,
purchase Mephedrone online UAE,
purchase Mephedrone online UK,
purchase Mephedrone online USA
2022-7-13Reply Upvote Downvote Report
Contact General support
Email…([email protected])
Signal:::(@Realjames.39)
whatsap/Signal::+(34)607218704)
Whatsapp:::::+(237)672564181)
Buy Gbl wheel cleaner online in Hoxton Park UK
Buy Gbl wheel cleaner online in Kemps Creek UK
Buy Gbl wheel cleaner online in Len Waters Estate UK
Buy Gbl wheel cleaner online in Leppington UK
Buy Gbl wheel cleaner online in Liverpool UK
Buy Gbl wheel cleaner online in Luddenham UK
Buy Gbl wheel cleaner online in Lurnea UK
Buy Gbl wheel cleaner online in Middleton Grange.
Buy Gbl wheel cleaner online in Miller UK
Buy Gbl wheel cleaner online in Moorebank UK
Buy Gbl wheel cleaner online in Mount Pitchard UK
Buy Gbl wheel cleaner online in Pleasure Point UK
Buy Gbl wheel cleaner online in Prestons UK
Best place to buy Gbl wheel cleaner online in Rossmore UK
Best place to buy Gbl wheel cleaner online in Sadlier UK
Best place to buy Gbl wheel cleaner online in Silverdale Uk
Best place to buy Gbl wheel cleaner online in Voyager Point UK
Best place to buy Gbl wheel cleaner online in Wallacia UK
Best place to buy Gbl wheel cleaner online in Warwick Farm UK
Best place to buy Gbl wheel cleaner online in wattle Groove UK
Best place to buy Gbl wheel cleaner online in West Hoxton UK
Best place to buy Gbl alloy wheel cleaner online in china
Best place to buy Gbl online in Aberdeen
Best place to buy Gbl wheel cleaner online in Alford Uk
Best place to buy Gbl wheel cleaner online in Ballater UK
Best place to buy Gbl wheel cleaner online in Banchony UK
Best place to buy Gbl wheel cleaner online in Banff UK
Best place to buy Gbl wheel cleaner online in Buckie UK
Best place to buy Gbl wheel cleaner online in Alford
Best place to buy Gbl wheel cleaner online in Buckie.
Best place to buy Gbl wheel cleaner online in peterculter.
Best place to buy Gbl wheel cleaner online in Strathdon
Best place to buy Gbl wheel cleaner online in Inverurie
Best place to buy Gbl wheel cleaner online in Turriff
Best place to buy Gbl wheel cleaner online in westhill
Best place to buy Gbl wheel cleaner online in Fraserburgh
Best place to buy Gbl online in Harpenden UK
Best place to buy Gbl online in Hatfield UK
Best place to buy Gbl online in St. Albans UK
Best place to buy Gbl online in Welwln UK
Best place to buy Gbl online in Alcester UK
Best place to buy Gbl online in Birmingham UK
Best place to buy Gbl online in Bromsgrove UK
Best place to buy Gbl online in Cradley Heath UK
Best place to buy Gbl online in Halesowen UK
Best place to buy Gbl online in Henley-in-Arden UK
Best place to buy Gbl online in Oldbury UK
Best place to buy Gbl online in Redditch UK
Best place to buy Gbl online in Rowley Regis UK
Best place to buy Gbl online in Smethwick UK
Best place to buy Gbl online in Solihull UK
Best place to buy Gbl online in Studley UK
Best place to buy Gbl online in Sutton Coldfield Uk
Best place to buy Gbl online in Tamworth UK
Best place to buy Gbl online in West Bromwich
Best place to buy Gbl online in Bath UK
Best place to buy Gbl online in Bruton UK
Best place to buy Gbl online in Castle Cary UK
Best place to buy Gbl online in Glastonbury UK
Best place to buy Gbl online in Radstock UK
Best place to buy Gbl online in Westbury UK
Best place to buy Gbl online in Barnoldswick UK
Best place to buy Gbl online in Albourne UK
Best place to buy Gbl online in Barcombe UK
Best place to buy Gbl online in Buxted UK
Best place to buy Gbl online in Chailey UK
Best place to buy Gbl online in Clayton UK
Best place to buy Gbl online in cooksbridge UK
Best place to buy Gbl online in Cuckfield UK
Best place to buy Gbl online in Denton UK
Best place to buy Gbl online in Ditchling UK
Best place to buy Gbl online in East Chilington UK
Best place to buy Gbl online in Falmer UK
Best place to buy Gbl online in Firle UK
Best place to buy Gbl online in Fletching UK
Best place to buy Gbl online in Fulking UK
Best place to buy Gbl online in Glynde UK
Best place to buy Gbl online in Hamsey UK
Best place to buy Gbl online in Hurstpierpoint UK
Best place to buy Gbl online in Iford UK
Best place to buy Gbl online in Keymer UK
Best place to buy Gbl online in Kingston by Sea UK
Best place to buy Gbl online in Little Horsted
Best place to buy Gbl online in Maresfield UK
Best place to buy Gbl online in Newick UK
Best place to buy Gbl online in Offham UK
Best place to buy Gbl online in Ovingdean UK
Best place to buy Gbl online in piddinghoe UK
Best place to buy Gbl online in piltdown UK
Best place to buy Gbl online in plumpton UK
Best place to buy Gbl online in plumpton Green UK
Best place to buy Gbl online in poynings UK
Best place to buy Gbl online in pycombe UK
Best place to buy Gbl online in Ringmer UK
Best place to buy Gbl online in Rodmell UK
Best place to buy Gbl online in Rottingdean UK
Best place to buy Gbl online in Sheffield Park UK
Best place to buy Gbl online in shermanbury
Best place to buy Gbl online in small Dole
Best place to buy Gbl online in south Heighton
Best place to buy Gbl online in southease UK
Best place to buy Gbl online in Spithurst UK
Best place to buy Gbl online in Stanmer UK
Best place to buy Gbl online in Streat UK
Best place to buy Gbl online in Tarring Neville UK
Best place to buy Gbl online in Telscombe UK #texas #homosexuality #lgbtqcommunity #lgbtqpride #party #dallas #pride #dallasrapper #puppylife #incognito #terapiaonline #incognitomode #dallastexas #GayBar #lgbt #UK #unitedkingdom #Liverpool #gaylondon #gayliquid #gblgammabutyrolactone #ukpride #besexualbehealthy #prep #chemsex #gay #drogas #n #instagay #sexodrogasyt #lgbtqia #queer #vih #harmreduction #saludsexual #educacionsexual #sexoquimico #harmreductionsaveslives
buy gbl (gamma-butyrolactone) online
buy gamma butyrolactone uk
gamma-butyrolactone buy usa
gamma butyrolactone buy canada
gamma-butyrolactone buy australia
gamma-butyrolactone buy
gamma butyrolactone buy online
gamma-butyrolactone in bacteria
gamma-butyrolactone in wine
gamma-butyrolactone for sale
gamma butyrolactone products
gamma butyrolactone cleaner
gamma butyrolactone suppliers uk
gamma butyrolactone buy
gamma butyrolactone uk
gamma butyrolactone products uk
gamma butyrolactone sds
gamma butyrolactone amazon
gamma butyrolactone australia
gamma butyrolactone alibaba
gamma-butyrolactone and 1 4 butanediol
gamma butyrolactone anhydrous
gamma butyrolactone aldrich
gamma butyrolactone abuse
gamma-butyrolactone ar
gamma butyrolactone bunnings
gamma butyrolactone boiling point
gamma butyrolactone buy online
gamma-butyrolactone buy australia
gamma butyrolactone basf
Contact General support
Email…([email protected])
Signal:::(@Realjames.39)
whatsap/Signal::+(34)607218704)
Whatsapp:::::+(237)672564181)
Gbl Gamma-Butyrolactone wheel cleaner for sale in Townsvill,Australia
Gbl Gamma-Butyrolactone wheel cleaner for sale inNewcastle,Australia
Gbl Gamma-Butyrolactone wheel cleaner for sale in Launceston,Australia
Gbl Gamma-Butyrolactone wheel cleaner for sale in Queanbeyan,Australia
Gbl Gamma-Butyrolactone wheel cleaner for sale in Bendigo,Australia
Gbl Gamma-Butyrolactone wheel cleaner for sale in Ballarat,Australia
Gbl Gamma-Butyrolactone wheel cleaner for sale in Mackay,Australia
Gbl Gamma-Butyrolactone wheel cleaner for sale in Bunbury,Australia
Gbl Gamma-Butyrolactone wheel cleaner for sale in Cyprus
Gbl gamma butyrolactone wheel cleaner for sale in Queensland Australia
Gbl gamma butyrolactone wheel cleaner for sale in Hervey bay Australia
Gbl gamma butyrolactone wheel cleaner for sale in Burliegh head Australia
Gbl gamma butyrolactone wheel cleaner for sale in Hamilton island Australia
Is butanediol illegal?
Can you buy GBL in Australia?
gbl drug for sale
what is gbl trafficking
gbl overdose
gbl bodybuilding
gbl uk
how to extract gbl
gbl legality
gamma-butyrolactone buy australia
gbl cleaner bunnings
what is gbl drug used for
blue nitro drug
gamma butyrolactone bunnings
fantasy drug effects
g drug urban dictionary
Is it legal to buy GBL?
What products contain GBL?
What is GBL cleaner used for?
1,4-butanediol to gbl
1,4-butanediol buy
1,4-butanediol price
1,4-butanediol dosage
1,4-butanediol suppliers
1,4 butanediol cleaner
how to make 1 4-butanediol
1,4-butanediol uses
Is BDO illegal?
What is the difference between BDO and GHB?
Is possessing GBL illegal?
1,4 butanediol 500ml
buy 1,4-butanediol online usa
1,4 bdo ink cleaner
1,4 butanediol buy uk
1,4 butanediol buy amazon
1,4-butanediol price
buy 1 4 butanediol ebay
1,4-butanediol suppliers
buy 1,4-butanediol online reddit
1,4 butanediol 500ml
buy 1,4-butanediol (bdo)
1,4 butanediol cleaner
1,4 butanediol buy amazon
1,4-butanediol suppliers
1,4 butanediol ebay
1,4-butanediol price
buy 1,4-butanediol online reddit
buy 1,4-butanediol (bdo)
1,4 butanediol ebay
1,4 butanediol 500ml
1,4 butanediol cleaner
1,4-butanediol suppliers
1,4 butanediol buy amazon
how to make 1 4-butanediol
buy 1,4 butanediol cleaner
buy 1,4-butanediol online
1,4 butanediol 500ml
1,4-butanediol price
1,4 butanediol buy amazon
1 4 butanediol ebay
buy 1,4-butanediol online usa
indiana chemical 1,4 butanediol
1,4 butanediol cleaner
gbl cleaner usa
buy gbl online ship to usa
gbl online shop
gbl china
buy 1 4 butanediol ebay
buy gbl in uk
Can you buy GBL in UK?
Can you buy GBL online?
What brands contain GBL?
Is GBL legal in the US?
Can you buy GBL online?
What brands contain GBL?
What cleaning products contain GBL?
buy gbl usa reddit
buy gbl usa
Can you buy GBL in the US?
best place to buy gbl
pure gbl for sale
gbl next day delivery
buy gbl usa
buy gbl online europe
buy gbl with credit card
buy gbl online india
gamma-butyrolactone price
How do you get gamma butyrolactone?
Can I buy GBL in UK?
Is GBL legal?
buy gbl online ship to usa
pure gbl for sale
gamma-butyrolactone products
gamma butyrolactone ebay
how to extract gbl
gamma-butyrolactone synthesis
Is possessing GBL illegal?
gbl next day delivery uk
gamma-butyrolactone for sale uk
where to buy gbl
best place to buy gbl
buy gbl online europe
gamma-butyrolactone suppliers uk
gbl buy online
gamma-butyrolactone uk
best place to buy gbl uk
buy gbl online uk
buy gbl online ship to usa
gbl online shop
gbl suppliers usa
buy gbl cleaner
buy gbl with credit card
where to buy gbl uk
gamma-butyrolactone buy online
gamma-butyrolactone paint remover
buy gbl online europe
best place to buy gbl uk
gamma-butyrolactone price
best place to buy gbl
buy gbl discreetly in usa
buy gbl online india
buy gbl with credit card
gamma-butyrolactone price
how to extract gbl from wheel cleaner
gamma-butyrolactone products uk
buy gbl paypal
buy gbl online usa
best place to buy gbl uk
gbl next day delivery
buy gbl online uk
where to buy gbl uk
buy gbl discreetly in usa
buy gbl eu
buy gbl paypal
cas 7331-52-4
gbl shop china review
gbl cleaner usa
gbl wheel brite review
pure gbl for sale
buy gbl online usa
best place to buy gbl
buy gbl with credit card
gamma-butyrolactone home depot
gamma-butyrolactone products
how to extract gbl
best place to buy GBL Gamma-Butyrolactone Cleaning chemical Online
GBL for sale in Netherland
GBL for sale in Australia
GBL Gamma-Butyrolactone online
GBL for sale in Melbourne
GBL for sale in Lake Conjola
GBL for sale in Northern Ireland
GBL for sale near me
GBL for sale online
GBL for sale in Sydney
GBL for in Perth
GBL for sale in Sydney
GBL for sale in New South Wales
GBL for sale in Queenstown
GBL for sale in Queensland
GBL for sale in Victoria
GBL for sale in western Australia
GBL for sale in Tasmania
GBL for sale in Swan River
GBL for sale in Eastern States of Australia
GBL for sale in Brisbane
GBL for sale in Perth
GBL for sale in Adelaide
GBL for sale in Canberra
GBL for sale in Gold Coast
GBL for sale in Hobart
GBL for sale in Darwin
GBL for sale in Cairns
GBL for sale in Wollongong
GBL for sale in Newcastle
GBL for sale in Geelong
GBL for sale in Townsville
GBL for sale in Launceston
GBL for sale in Ballarat
GBL for sale in Bendigo
Best place to buy GBL Gamma-Butyrolactone online
GBL for sale near me
GBL for sale online
GBL for sale in Bundaberg centra
GBL for sale in Toowoomba
GBL for sale in Rockhampton
GBL for sale in Wagga Wagga
GBL for sale in Kalgorlie Boulder
GBL for sale in Alice Springs
GBL for sale in Mackay
GBL for sale in Queenbeyan
GBL for sale in orange
GBL for sale in Geraldton
GBL for sale in Mildura
GBL for sale in Dubbo
GBL for sale in Coffs Habbour
GBL for sale in Tamworth
GBL for sale in Denvonport
GBL for sale in Hervey Bay
Trusted GBL vendor
Buy GBL Gamma-Butyrolactone online from secured source
GBL Gamma-Butyrolactone for sale online
GBL for sale in Traralgon
GBL for sale in Bathurst
GBL for sale in Logan city
Buy GBL Gamma-Butyrolactone Alloy wheel cleaner online
Discrete delivery to all locations
gbl supplier in West Melbourne Australia
gbl for sale near Carlton, Australia
1,4 Butanedoil in South Wharf Australia
buy GBL in North Melbourne Australia
southbank Australia
buy GBL online in Fitzroy Australia
Buy GBL online in Parksville Australia
Buy GBL online in South Melbourne
Buy GBL online in Collingwood Australia
Buy GBL online in Carlton North Australia
GBL for sale in Prince hill Australia
gbl Gamma-Butyrolactone
1,4 Butanedoil online in Richmond Australia
buy 1,4 Butanedoil online in Alberrt park
GBL for sale near Cariton
Contact General support
Email…([email protected])
Signal:::(@Realjames.39)
whatsap/Signal::+(34)607218704)
Whatsapp:::::+(237)672564181)
Buy gbl wheel cleaner online in Sydney Australia
Buy gbl wheel cleaner online in Melbourne Australia
Buy gbl wheel cleaner online in carlton Australia
Buy gbl wheel cleaner online in port Melbourne Australia
Buy gbl wheel cleaner online in East Melbourne Australia
Buy gbl wheel cleaner online in Docklandsb Australia
Buy gbl wheel cleaner online in south Yarra Australia
Buy gbl wheel cleaner online in west Melbourne Australia
Buy gbl wheel cleaner online in North Melbourne Australia
Buy gbl wheel cleaner online in Fitzroy Australia
Buy gbl wheel cleaner online in Collingwood Australia
Buy gbl wheel cleaner online in parkville Australia
Buy gbl wheel cleaner online in Brighton Australia
Buy gbl wheel cleaner online in carton north Australia
Buy gbl wheel cleaner online in frankston Australia
Buy gbl wheel cleaner online in Sunbury Australia
Buy gbl wheel cleaner online in Camberwell Australia
Buy gbl wheel cleaner online in moonee valley city Australia
Buy gbl wheel cleaner online in northcote Australia
Buy gbl wheel cleaner online in Alexandria Australia
Buy gbl wheel cleaner online in Annandale Australia
Buy gbl wheel cleaner online in barangaroo Australia
Buy gbl wheel cleaner online in Beaconsfield
Buy gbl wheel cleaner online in camperdown Australia
Buy gbl wheel cleaner online in centennial park Australia
Buy gbl wheel cleaner online in Chippendale
Buy gbl wheel cleaner online in darlinghurst
Buy gbl wheel cleaner online in Darlington
Buy gbl wheel cleaner online in Dawes point
Buy gbl wheel cleaner online in Elizabeth bay
GBL for sale near Docklands
GHB for sale in East Melbourne
GBL/GHB for sale near north Melbourne
1,4 Butanedoil for sale near Parksville
Buy GBL with Bitcoins online
gbl supplier in Kensington and Flemington
gbl for sale near Port Melbourne
1,4 Butanedoil in Melbourne
buy GBL in South Yarrra west
buy GBL online in Australia
#Australia
GBL for sale in Albany
GBL for sale in Warrnambool
GBL for sale in Busselton
GBL for sale in Gladstone Central
GBL for sale in Albury Wodonga
GBL for sale in Nowra
GBL for sale in Lismore
GBL for sale in Broken Hill
GBL for sale in Whyalla
GBL for sale in Port Macq
3-hydroxy-gamma-butyrolactone
Can you buy GBL in the US?
Is it legal to buy GBL?
Where is GBL found?
Is gamma butyrolactone illegal?Can you still buy GBL?Is GBL legal?
What is GBL cleaner?
Where can I buy gbl wheel cleaner online
Where can I buy gbl wheel cleaner in usa
Where can I buy gbl wheel cleaner in Canada
Where can I buy gbl wheel cleaner in Australia
Where can I buy gbl in New Zealand
Cleaning products
Wheel cleaner chemicals
Gbl online shop
Legit gbl wheel cleaner shop online
Where can I buy gbl in california
Where can I buy gbl wheel cleaner in Texas
Where can I buy gbl wheel cleaner in New York
Where can I buy gbl wheel cleaner in Alabama
Where can I buy gbl wheel cleaner in Florida
Where can I buy gbl wheel cleaner in Washington
Where can I buy gbl wheel cleaner in Michigan
Where can I buy gbl wheel cleaner in NJ
Where can I buy gbl wheel cleaner in SC
Where can I buy gbl wheel cleaner In NC
Where can I buy gbl wheel cleaner in Canada
Where can I buy gbl wheel cleaner In UNITED STATE
Where can I buy gbl wheel cleaner DENMARK
GBL WHEEL CLEANER
GBL Wheel cleaner 2L GBL Wheel cleaner 3L GBL Wheel cleaner BUY GBL ONLINE
Buy gbl online usa,
Buy GBL Payment via Paypal
buy gbl use Paypal
buy gbl online pay via Paypal.
Buy GBL online ship to usa
Pure GBL for sale
Best place to buy GBL
Top car cleaners gbl
Best cleaner for inside car
Best car carpet cleaner
Best car fabric cleaner
Best car glass cleaner
Best car leather cleaner
Best cleaner for car interiors
Best car wheel cleaner
Best car mat cleaner
Best car cleaning products 2022
Best car cleaning products 2022
Professional car cleaning products
Car cleaner interior
Best home car wash System
Car Cleaner Spray
Gbl car
Best car cleaning products UK 2022
GBL cleaner
Griot’s Garage Wheel Cleaner GBL
Gold car cleaner GBL
How to extract GBL from wheel cleaner
Gbl car
Buy GBL online
Magic cleaner gbl reddit
GBL magic cleaner
GBL Europe
GBL wheel cleaner reviews
GBL graffiti remover
Gamma-butyrolactone buy
GBL next day delivery
Contact General support
Email…([email protected])
Signal:::(@Realjames.39)
whatsap/Signal::+(34)607218704)
Whatsapp:::::+(237)672564181)
GBL,GHB,Cocaine,mdma,Crystal Meth,DMT,LSD,METH,ketamineGBL,GHB,Cocaine,mdma,Crystal Meth,DMT,LSD,METH,ketamineGBL,GHB,Cocaine,mdma,Crystal Meth,DMT,LSD,METH,ketamineMephedrone for sale online,
Mephedrone for sale online ARGENTINA,
Mephedrone for sale online AUSTRALIA,
Mephedrone for sale online CANADA,
Mephedrone for sale online EUROPE,
Mephedrone for sale online FRANCE,
Mephedrone for sale online GERMANY,
Mephedrone for sale online ITALY,
Mephedrone for sale online NEWZEALAND,
Mephedrone for sale online PORTUGAL,
Mephedrone for sale online RUSSIA,
Mephedrone for sale online SPAIN,
Mephedrone for sale online UAE,
Mephedrone for sale online UK,
Mephedrone for sale online USA,
Mephedrone online,
buy Mephedrone online ARGENTINA,
buy Mephedrone online AUSTRALIA,
buy Mephedrone online CANADA,
buy Mephedrone online EUROPE,
buy Mephedrone online FRANCE,
buy Mephedrone online GERMANY,
buy Mephedrone online ITALY,
buy Mephedrone online NEWZEALAND,
buy Mephedrone online PORTUGAL,
buy Mephedrone online RUSSIA,
buy Mephedrone online SPAIN,
buy Mephedrone online UAE,
buy Mephedrone online UK,
buy Mephedrone online USA,
order Mephedrone online,
order Mephedrone online ARGENTINA,
order Mephedrone online AUSTRALIA,
order Mephedrone online CANADA,
order Mephedrone online EUROPE,
order Mephedrone online FRANCE,
order Mephedrone online GERMANY,
order Mephedrone online ITALY,
order Mephedrone online NEWZEALAND,
order Mephedrone online PORTUGAL,
order Mephedrone online RUSSIA,
order Mephedrone online SPAIN,
order Mephedrone online UAE,
order Mephedrone online UK,
order Mephedrone online USA,
purchase Mephedrone online,
purchase Mephedrone online ARGENTINA,
purchase Mephedrone online AUSTRALIA,
purchase Mephedrone online CANADA,
purchase Mephedrone online EUROPE,
purchase Mephedrone online FRANCE,
purchase Mephedrone online GERMANY,
purchase Mephedrone online ITALY,
purchase Mephedrone online NEWZEALAND,
purchase Mephedrone online PORTUGAL,
purchase Mephedrone online RUSSIA,
purchase Mephedrone online SPAIN,
purchase Mephedrone online UAE,
purchase Mephedrone online UK,
purchase Mephedrone online USA
Contact General support
Email…([email protected])
Signal:::(@Realjames.39)
whatsap/Signal::+(34)607218704)
Whatsapp:::::+(237)672564181)
Can I take Ozempic without consulting a doctor IN USA
How can I get approved for Ozempic without diabetes IN UK
What is the poor man’s Ozempic supplement IN CANADA
What works like Ozempic but is cheaper IN GERMANY
How much weight can you lose in a month with Ozempic IN BELGUIM
How much does a 30 day supply of Ozempic cost IN EUROPE
What is the cheapest way to buy Ozempic IN AUSTRALIA
Does Costco Canada have Ozempic
Is there an over-the-counter Ozempic
How much is Ozempic in Mexico
Is it possible to buy generic Ozempic
buy ozempic in Alsace (region),
buy ozempic in Colmar,
buy ozempic in Haguenau,
buy ozempic in Mulhouse,
buy ozempic in Ribeauvillé,
buy ozempic in Strasbourg,
buy ozempic in Aquitaine (region), buy
ozempic in Agen,
buy ozempic in Bayonne ,
buy ozempic in Bergerac,
buy ozempic in Biarritz,
buy ozempic in Bordeaux,
buy ozempic online in Dax,
buy ozempic online in Lacq,
buy ozempic online in Libourne,
buy ozempic online in Mont-de-Marsan,
buy ozempic online in Pau,
buy ozempic online in Périgueux,
buy ozempic online in Pessac,
buy ozempic online in Saint-Jean-de-Luz,
buy ozempic online in Talence,
buy ozempic online in Auvergne (region),
buy ozempic online in Aurillac,
buy ozempic online in Clermont -Ferrand,
buy ozempic online in Le Puy-en-Velay,
buy ozempic online in Montluçon,
buy ozempic online in Moulins,
buy ozempic online in Riom,
buy ozempic online in Vichy,
buy ozempic online in Lower Normandy (region),
buy ozempic online in Alençon,
buy ozempic online in Arromanches,
buy ozempic online in Avranches,
buy ozempic online in Bayeux,
buy ozempic online in Bénouville,
buy ozempic online in Caen,
buy ozempic online in Cherbourg,
buy ozempic online in Courseulles,
buy ozempic online in Coutances,
buy ozempic online in Deauville,
buy ozempic online in Falaise,
buy ozempic online in Grandcamp-Maisy,
buy ozempic online in Granville,
buy ozempic online in Honfleur,
buy ozempic online in Lisieux,
buy ozempic online in Ouistreham,
buy ozempic online in Saint-Lô,
buy ozempic online in Sainte-Marie-du-Mont,
buy ozempic online in Sainte-Mère-Église,
buy ozempic online in Trouville,
buy semaglutide online in Brittany (region),
buy semaglutide online in Auray,
buy semaglutide online in Brest,
buy semaglutide online in Carnac,
buy semaglutide online in Dinan,
buy semaglutide online in Dinard,
buy semaglutide online in Douarnenez,
buy semaglutide online in Fougères,
buy semaglutide online in Guingamp,
buy semaglutide online in Locmariaquer,
buy semaglutide online in Lorient,
buy semaglutide online in Morlaix, buy
semaglutide online in Quimper,
buy semaglutide online in Rennes,
buy semaglutide online in Saint-Brieuc,
buy semaglutide online in Saint -Malo,
buy semaglutide online in Vannes,
Contact General support
Email…([email protected])
Signal:::(@Realjames.39)
whatsap/Signal::+(34)607218704)
Whatsapp:::::+(237)672564181)
HOW TO RECOVER YOUR LOST BITCOIN WITHOUT FALLING VICTIM TO A SCAM
When my assets were stolen by a fraudulent online platform, I was fortunate enough to discover ALPHA RECOVERY EXPERTS Amidst my search for solutions who was able to recover my lost assets and regain my financial footing. The professionalism displayed by their team instilled confidence during the challenging time. Thanks to them, I was able to regain my lost assets and feel secure again. If you find yourself facing similar challenges or want to learn more about safeguarding your finances against fraudsters, consider reaching out to ALPHA RECOVERY EXPERTS for professional recovery guidance today.
SMS: +44(745, 742 (4681
Email; [email protected]
Ngoài ưu đãi khi nạp tiền lần đầu và hoàn tiền, nhà cái 66b triều khúc còn thường xuyên tổ chức các chương trình khuyến mãi định kỳ hàng tuần, hàng tháng. Những phần thưởng này có thể là tiền mặt, quà tặng hoặc vòng quay miễn phí trong trò chơi slot game. TONY04-01H
I love this idea as Block Blast as. This could also work for cemetry personalized photos. But what can I put as a sealer so it can be weather protected?
Cryptocurrency Recovery Experts – Alpha Recovery Experts
Alpha Recovery Experts provides recovery solutions to those who have been victims of investment scams in order to recoup their losses. I was a victim of a phony cryptocurrency exchange fraud and lost a significant sum of money. I was in shock and discomfort because this was my hard-earned money and life savings. The fear of losing my investment was agonizing. Desperate for an answer, I turned to the internet. I looked through forums, read articles, and even spoke with so-called “experts,” but nothing seemed to work. Just when I thought all hope was lost, I came across Alpha Recovery Experts, who stepped in and helped me recover my money. From our first interaction, Alpha Recovery Experts demonstrated professionalism and skill throughout the recovery process.
Email Add; Alpharecoveryexpert@consultant. com
WhatsApp/Text; +44 (745)-742-4681.
Signal ID:(fentpint.33) Buy 6CL-ADB A, 5CLADBA, bmkoil, pmk ethylgly cidate, Etonitazepipne, Mcat (Mephedrone, 4mmc ) mdma, apvp, mdpv, ketamine, jwh series, bk mdma, mephedrone, 3mmc, 4cmc, methylone, pentylone
Signal ID:(fentpint.33) Buy 99.9% GBL\GHB Gamma Butyrolactone Chemical for sale in Australia
Signal ID:(fentpint.33) Buy Research Chemicals Ephedrine hcl JWH-018 2fdck Apvp 3cmc Alprazolam Bromazolam Clonazolam Powder Protonitazene 2CB Mdphp Freebase Buy 5cladba 5cl online
Signal ID:(fentpint.33) Buy 5cl-adba, ADBB, APVP, Eutylone crystal, Jwh-018 / Jwh210, 2fdck, Isotonitazene, Fluetizolam, Bromazolam, Protonitazene, Metonitazene
Signal ID:(fentpint.33) Buy 5 Meo DMT, 4-Aco DMT, DMT, Cocaine, heroin, 2ci, 2cb, 2cp, 2ce, ephedrine powder, etizolam powder, Buy crystals
5cl-adba precursor (semi finished)
5cl-adba raw materials
ADBB precursor (semi finished)
ADBB raw materials
APVP powder
Eutylone crystal
ADBB raw materials
Jwh-018 / Jwh210
2fdck New (small and big crystal)
Isotonitazene cas 14188-81-9
Fluetizolam CAS: 40054-88-4
Bromazolam CAS: 71368-80-4
Protonitazene (hydrochloride) CAS: 119276-01-6
Flubrotizolam CAS: 57801-95-3
Metonitazene CAS: 14680-51-4
We specialize in exporting high quality Research chemicals, medical intermediate, Pharmaceutical chemicals and so on. Products are exported to USA, Canada, France, Korea, Japan, Russia, Southeast Asia and other countries.
Contact info below
WhatsApp:+1(215)-824-5074
LINE ID:(fentpint)
Signal ID:(fentpint.33)
Email:([email protected])
Proton Email: ([email protected])
WhatsApp:+1(215)-824-5074) Buy 1kg 6CL-ADB A, 5CLADBA, bmkoil, pmk ethylgly cidate, Etonitazepipne, Mcat (Mephedrone, 4mmc ) mdma, apvp, mdpv, ketamine, jwh series, bk mdma, mephedrone, 3mmc, 4cmc, methylone, pentylone
Signal ID:(fentpint.33) Buy 99.9% GBL\GHB Gamma Butyrolactone Chemical for sale in Australia
Signal ID:(fentpint.33) Buy Research Chemicals Ephedrine hcl JWH-018 2fdck Apvp 3cmc Alprazolam Bromazolam Clonazolam Powder Protonitazene 2CB Mdphp Freebase Buy 5cladba 5cl online
WhatsApp:+1(215)-824-5074) Buy 1kg 5cl-adba, ADBB, APVP, Eutylone crystal, Jwh-018 / Jwh210, 2fdck, Isotonitazene, Fluetizolam, Bromazolam, Protonitazene, Metonitazene
Signal:+1(530)505-4406) Buy 5 Meo DMT, 4-Aco DMT, DMT, Cocaine, heroin, 2ci, 2cb, 2cp, 2ce, ephedrine powder, etizolam powder, Buy crystals
5cl-adba precursor (semi finished)
5cl-adba raw materials
ADBB precursor (semi finished)
ADBB raw materials
APVP powder
Eutylone crystal
ADBB raw materials
Jwh-018 / Jwh210
2fdck New (small and big crystal)
Isotonitazene cas 14188-81-9
Fluetizolam CAS: 40054-88-4
Bromazolam CAS: 71368-80-4
Protonitazene (hydrochloride) CAS: 119276-01-6
Flubrotizolam CAS: 57801-95-3
Metonitazene CAS: 14680-51-4
We specialize in exporting high quality Research chemicals, medical intermediate, Pharmaceutical chemicals and so on. Products are exported to USA, Canada, France, Korea, Japan, Russia, Southeast Asia and other countries.
Contact info below
WhatsApp:+1(215)-824-5074)
Signal:+1(530)505-4406)
Signal ID:(fentpint.33)
LINE ID:(fentpint)
Email:([email protected])
Proton Email:([email protected])
I appreciate how geometry dash subzero encourages players to improve through repetition. Every failed attempt provides valuable experience that helps you progress further on the next run.
Do u prefer to use The Freak Circus Gloss Mod Podge and then matte sealer? Is there a difference or just preference?
These coasters are such a genius gift idea! I finally gave the tutorial a try this weekend using some old family vacation photos. The Mod Podge step was a bit messy, but your instructions made it super easy to follow. While waiting for that first thick layer of sealant to completely dry, I actually ended up sitting on my couch playing the Dead Plate Game for hours just to pass the time! Can’t wait to see how they turn out tomorrow. Thanks for the inspiration!
Crypto Scam Recovery with Alpha Recovery Experts
ALPHA RECOVERY EXPERTS is a seasoned expert in online financial recovery, specializing in assisting victims of cryptocurrency scams, Ponzi schemes, and fraudulent investment platforms. With years of experience and a team of dedicated professionals, ALPHA RECOVERY EXPERTS has successfully aided thousands in reclaiming their funds, making him a trusted figure in the realm of financial recovery.
Lost Crypto Recovery? Crypto Asset Recovery / How to recover lost or stolen crypto assets with ALPHA RECOVERY EXPERTS?
How to recover my losses from trading? Can you recover lost Bitcoins or Ethereum? Can I get my money back if I was scammed through Bitcoin?
What is the best recovery company to help me recover my stolen Bitcoins? What is the best crypto recovery service?
Contact: Website: https://alpharecoveryexperts.com
Email: ([email protected])
WhatsApp: (+44 745, 742,4681)
At Rx-Pills, we are committed to providing reliable information about medications, health, and wellness. Our platform offers helpful resources and guides to support informed healthcare decisions. Rx-Pills Online Pharmacy
Thanks for sharing this creative idea! It’s simple, thoughtful, and the step-by-step instructions make it easy to follow. I’m inspired to give it a try. Thanks for the great tutorial! Foundation Repair Services
Chơi ở cricfy apk cảm giác rất thoải mái vì tốc độ tải khá nhanh. TONY07-03
Crypto Asset Recovery: Ethical and Transparent Cryptocurrency Recovery with Alpha Recovery Experts.
Hiring Alpha Recovery Experts to help me recover my stolen Bitcoin was one of the best moves I’ve ever made. From conducting thorough analyses of transaction trails to utilizing advanced tracing software, Alpha Recovery Experts swiftly identified potential leads and established connections with law enforcement agencies. Their planned approach resulted in the successful recovery of a major percentage of my lost assets, reinforcing the value of involving professionals in high-stakes digital scenarios. Without doubt, committing this difficult issue to Alpha Recovery Experts was a critical step in regaining control of my financial future. I urge all scam victims seeking assistance in recovering their lost cryptocurrency to reach out to Alpha Recovery Experts, a highly regarded expert in digital asset recovery.
Email: [email protected] or WhatsApp at : +44(745)742-4681
Website link; Alpharecoveryexperts.com
“Honestly the Best dentist in Kalispell! The staff is friendly, the technology is modern, and they truly care about patient comfort. Highly recommend.”
I just have to introduce this hacker that I have been working with him on getting my credit score been boosted across the Equifax, TransUnion and Experian report. He made a lot of good changes on my credit report by erasing all the past eviction, bad collections and DUI off my credit report history and also increased my FICO score above 876 across my three credit bureaus report you can contatc him for all kind of hacks, he helped my sister get all her stolen funds from a fraudulent cryptocurrency company . Email him here via EMAIL realcyberhackers @ gmail com orwhatsapp +14106350697
Dust ID:(chemicaltrade_link1) Buy 1kg 6CL-ADB A, 5CLADBA, bmkoil, pmk ethylgly cidate, Etonitazepipne, Mcat (Mephedrone, 4mmc ) mdma, apvp, mdpv, ketamine, jwh series, bk mdma, mephedrone, 3mmc, 4cmc, methylone, pentylone
Signal ID:(chemicaltrade_link1.25) Buy 99.9% GBL\GHB Gamma Butyrolactone Chemical for sale in Australia
Telegram ID:(Chemicaltradelink) Buy Research Chemicals Ephedrine hcl JWH-018 2fdck Apvp 3cmc Alprazolam Bromazolam Clonazolam Powder Protonitazene 2CB Mdphp Freebase Buy 5cladba 5cl online
WeChat ID:(chemicaltradelink) Buy 1kg 5cl-adba, ADBB, APVP, Eutylone crystal, Jwh-018 / Jwh210, 2fdck, Isotonitazene, Fluetizolam, Bromazolam, Protonitazene, Metonitazene
Signal:+1(530)505-4406) Buy 5 Meo DMT, 4-Aco DMT, Cocaine, heroin, 2ci, 2cb, 2cp, 2ce, ephedrine powder, etizolam powder,
Signal:+1(530)505-4406) Buy crystals, Buy GBL, Cocaine, GHB, Eutylone, MDMA, Ketamine, APVP, ADBB, 5cl-adba, DMT, Meth, Research chemicals
5cl-adba precursor (semi finished)
5cl-adba raw materials
ADBB precursor (semi finished)
ADBB raw materials
APVP powder
Eutylone crystal
ADBB raw materials
Jwh-018 / Jwh210
2fdck New (small and big crystal)
Isotonitazene cas 14188-81-9
Fluetizolam CAS: 40054-88-4
Bromazolam CAS: 71368-80-4
Protonitazene (hydrochloride) CAS: 119276-01-6
Flubrotizolam CAS: 57801-95-3
Metonitazene CAS: 14680-51-4
We specialize in exporting high quality Research chemicals, medical intermediate, Pharmaceutical chemicals and so on. Products are exported to USA, Canada, France, Korea, Japan, Russia, Southeast Asia and other countries.
Contact info below
WhatsApp:+1(413)273-6075)
Signal:+1(530)505-4406)
Signal ID:(chemicaltrade_link1.25)
Dust ID:(chemicaltrade_link1)
WeChat ID:(chemicaltradelink)
Telegram ID:(Chemicaltradelink)
Email:([email protected])
Proton Email:([email protected])
Hệ thống của sportzfy similar app hoạt động khá tốt vào buổi tối, không bị đứng hay tải chậm nhiều. TONY07-20